程序包编译安装
在linux中,程序的安装分为rpm安装、yum安装和编译安装,rpm包和yum包在制作过程中已经规划好了安装的路径,相对普通用户来说,这种方式相对于便捷,但是只能用在匹配的系统版本上,定义不同的安装方式。很多软件使用源码发布,以便于应用在不同的平台上。用户在编译源码的时候,生成适用于当前操作系统的二进制程序。linux有现成的编译工具,可以批量的,自动的帮我们把成千上万的源代码按规则生成二进制。这个工具叫做make(项目管理器),针对于c语言和c++。
本文章所用系统为CentOS 7,httpd源码为httpd-2.4.27.tar.bz2
准备工作:安装开发包组
在程序的编译安装之前,先安装好开发包组,执行命令yum groupinstall "Development tools"(安装过程过长,截取部分展示)
[root@centos7 /usr/local/src/httpd-2.4.27]#yum groupinstall "Development tools"
Loaded plugins: fastestmirror, langpacks
There is no installed groups file.
Maybe run: yum groups mark convert (see man yum)
base                                                                                    | 3.6 kB  00:00:00
epel/x86_64/metalink                                                                    | 6.6 kB  00:00:00
epel                                                                                    | 4.3 kB  00:00:00
extras                                                                                  | 3.4 kB  00:00:00
updates                                                                                 | 3.4 kB  00:00:00
webtatic                                                                                | 3.6 kB  00:00:00
(1/2): epel/x86_64/updateinfo                                                           | 806 kB  00:00:02
(2/2): epel/x86_64/primary_db                                                           | 4.8 MB  00:00:14
Loading mirror speeds from cached hostfile
 * base: mirrors.btte.net
 * epel: ftp.jaist.ac.jp
 * extras: mirrors.btte.net
 * updates: mirrors.aliyun.com
 * webtatic: sp.repo.webtatic.com
Resolving Dependencies
--> Running transaction check
---> Package autoconf.noarch 0:2.69-11.el7 will be installed
--> Processing Dependency: m4 >= 1.4.14 for package: autoconf-2.69-11.el7.noarch
---> Package automake.noarch 0:1.13.4-3.el7 will be installed
--> Processing Dependency: perl(Thread::Queue) for package: automake-1.13.4-3.el7.noarch
--> Processing Dependency: perl(TAP::Parser) for package: automake-1.13.4-3.el7.noarch
......
准备工作:安装Apache
因为安装httpd必须用到apache,在这里提前按住Apache,执行命令yum install apr-util-devel
[root@centos7 /usr/local/src/httpd-2.4.27]#yum install apr-util-devel
Loaded plugins: fastestmirror, langpacks
Loading mirror speeds from cached hostfile
 * base: mirrors.btte.net
 * epel: repo.ugm.ac.id
 * extras: mirrors.btte.net
 * updates: mirrors.aliyun.com
 * webtatic: sp.repo.webtatic.com
Resolving Dependencies
--> Running transaction check
---> Package apr-util-devel.x86_64 0:1.5.2-6.el7 will be installed
--> Processing Dependency: pkgconfig(apr-1) for package: apr-util-devel-1.5.2-6.el7.x86_64
--> Processing Dependency: openldap-devel(x86-64) for package: apr-util-devel-1.5.2-6.el7.x86_64
--> Processing Dependency: libdb-devel(x86-64) for package: apr-util-devel-1.5.2-6.el7.x86_64
--> Processing Dependency: expat-devel(x86-64) for package: apr-util-devel-1.5.2-6.el7.x86_64
--> Processing Dependency: apr-devel(x86-64) for package: apr-util-devel-1.5.2-6.el7.x86_64
--> Running transaction check
......
准备工作:安装pcre
pcre是通用的正则表达式引擎,在很多软件中都可以使用,是必要安装的组件之一,执行命令yum install pcre-devel
[root@centos7 /usr/local/src/httpd-2.4.27]#yum install pcre-devel
Loaded plugins: fastestmirror, langpacks
Loading mirror speeds from cached hostfile
 * base: mirrors.btte.net
 * epel: mirror.premi.st
 * extras: mirrors.btte.net
 * updates: mirrors.aliyun.com
 * webtatic: sp.repo.webtatic.com
Resolving Dependencies
--> Running transaction check
---> Package pcre-devel.x86_64 0:8.32-15.el7_2.1 will be installed
--> Finished Dependency Resolution

Dependencies Resolved
......
下载httpd源码并上传至centos虚拟机并解压
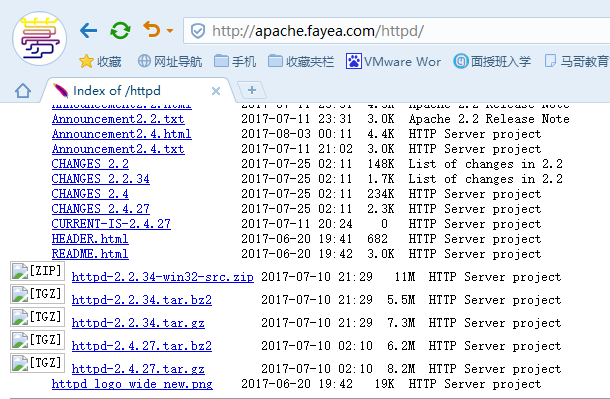
首先下载我们所需要的httpd源码,这里推荐下载网址http://apache.fayea.com/httpd/

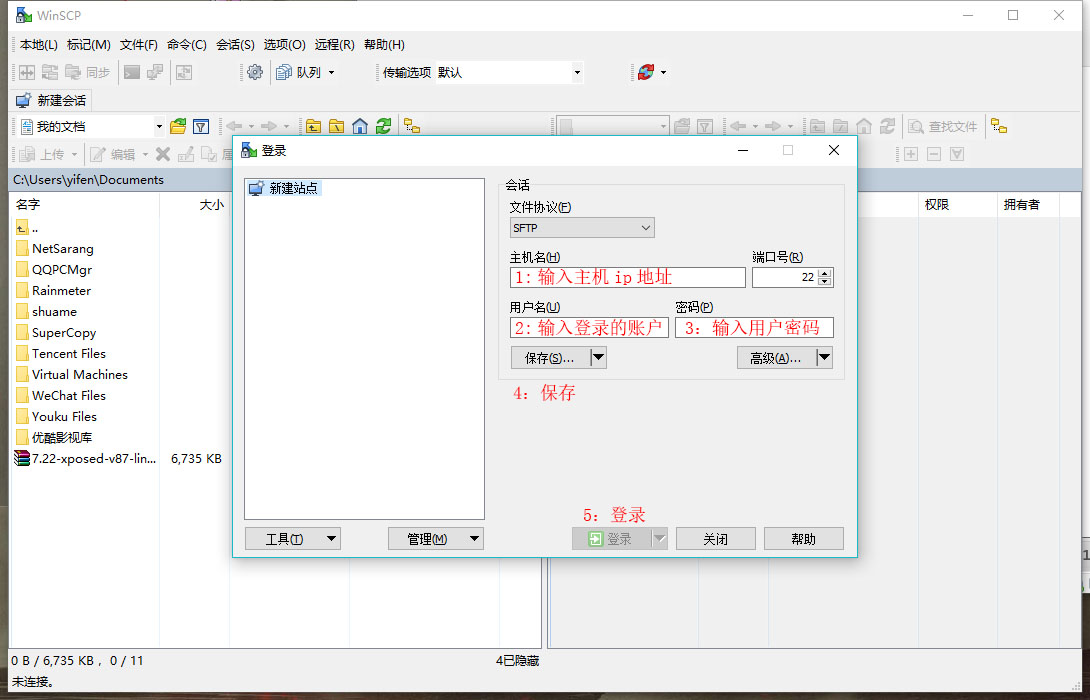
在这里我们需要用一个工具WinSCP,把我们已经下载的httpd-2.4.27.tar.bz2上传至CentOS 7虚拟机里。
使用XShell/CRT远程连接时,直接使用rz命令向Centos系统上传文件第一步:配置WinSCP客户端,连接到CentOS 7

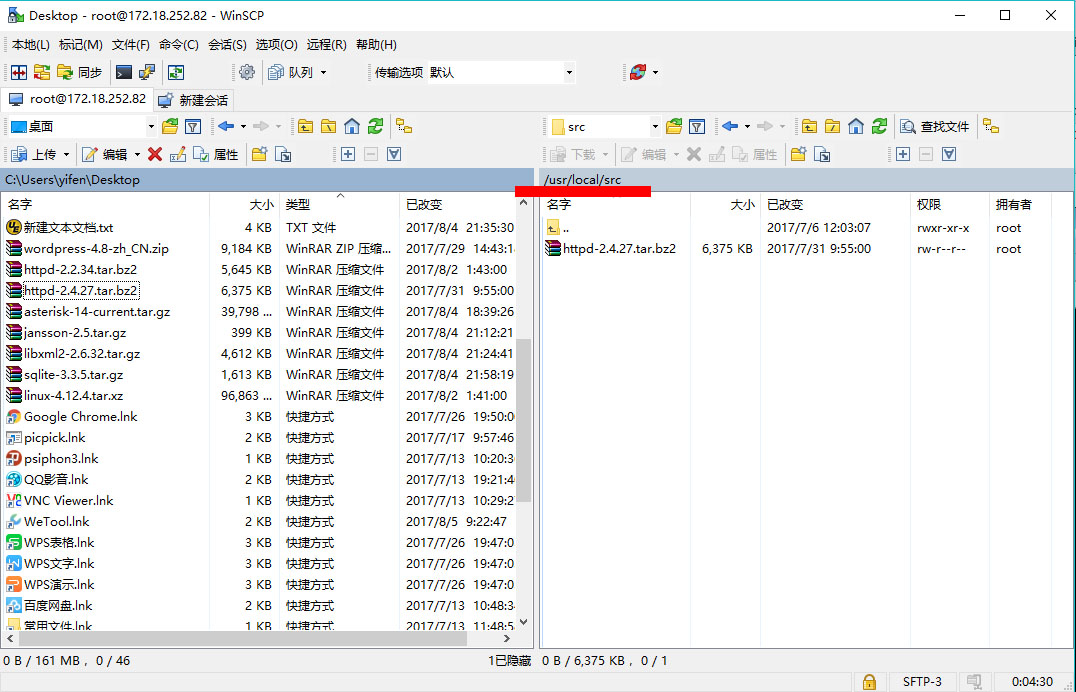
第二步:找到你下载在windows系统下的源码包,复制进CentOS 7系统里,在linux中,有一个专门放置源码包的目录 /usr/local/src/,推荐源码包统一放置在此文件夹

第三步:在CentOS 7中检查是否上传完成
[root@centos7 ~]#cd /usr/local/src/
[root@centos7 /usr/local/src]#ll
total 6376
-rw-r--r--. 1 root root 6527394 Jul 31 09:55 httpd-2.4.27.tar.bz2
第四步:用tar命令解压已上传的httpd源码包,在这里已经可以看到解压后的httpd-2.4.27文件夹
[root@centos7 /usr/local/src]#tar xvf httpd-2.4.27.tar.bz2
httpd-2.4.27/
httpd-2.4.27/.deps
httpd-2.4.27/.gdbinit
httpd-2.4.27/ABOUT_APACHE
httpd-2.4.27/acinclude.m4
httpd-2.4.27/ap.d
httpd-2.4.27/Apache-apr2.dsw
......
[root@centos7 /usr/local/src]#ll
total 6380
drwxr-xr-x. 11  501 games    4096 Jul  7 01:38 httpd-2.4.27
-rw-r--r--.  1 root root  6527394 Jul 31 09:55 httpd-2.4.27.tar.bz2
看说明
cat README 查看使用说明(由于文件过大,截取部分展示)
[root@centos7 /usr/local/src/httpd-2.4.27]#cat README

                          Apache HTTP Server

  What is it?
  -----------

  The Apache HTTP Server is a powerful and flexible HTTP/1.1 compliant
  web server.  Originally designed as a replacement for the NCSA HTTP
  Server, it has grown to be the most popular web server on the
  Internet.  As a project of the Apache Software Foundation, the
  developers aim to collaboratively develop and maintain a robust,
  commercial-grade, standards-based server with freely available
  source code.

  The Latest Version
  ------------------

  Details of the latest version can be found on the Apache HTTP
  server project page under http://httpd.apache.org/.

  Documentation
  -------------

  The documentation available as of the date of this release is
  included in HTML format in the docs/manual/ directory.  The most
  up-to-date documentation can be found at
  http://httpd.apache.org/docs/2.4/.
......
cat INSTALL 查看安装信息(由于文件过大,截取部分展示)
[root@centos7 /usr/local/src/httpd-2.4.27]#cat INSTALL

 APACHE INSTALLATION OVERVIEW

 Quick Start - Unix
 ------------------

 For complete installation documentation, see [ht]docs/manual/install.html or
 http://httpd.apache.org/docs/2.4/install.html

    $ ./configure --prefix=PREFIX
    $ make
    $ make install
    $ PREFIX/bin/apachectl start

    NOTES: * Replace PREFIX with the filesystem path under which
             Apache should be installed.  A typical installation
             might use "/usr/local/apache2" for PREFIX (without the
             quotes).

           * Consider if you want to use a previously installed APR and
             APR-Util (such as those provided with many OSes) or if you
             need to use the APR and APR-Util from the apr.apache.org
             project. If the latter, download the latest versions and
             unpack them to ./srclib/apr and ./srclib/apr-util (no
             version numbers in the directory names) and use
             ./configure's --with-included-apr option. This is required
             if you don't have the compiler which the system APR was
             built with.  It can also be advantageous if you are a
             developer who will be linking your code with Apache or using
             a debugger to step through server code, as it removes the
             possibility of version or compile-option mismatches with APR
             and APR-Util code. As a convenience, prepackaged source-code
             bundles of APR and APR-Util are occasionally also provided
             as a httpd-2.X.X-deps.tar.gz download.
......
生成Makefile文件并安装
执行configure文件,定义安装位置为/app/httpd24,开启动态链接功能,开启ssl模块。执行命令./configure --prefix=/app/httpd24 --enable-so --with-ssl
[root@centos7 /usr/local/src/httpd-2.4.27]#./configure --prefix=/app/httpd24 --enable-so --with-ssl
checking for chosen layout... Apache
checking for working mkdir -p... yes
checking for grep that handles long lines and -e... /usr/bin/grep
checking for egrep... /usr/bin/grep -E
checking build system type... x86_64-pc-linux-gnu
checking host system type... x86_64-pc-linux-gnu
checking target system type... x86_64-pc-linux-gnu
configure:
configure: Configuring Apache Portable Runtime library...
configure:
checking for APR... yes
  setting CC to "gcc"
  setting CPP to "gcc -E"
  setting CFLAGS to "  -pthread"
  setting CPPFLAGS to " -DLINUX -D_REENTRANT -D_GNU_SOURCE"
  setting LDFLAGS to " "
configure:
configure: Configuring Apache Portable Runtime Utility library...
configure:
checking for APR-util... yes
checking for gcc... gcc
checking whether the C compiler works... yes
checking for C compiler default output file name... a.out
checking for suffix of executables...
checking whether we are cross compiling... no
checking for suffix of object files... o
checking whether we are using the GNU C compiler... yes
checking whether gcc accepts -g... yes
checking for gcc option to accept ISO C89... none needed
checking how to run the C preprocessor... gcc -E
checking for gcc option to accept ISO C99... -std=gnu99
checking for pcre-config... /usr/bin/pcre-config
configure: Using external PCRE library from /usr/bin/pcre-config
  setting PCRE_INCLUDES to ""
  setting PCRE_LIBS to "-lpcre"
configure:
configure: Configuring Apache httpd...
......
执行make命令,编译二进制文件,这是一个漫长的过程,等待完成即可。接着执行make install安装
[root@centos7 /usr/local/src/httpd-2.4.27]#make install
Making install in srclib
make[1]: Entering directory `/usr/local/src/httpd-2.4.27/srclib'
make[2]: Entering directory `/usr/local/src/httpd-2.4.27/srclib'
make[2]: Leaving directory `/usr/local/src/httpd-2.4.27/srclib'
make[1]: Leaving directory `/usr/local/src/httpd-2.4.27/srclib'
Making install in os
make[1]: Entering directory `/usr/local/src/httpd-2.4.27/os'
Making install in unix
make[2]: Entering directory `/usr/local/src/httpd-2.4.27/os/unix'
make[3]: Entering directory `/usr/local/src/httpd-2.4.27/os/unix'
make[3]: Leaving directory `/usr/local/src/httpd-2.4.27/os/unix'
make[2]: Leaving directory `/usr/local/src/httpd-2.4.27/os/unix'
make[2]: Entering directory `/usr/local/src/httpd-2.4.27/os'
make[2]: Leaving directory `/usr/local/src/httpd-2.4.27/os'
make[1]: Leaving directory `/usr/local/src/httpd-2.4.27/os'
Making install in server
make[1]: Entering directory `/usr/local/src/httpd-2.4.27/server'
Making install in mpm
make[2]: Entering directory `/usr/local/src/httpd-2.4.27/server/mpm'
Making install in worker
......
更改系统配置
更改配置文件,永久关闭selinux
[root@centos7 /app/httpd24]#vim /etc/selinux/config
修改文件SELINUX=permission
# This file controls the state of SELinux on the system.
# SELINUX= can take one of these three values:
#     enforcing - SELinux security policy is enforced.
#     permissive - SELinux prints warnings instead of enforcing.
#     disabled - No SELinux policy is loaded.
SELINUX=permission
# SELINUXTYPE= can take one of three two values:
#     targeted - Targeted processes are protected,
#     minimum - Modification of targeted policy. Only selected processes are protected.
#     mls - Multi Level Security protection.
SELINUXTYPE=targeted
systemctl stop firewalld 暂停防火墙
systemctl disable firewalld 取消防火墙开机自启动
[root@centos7 /app/httpd24]#systemctl stop firewalld
[root@centos7 /app/httpd24]#systemctl disable firewalld
配置path变量
进入安装目录
[root@centos7 /usr/local/src/httpd-2.4.27]#cd /app/httpd24/
设置变量脚本
[root@centos7 /app/httpd24]#echo 'export PATH=/app/httpd22/bin:$PATH' > /etc/profile.d/httpd24.sh
检查脚本生成
[root@centos7 /app/httpd24]#cat /etc/profile.d/httpd24.sh
export PATH=/app/httpd22/bin:$PATH
运行脚本
[root@centos7 /app/httpd24]#. /etc/profile.d/httpd24.sh
查看变量
[root@centos7 /app/httpd24]#echo $PATH
/app/httpd22/bin:/usr/local/sbin:/usr/local/bin:/usr/sbin:/usr/bin:/root/bin
启动apache
[root@centos7 /app/httpd24]#apachectl
检查端口开放情况,80端口开启即为正常
[root@centos7 /app/httpd24]#ss -ntl
State       Recv-Q Send-Q          Local Address:Port                         Peer Address:Port
LISTEN      0      50                          *:3306                                    *:*
LISTEN      0      128                         *:111                                     *:*
LISTEN      0      5               192.168.122.1:53                                      *:*
LISTEN      0      128                         *:22                                      *:*
LISTEN      0      128                 127.0.0.1:631                                     *:*
LISTEN      0      100                 127.0.0.1:25                                      *:*
LISTEN      0      128                        :::111                                    :::*
LISTEN      0      128                        :::80                                     :::*
LISTEN      0      128                        :::22                                     :::*
LISTEN      0      128                       ::1:631                                    :::*
LISTEN      0      100                       ::1:25                                     :::*
在浏览器中输入本机ip,即可进入主机网页
安装流程结束


网友评论