图文混排在iOS开发中经常遇到, 故总结了多种解决方案, 以便将来使用。本文先总结简单的方法-对控件的使用。这些控件包括UIWebView, UILabel, UITextView, UITextField, 都可以进行图文混排, 各有各的使用场景。
下图是控件基础架构, iOS7以前这几个控件都是基于WebKit开发, 而iOS7之后推出了TextKit, 重写了TextView, Label, TextField这几个控件。

至于怎么使用网络图片, 其实很简单, 只需要在图片下载完之后插入到指定位置就可以了。
- 觉得文本样式太简单了, 我们可以多点样式
// 高亮
attributedText.addAttribute(NSForegroundColorAttributeName, value: UIColor.redColor(), range: NSMakeRange(0, 3))

// 下划线
attributedText.addAttribute(NSUnderlineStyleAttributeName, value: NSUnderlineStyle.StyleSingle.rawValue, range: NSMakeRange(0, 10))

// 字体
attributedText.addAttribute(NSFontAttributeName, value: UIFont.boldSystemFontOfSize(50), range: NSMakeRange(20, 10))

// 背景色
attributedText.addAttribute(NSBackgroundColorAttributeName, value: UIColor.yellowColor(), range: NSMakeRange(30, 10))

// 删除线
attributedText.addAttribute(NSStrikethroughStyleAttributeName, value: NSUnderlineStyle.StyleSingle.rawValue, range: NSMakeRange(120, 20))

// 斜体
attributedText.addAttribute(NSObliquenessAttributeName, value: 1, range: NSMakeRange(100, 10))

// 阴影
let shadow = NSShadow()
shadow.shadowOffset = CGSize(width: 3.0, height: 3.0)
shadow.shadowColor = UIColor.redColor()
attributedText.addAttribute(NSShadowAttributeName, value: shadow, range: NSMakeRange(0, 15))

// 横竖文本
attributedText.addAttribute(NSVerticalGlyphFormAttributeName, value: 0, range: NSMakeRange(70, 10))
丰富多样的效果出现了

至此, Label的图文混合(包括富文本)处理已经完成, 至于排版视具体情况而定。
但是, Label的富文本处理出现了几个问题, 现一并记录在此
- 1.只剩下下面两个样式下划线和阴影, 两个样式的范围索引都从0开始
// 下划线
attributedText.addAttribute(NSUnderlineStyleAttributeName, value: NSUnderlineStyle.StyleSingle.rawValue, range: NSMakeRange(0, 10))

// 阴影
let shadow = NSShadow()
shadow.shadowOffset = CGSize(width: 3.0, height: 3.0)
shadow.shadowColor = UIColor.redColor()
attributedText.addAttribute(NSShadowAttributeName, value: shadow, range: NSMakeRange(0, 15))
出现了以下效果

- 2.还是只有下划线和阴影两个样式, 下划线的范围索引从0开始, 阴影的范围索引只要是非0就可以
// 下划线
attributedText.addAttribute(NSUnderlineStyleAttributeName, value: NSUnderlineStyle.StyleSingle.rawValue, range: NSMakeRange(0, 10))

// 阴影
let shadow = NSShadow()
shadow.shadowOffset = CGSize(width: 3.0, height: 3.0)
shadow.shadowColor = UIColor.redColor()
attributedText.addAttribute(NSShadowAttributeName, value: shadow, range: NSMakeRange(100, 15))
结果阴影效果未出现

这两个问题都是同一个原因导致, 只要将下划线的范围索引改成非0就都可以正常显示, 这里有相同问题的讨论, 可供参考。
三. UITextView
-
1.TextView的富文本处理跟Label一样都是操作NSAttributedString, 所以把Label的富文本代码复制过来, 就一样可以显示效果了

而针对Label出现的两个问题在TextView上不会出现, 说明Label的富文本是有问题的。
-
2.TextView富文本的自定义方式, 先来看下这种方式下的结构(图片来源于Apple)
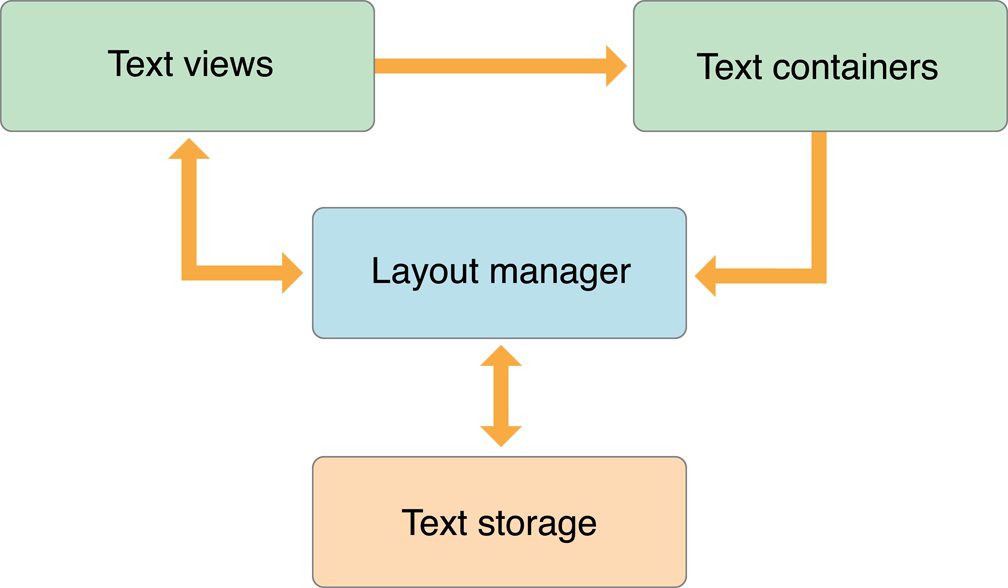
- TextStorage 文本存储类, 可继承实现自定义功能
- LayoutManager 文本排版类, 通过将TextStorage中的的数据转换为显示的文本
- TextContainer 文本容器, 定义了文本可显示的区域, 通过子类化NSTextContainer来创建别的一些形状,例如圆形、不规则的形状。
这三个类之间可以形成一对多的关系, 如图所示(图来自苹果)
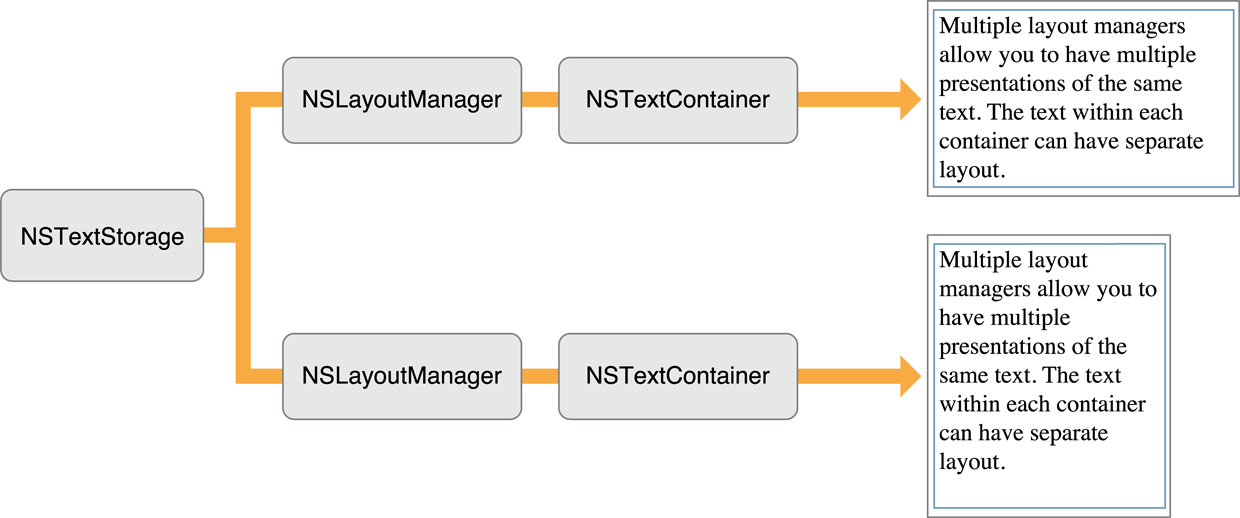
此处我们只创建一个一对一的关系
// 创建TextStorage, TextStorage必须被强引用
self.textStorage = NSTextStorage(string: text)

// 创建LayoutManager
let layoutManager = NSLayoutManager()
self.textStorage?.addLayoutManager(layoutManager)

// 创建TextContainer
let textContainer = NSTextContainer(size: self.view.bounds.size)
layoutManager.addTextContainer(textContainer)

// 创建TextView, 传入textContainer
self.textView = UITextView(frame: self.view.bounds, textContainer: textContainer)
self.textView?.delegate = self
self.view.addSubview(self.textView!)
这样就创建好了, 而例如高亮, 阴影等样式可以像之前那样直接设置, 此处不多说了。然后创建图片视图
self.imageView = UIImageView(image: UIImage(named: "catanddog"))
self.imageView?.center = CGPointMake(self.view.bounds.size.width / 2, self.imageView!.frame.size.height / 2 + 200)
self.view.addSubview(self.imageView!)

// 并给imageView加入手势, 为了拖动图片
self.imageView?.addGestureRecognizer(UIPanGestureRecognizer(target: self, action: #selector(imagePan)))
self.imageView?.userInteractionEnabled = true
界面都创建好了, 那么就来更新图片在文本中的位置
func updateExclusionPaths() {
    // 计算图片所占范围
    var imageRect = self.textView?.convertRect(self.imageView!.frame, fromView: self.view)
    imageRect!.origin.x -= self.textView!.textContainerInset.left;
    imageRect!.origin.y -= self.textView!.textContainerInset.top;
    let path = UIBezierPath(rect: imageRect!)
    self.textView?.textContainer.exclusionPaths = [path]
}
这样就出现了图文混排我们所需要的效果了, 既然我们加入了拖动图片的手势, 那么怎么让文本图片拖动而变化了
func imagePan(pan: UIPanGestureRecognizer) {
    if pan.state == .Began {
      self.panOffset = pan.locationInView(self.imageView!)
    }

    let location = pan.locationInView(self.view)
    var imageCenter = self.imageView!.center

    // 让图片随手势变化位置
    imageCenter.x = location.x - self.panOffset.x + self.imageView!.frame.size.width / 2
   imageCenter.y = location.y - self.panOffset.y + self.imageView!.frame.size.height / 2

   self.imageView?.center = imageCenter
   self.imageCenterY = imageCenter.y + self.textView!.contentOffset.y + navigationBarHeight

   // 更新文本排版
   updateExclusionPaths()
}
此时, 拖动图片, 文本也可随着图片位置的变化而重新排版了, perfect!!!有没有? 但是, 如果文本太长导致textView可以上下滚动了, 完了, 图片不动了
// 实现ScrollViewDelegate协议, 让textView滚动的时候, 图片也动起来
func scrollViewDidScroll(scrollView: UIScrollView) {
    self.imageView?.center = CGPointMake(self.imageView!.center.x, self.imageCenterY - (scrollView.contentOffset.y + navigationBarHeight))
}
perfect!!! 我们来看看效果

可是还是有一个问题, 当设置了字体样式时就出问题了
// 字体
self.textStorage?.addAttribute(NSFontAttributeName, value: UIFont.boldSystemFontOfSize(50), range: NSMakeRange(220, 1))
设置字体后, 当拖动图片到这个大字体附近就会出现大段空白的情况, 谁能告诉我为什么? 有大牛能帮解释下么?
好了, 这篇到此结束了, 源码在此, 请查收!!!
参考:
https://developer.apple.com/library/ios/documentation/StringsTextFonts/Conceptual/TextAndWebiPhoneOS/CustomTextProcessing/CustomTextProcessing.html
https://objccn.io/issue-5-1/
https://www.raywenderlich.com/50151/text-kit-tutorial
本文由啸寒原创, 转载请注明出处!!!


网友评论