【源码解析】 Volley的用法及源码解析
前言
Volley是谷歌在2013年I/O大会上推出的新的网络请求框架,如今已经被废弃,取而代之使用okhttp进行网络请求。虽然现在使用场景不多了,但是技术总有光辉的一面,而且也是面试所遇到的最常见的源码问题之一,所以此篇就作为认识源码的入门之作。
Volley简介
Volley是谷歌推出的Android异步网络请求和图片加载库,特别适合网络请求量不大但是请求频繁的场景。
Volley的优点:
- 非常适合进行数据量不大但是通信频发的网络操作(比如加载大量小图片)
- 对请求进行了处理,包括服务器ResponseCode(2xx,3xx,...)的处理,请求头的处理,支持重试和取消请求,加入缓存机制,支持自定义请求优先级。
- 在api-9以上使用httpURLconnection,在api-9一下使用httpclient。
- 提供简便的图片加载工具ImageLoader。
Volley的缺点:
- 使用的是httpurlconnection和httpclient,现在主流使用okhttp。
- 只支持http。
- 加载图片性能一般。
- 对大文件下载表现糟糕。
Volley的基本用法
请求结果为JSON字符串(String/xml与此类似)
    RequestQueue mQueue = Volley.newRequestQueue(this);

    String url = null;

    JsonObjectRequest jsonRequest = new JsonObjectRequest(url, null, new Response.Listener<JSONObject>() {
        @Override
        public void onResponse(JSONObject response) {
            // TODO
        }
    }, new Response.ErrorListener() {
        @Override
        public void onErrorResponse(VolleyError error) {
            // TODO
        }
    });
    mQueue.add(jsonRequest);
图片加载
1 使用ImageRequest与jsonrequest类似
2 使用Volley ImageLoader
    RequestQueue mQueue = Volley.newRequestQueue(this);
    ImageLoader.ImageCache imageCahce = new ImageLoader.ImageCache() {
        @Override
        public Bitmap getBitmap(String url) {
            return null;
        }

        @Override
        public void putBitmap(String url, Bitmap bitmap) {
            // TODO
        }
    };
    ImageLoader imageLoader = new ImageLoader(mQueue, imageCahce);

    String url;

    ImageView imageView;
    imageLoader.get(url, ImageLoader.getImageListener(imageView, R.id.defalt_img, R.id.error_img));
Volley源码解析
分析上边的Volley的基本用法我们可以知道,发送请求,我们会先去创建一个RequestQueue,然后创建一个Request对象,最后把这个Request对象添加到队列里。
具体到代码里,分别是:
创建请求队列:
RequestQueue mQueue = Volley.newRequestQueue(this);
newRequestQueue()方法如下:
/**
 * Creates a default instance of the worker pool and calls {@link RequestQueue#start()} on it.
 *
 * @param context A {@link Context} to use for creating the cache dir.
 * @param stack An {@link HttpStack} to use for the network, or null for default.
 * @return A started {@link RequestQueue} instance.
 */
public static RequestQueue newRequestQueue(Context context, HttpStack stack) {

    // DiskBasedCache的参数
    // 创建缓存目录
    File cacheDir = new File(context.getCacheDir(), DEFAULT_CACHE_DIR);

    // Stack的参数
    // 设置userAgent,userAgent是创建AndroidHttpClient的参数
    String userAgent = "volley/0";
    try {
        String packageName = context.getPackageName();
        PackageInfo info = context.getPackageManager().getPackageInfo(packageName, 0);
        userAgent = packageName + "/" + info.versionCode;
    } catch (NameNotFoundException e) {
    }

    // NetWork对象的参数
    // 判断api等级
    // 如果sdk >= 9,使用httpurlconnection进行网络请求
    // 如果sdk < 9,使用httpclient进行网络请求
    if (stack == null) {
        if (Build.VERSION.SDK_INT >= 9) {
            stack = new HurlStack();
        } else {
            // Prior to Gingerbread, HttpUrlConnection was unreliable.
            // See: http://android-developers.blogspot.com/2011/09/androids-http-clients.html
            stack = new HttpClientStack(AndroidHttpClient.newInstance(userAgent));
        }
    }

    // RequestQueue的参数
    Network network = new BasicNetwork(stack);

    // 创建RequestQueue对象
    RequestQueue queue = new RequestQueue(new DiskBasedCache(cacheDir), network);

    queue.start();

    return queue;
}
ReuestQueue方法:
/**
 * Creates the worker pool. Processing will not begin until {@link #start()} is called.
 *
 * @param cache A Cache to use for persisting responses to disk
 * @param network A Network interface for performing HTTP requests
 * @param threadPoolSize Number of network dispatcher threads to create
 * @param delivery A ResponseDelivery interface for posting responses and errors
 */
public RequestQueue(Cache cache, Network network, int threadPoolSize,
        ResponseDelivery delivery) {
    mCache = cache;
    mNetwork = network;
    mDispatchers = new NetworkDispatcher[threadPoolSize];
    mDelivery = delivery;
}
start()方法:
/**
 * Starts the dispatchers in this queue.
 */
public void start() {
    // 停止现有的网络请求
    // 在stop()方法中,中断mCacheDispatcher线程和NetworkDispatcher线程
    // 下边会分析到这两个线程,缓存线程和网络线程
    stop();  // Make sure any currently running dispatchers are stopped.
    // Create the cache dispatcher and start it.
    // 创建并启动一个缓存线程
    mCacheDispatcher = new CacheDispatcher(mCacheQueue, mNetworkQueue, mCache, mDelivery);
    mCacheDispatcher.start();

    // Create network dispatchers (and corresponding threads) up to the pool size.
    // 创建并启动网络线程,默认是4条
    for (int i = 0; i < mDispatchers.length; i++) {
        NetworkDispatcher networkDispatcher = new NetworkDispatcher(mNetworkQueue, mNetwork,
                mCache, mDelivery);
        mDispatchers[i] = networkDispatcher;
        networkDispatcher.start();
    }
}
stop()方法源码:
/**
 * Stops the cache and network dispatchers.
 */
public void stop() {
    // 中断网络线程和缓存线程
    if (mCacheDispatcher != null) {
        mCacheDispatcher.quit();
    }
    for (final NetworkDispatcher mDispatcher : mDispatchers) {
        if (mDispatcher != null) {
            mDispatcher.quit();
        }
    }
}
在newRequestQueue()方法里只做了两件事:创建了RequestQueue对象,执行了RequestQueue的start方法。
- 其中创建RequestQueue对象的两个参数,会被设置为RequestQueue对象的字段,分别对应缓存和网络请求的配置。
- start方法中,先停止网络操作,然后分别创建并启动缓存线程和网络线程。
创建一个请求:
JsonObjectRequest jsonRequest = new JsonObjectRequest();
JsonObjectRequest是Request的子子类,包括两个构造方法和一个复写方法parseNetworkResponse(),网络请求时会根据这个方法的返回值判断是否需要使用缓存数据。
将请求添加到队列:
mQueue.add(jsonRequest);
add()方法的源码:
/**
 * Adds a Request to the dispatch queue.
 * @param request The request to service
 * @return The passed-in request
 */
public <T> Request<T> add(Request<T> request) {
    // Tag the request as belonging to this queue and add it to the set of current requests.
    // 给request设置requestqueue
    request.setRequestQueue(this);

    // 添加request到currentrquests集合中
    synchronized (mCurrentRequests) {
        mCurrentRequests.add(request);
    }

    // Process requests in the order they are added.
    // 设置request
    request.setSequence(getSequenceNumber());
    request.addMarker("add-to-queue");

    // If the request is uncacheable, skip the cache queue and go straight to the network.
    // 如果设置过request不能缓存,直接添加到网络队列返回
    if (!request.shouldCache()) {
        mNetworkQueue.add(request);
        return request;
    }

    // Insert request into stage if there's already a request with the same cache key in flight.
    // 默认是可以缓存的
    synchronized (mWaitingRequests) {
        String cacheKey = request.getCacheKey();
        if (mWaitingRequests.containsKey(cacheKey)) {
            // There is already a request in flight. Queue up.
            // 如果已经在缓存队列中,加入到相同的等待队列中
            Queue<Request<?>> stagedRequests = mWaitingRequests.get(cacheKey);
            if (stagedRequests == null) {
                stagedRequests = new LinkedList<>();
            }
            stagedRequests.add(request);
            mWaitingRequests.put(cacheKey, stagedRequests);
            if (VolleyLog.DEBUG) {
                VolleyLog.v("Request for cacheKey=%s is in flight, putting on hold.", cacheKey);
            }
        } else {
            // Insert 'null' queue for this cacheKey, indicating there is now a request in
            // flight.
            // 添加到等待队列
            mWaitingRequests.put(cacheKey, null);

            // 添加到缓存队列
            mCacheQueue.add(request);
        }
        return request;
    }
}
add()方法中,先给request设置队列信息等,然后判断是否允许缓存,如果不允许缓存直接把请求加入网络队列,如果允许或者默认则会判断是否在等待队列中,如果不在等待队列中则添加到等待队列并添加到缓存队列,如果已经在等待对立中,就更新等待队列中该请求的队列信息。
添加到请求队列的时候,最重要的两步就是添加到缓存队列或者添加到网络队列。在创建RequestQueue的时候,会创建一个CacheDispatcher和4个NetworkDispatcher,他们都继承Thread。其中在CacheDispatcher中还持有NetworkDispatcher对象。
下边分别分析这两个线程。
CacheDispatcher
构造方法 // 正常的构造方法
成员变量
boolean DEBUG // Log的打印级别
BlockingQueue<Request<?>> mCacheQueue // 缓存请求队列
BlockingQueue<Request<?>> mNetworkQueue // 网络请求队列
Cache mCache // 缓存信息,请求结果的缓存
ResponseDelivery mDelivery // 请求结果的传递类
boolean mQuit // 结束请求的标志
成员方法
quit() // 结束线程

run () // 业务逻辑
业务流程图
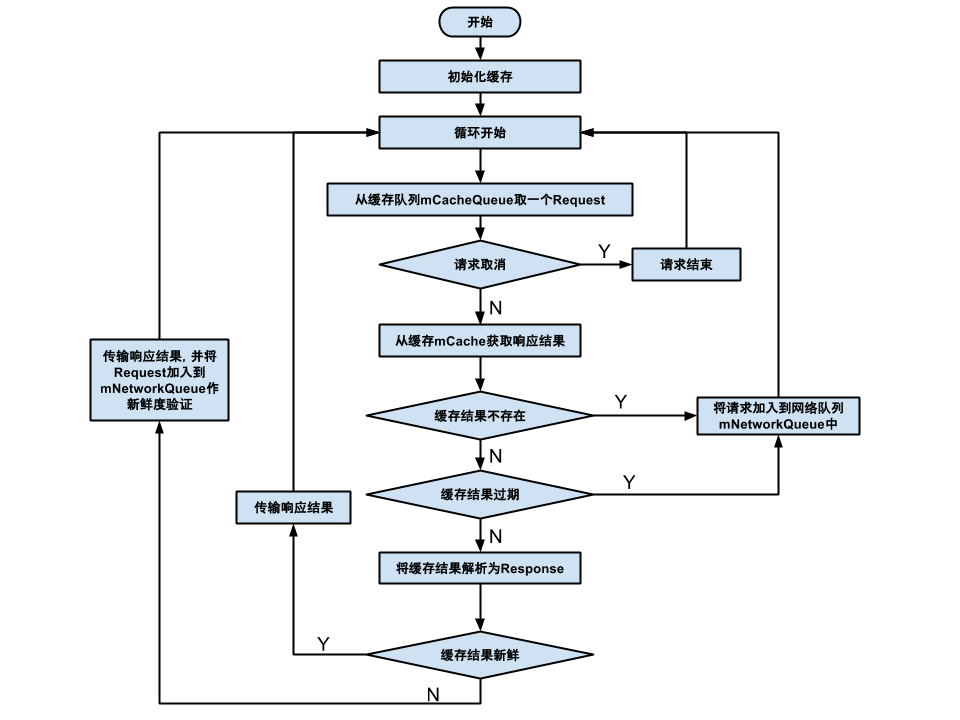 CacheDispatcher流程
NetworkDispatcher
构造方法 // 正常的构造方法
成员变量
BlockingQueue<Request<?>> mQueue // 网络请求队列
Network mNetwork // 网络类,代表了一个可以执行请求的网络
Cache mCache // 缓存结果数据
ResponseDelivery mDelivery // 请求结果传递
boolean mQuit // 取消请求的状态标志
成员方法
quit()  // 结束网络请求
addTrafficStatasTag(Request<E> request) // 给请求设置tag
 run() // 业务逻辑
业务流程图
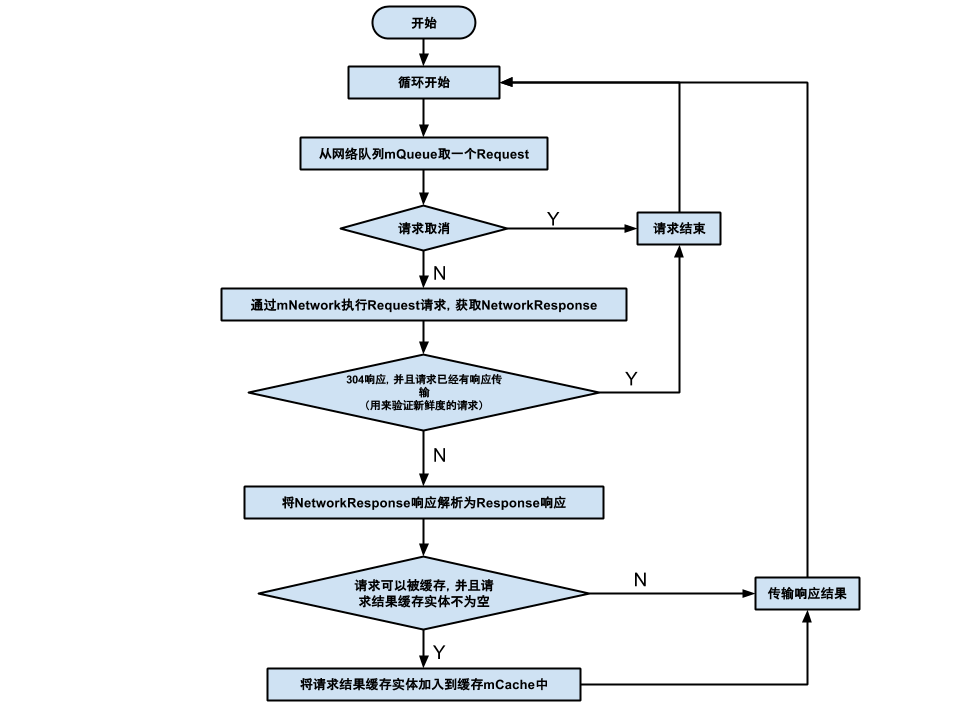 NetworkDispatcher流程图
我们总结一下流程和代码逻辑:
1 创建RequestQueue
首先会创建一个RequestQueue对象,在这个过程中会创建一个缓存目录和一个httpstack,这个httpstack是根据api等级选择httpURLconnection或者httpclient,然后会执行这个RequestQueue对象的start方法,在这个start方法中会首先取消当前请求,之后创建两个线程缓存线程和网络线程。
2 创建request
创建Request对象
3 讲request添加到RequestQueue
这这个过程中会首先设置request队列标志,然后判断是否需要缓存,如果已经设置过不需要缓存,那就直接添加这个request到网络队列并返回,如果要缓存,会去判断是否已经缓存过,如果没有缓存过,就就添加这个Request到缓存队列和缓存集合中,如果缓存过,需要重新设置这个Request的属性,更新到缓存集合中。
然后在缓存线程和网络线程都存在一个死循环来处理缓存队列和网络队列。
在缓存线程的run方法中,首先获取这个Request对象,如果请求已经被取消,需要结束这个请求,继续下一次请求,如果这个请求没有被缓存过,需要添加这个请求到网络请求队列,继续洗一次请求,已经被缓存过,需要判断请求的结果是否过期,如果过期了还是需要添加到网络队列,继续下一次请求,如果没有过期,会从缓存中获取结果,传递结果给回调处理。
在网络线程的run方法中,首先会获取Request对象,如果请求已经被取消,需要结束这个请求,继续下一次请求,如果没有被取消,就让network对象执行performRequest方法,并得到networkresponse,如果结果没有被修改,并且已经有响应传递,请求结束,继续下一次请求,如果有就需要执行parseNetworkResonse方法,最后判断是否需要缓存,如果需要缓存,就讲缓存结果缓存到mCache中。
后记
 请求的生命周期


网友评论