Programming Foundations with Python (closed)
标签(空格分隔): Udacity
Course Syllabus
1.1 Lesson 0: Introduction
1.2 Lesson 1: Using Functions
1.3 Lesson 2: Using Classes
1.4 Lesson 3: Making Classes
1.5 Final Project
[TOC]
Lesson 1: Using Functions
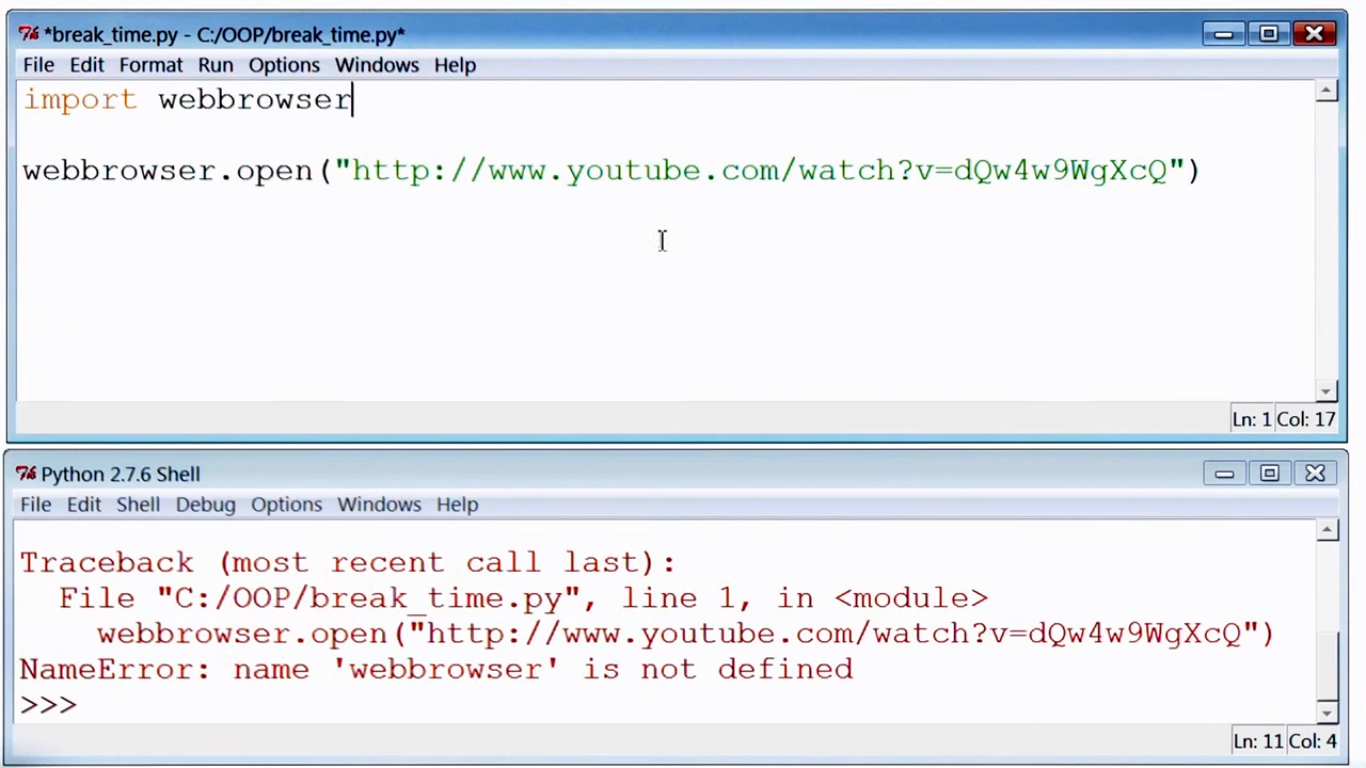
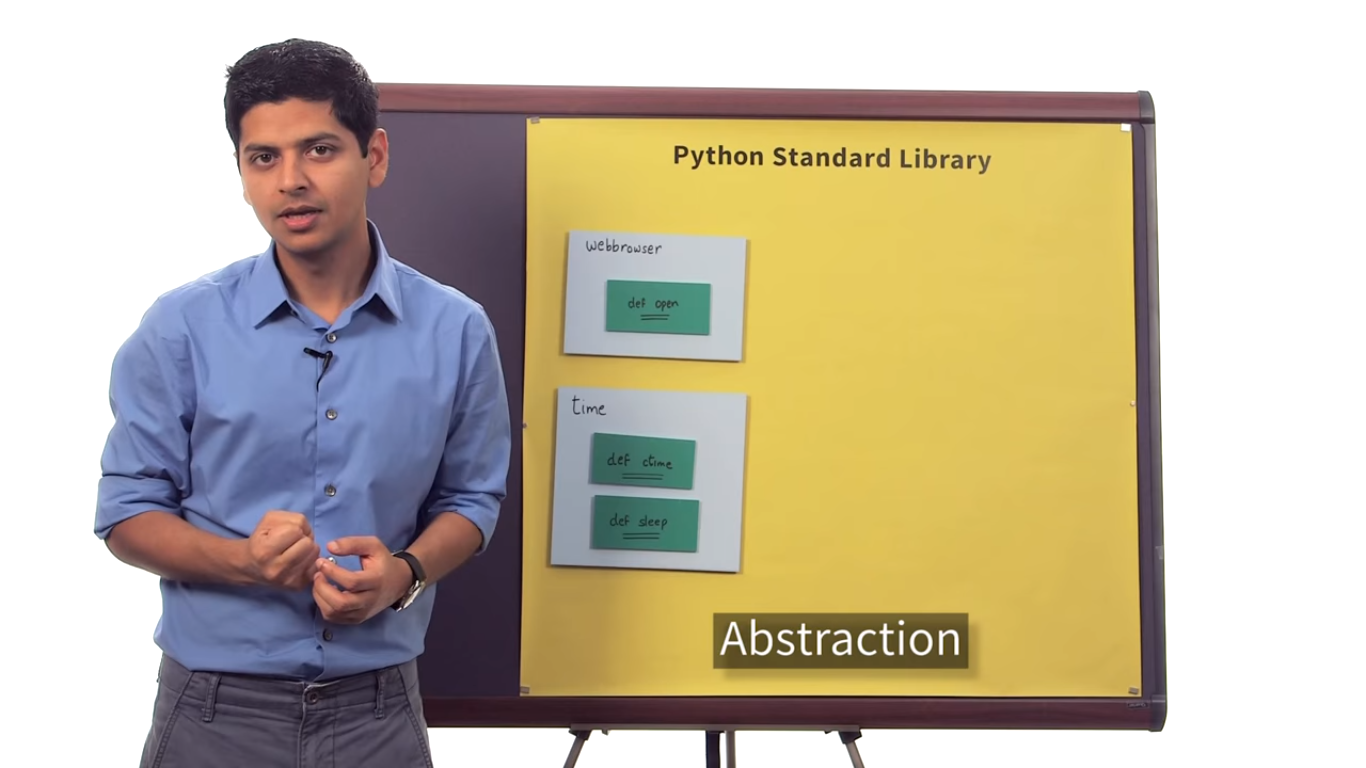
We will use functions (webbrowser.open and os.rename) from the Python Standard Library to build two projects in this lesson. After that we will present a scenario where using functions will not present a very elegant solution; this will illuminate the need for a new programming tool called Classes.
必须要import才能调用function.图中是一个能打开browser的命令。
 pf1.png-467.7kB
1.1 Making the Program Wait
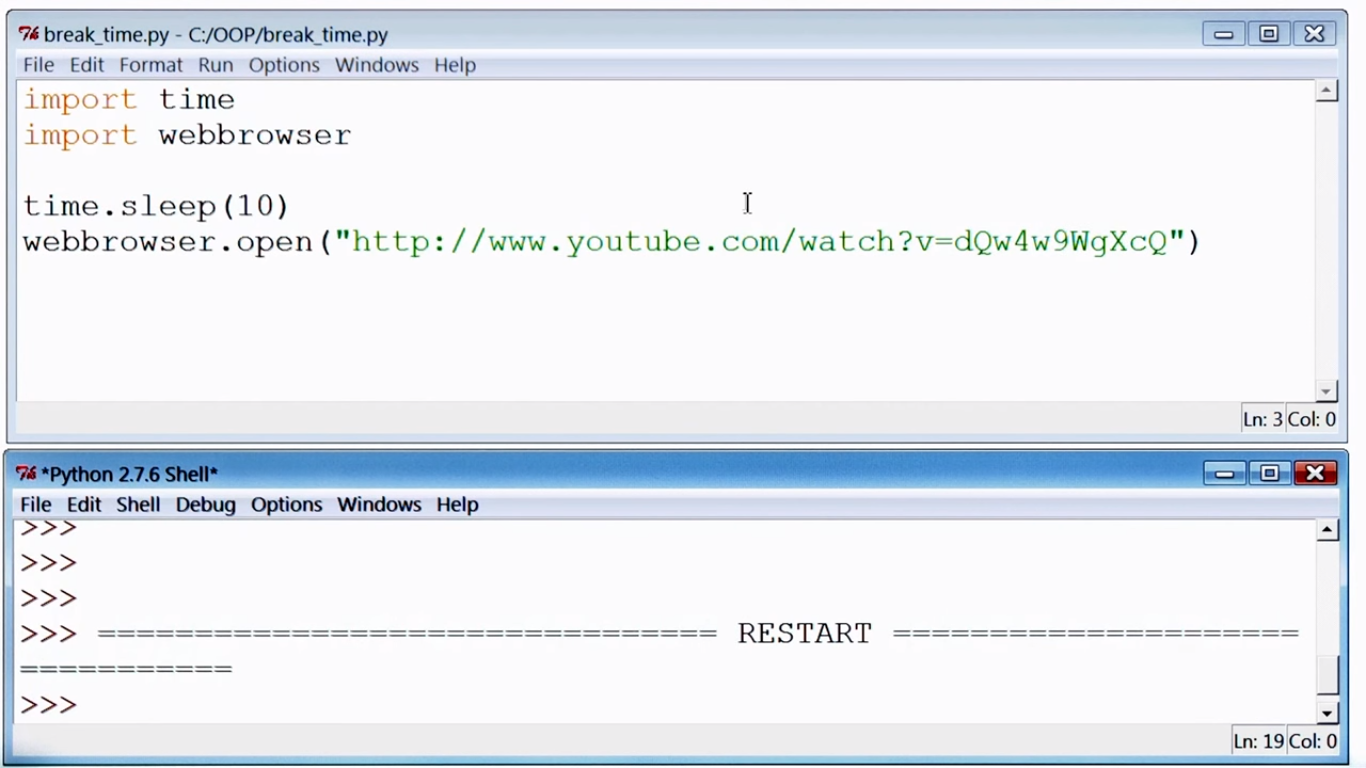
time.sleep()里存放的是seconds,如果想用2 hours,就这么用time.sleep(2*60*60)
 pf2.png-396kB
1.2 Adding a Loop
每隔10s来一个break,一共三次break。
在shell里import time后,可以直接调用time.ctime()来查看当前时间。
ctrl+c可在shell里终止当前程序
 pf3.png-510.8kB
1.3 Where Does Webbrowser Come From?
 pf4.png-450.7kB
1.4 Secret Message
1.4.1 程序描述
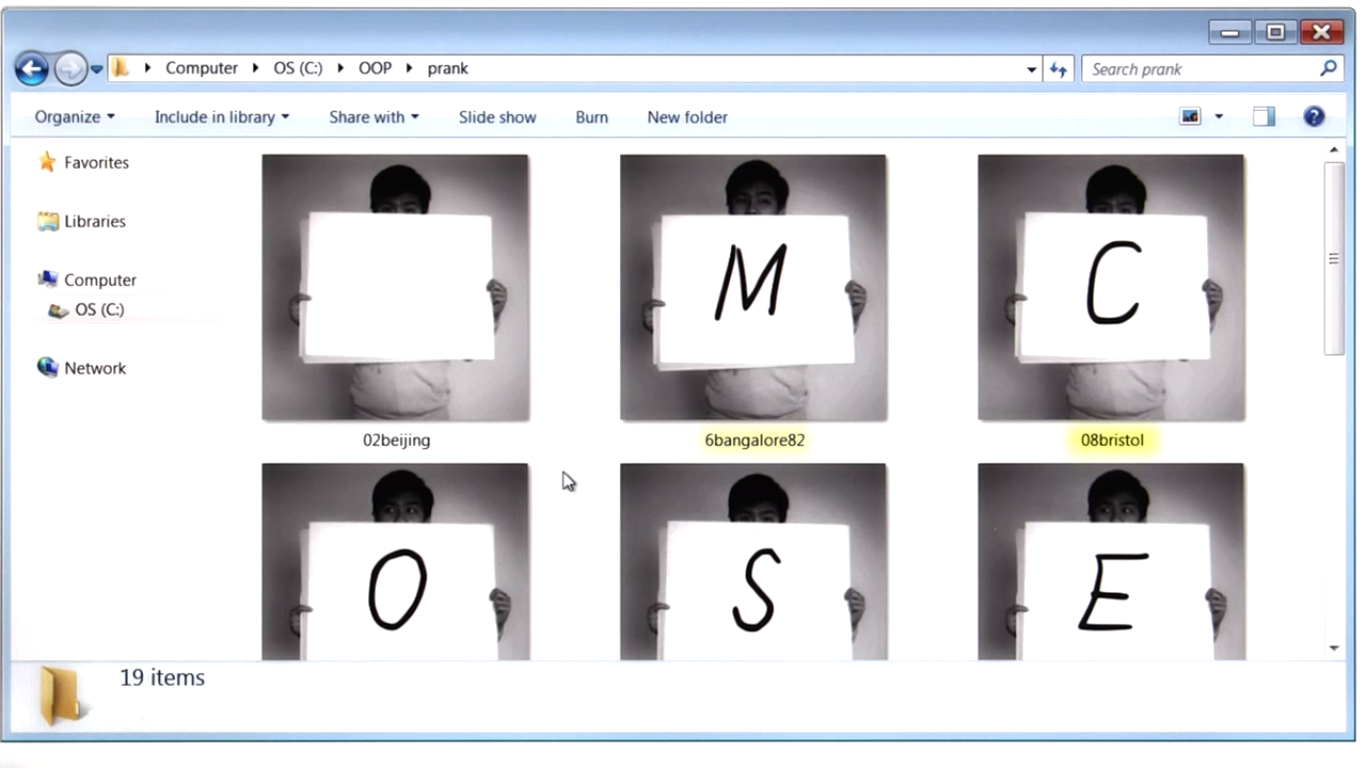
把一堆图片文件名更改,得到图片中透露的secret message.
比如一开始是乱序的,每隔文件名都有数字,我们要写一个program把这些数字去除
 pf6.png-420.6kB
 pf9.png-460.5kB
执行remove program
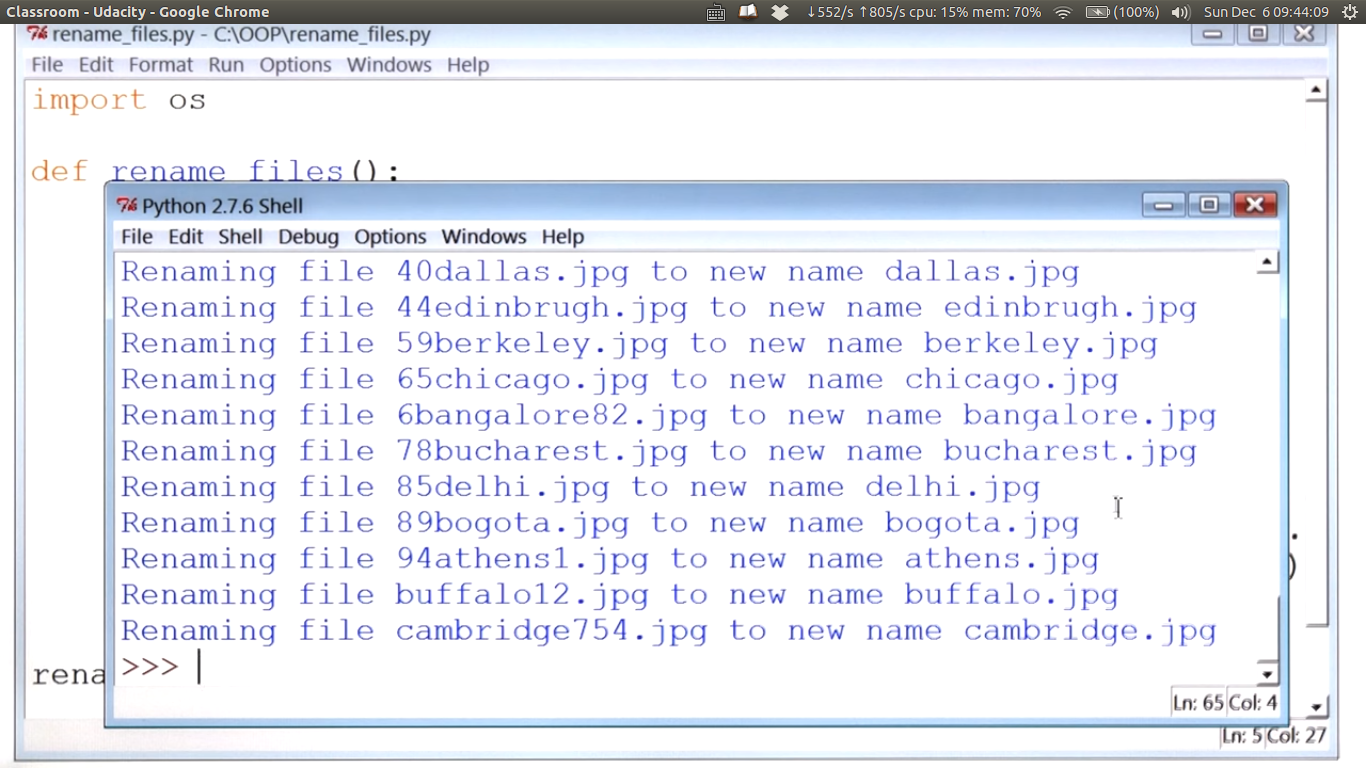 pf7.png-512.6kB
发现所有文件名中的数字都没有了
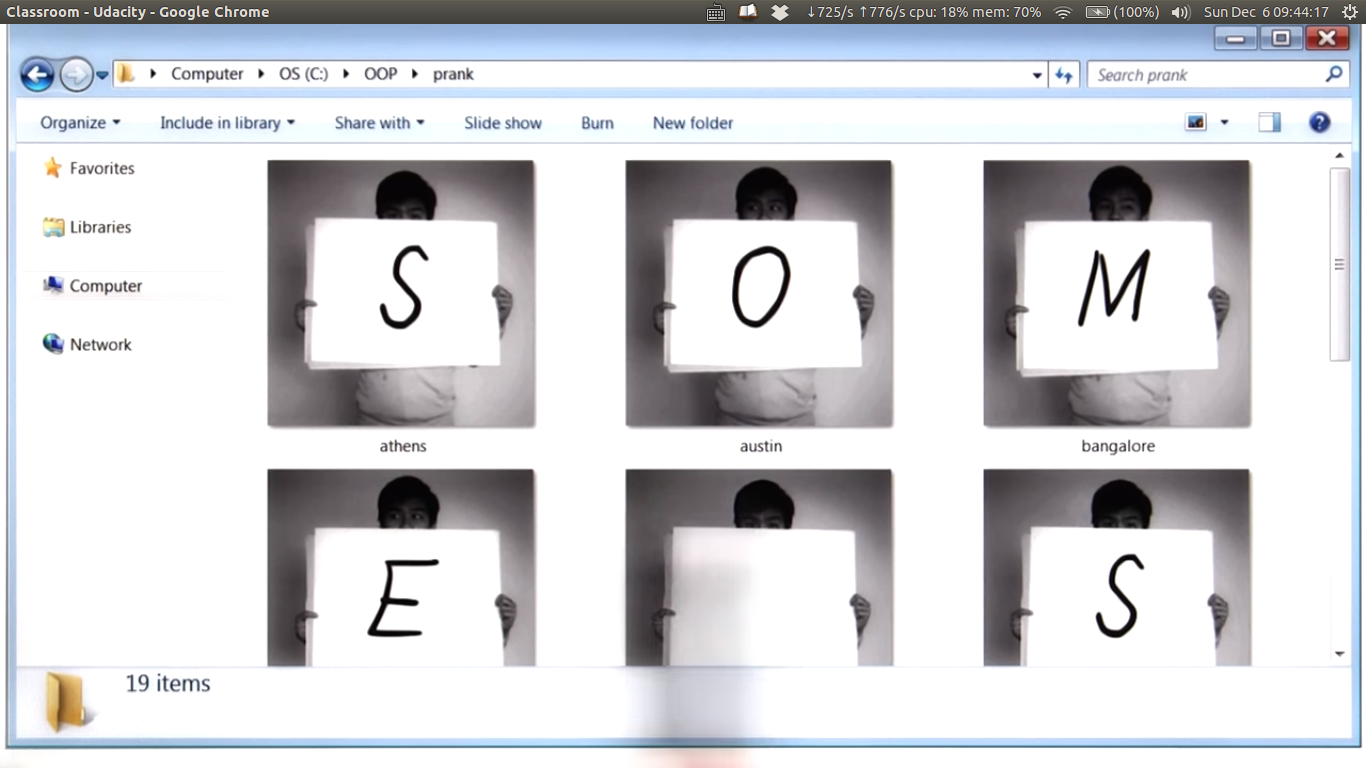 pf8.png-419.2kB
得到排好序的图片文件
 pf10.png-460.5kB
1.4.2 procedure(Planning a Secret Message)
- Get file names
- For each file:
rename it
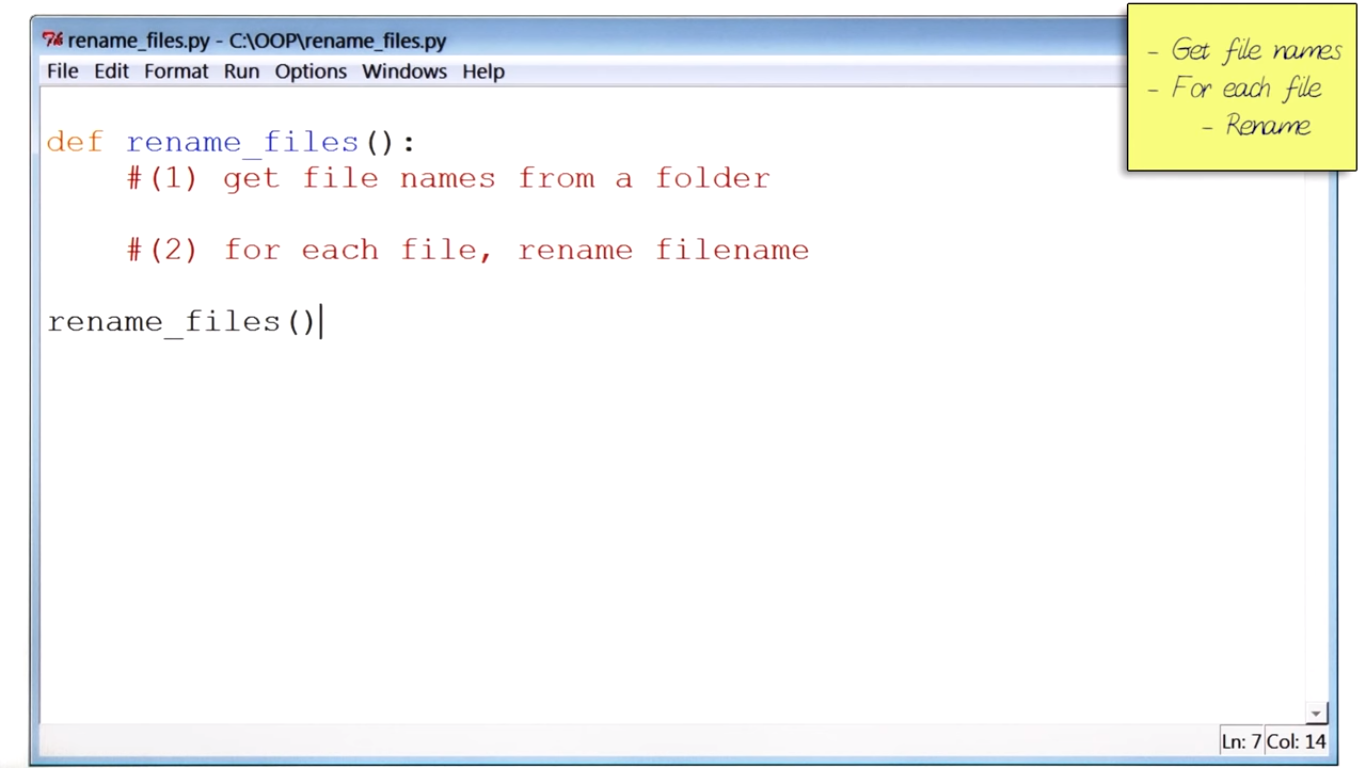 pf11.png-187.3kB
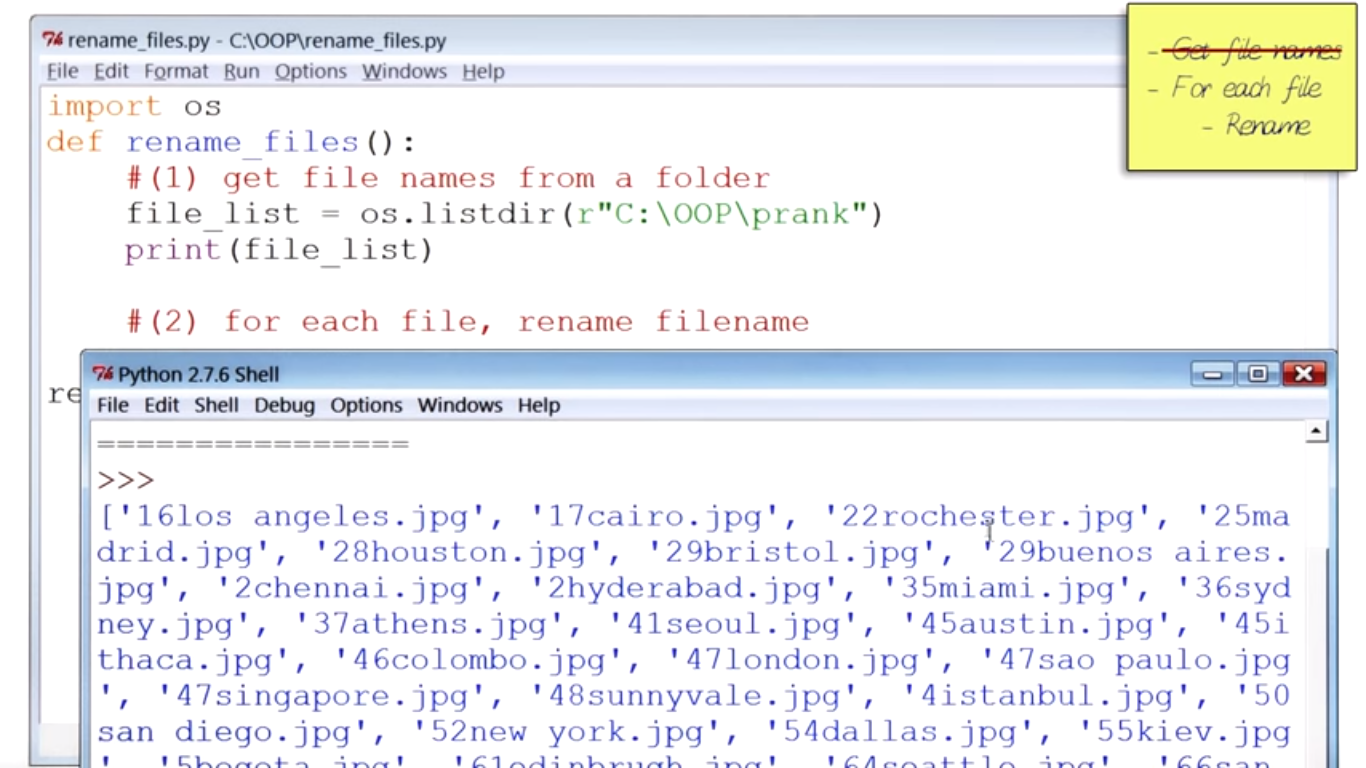
1.4.3 step 1: Opening a File(Get file names)
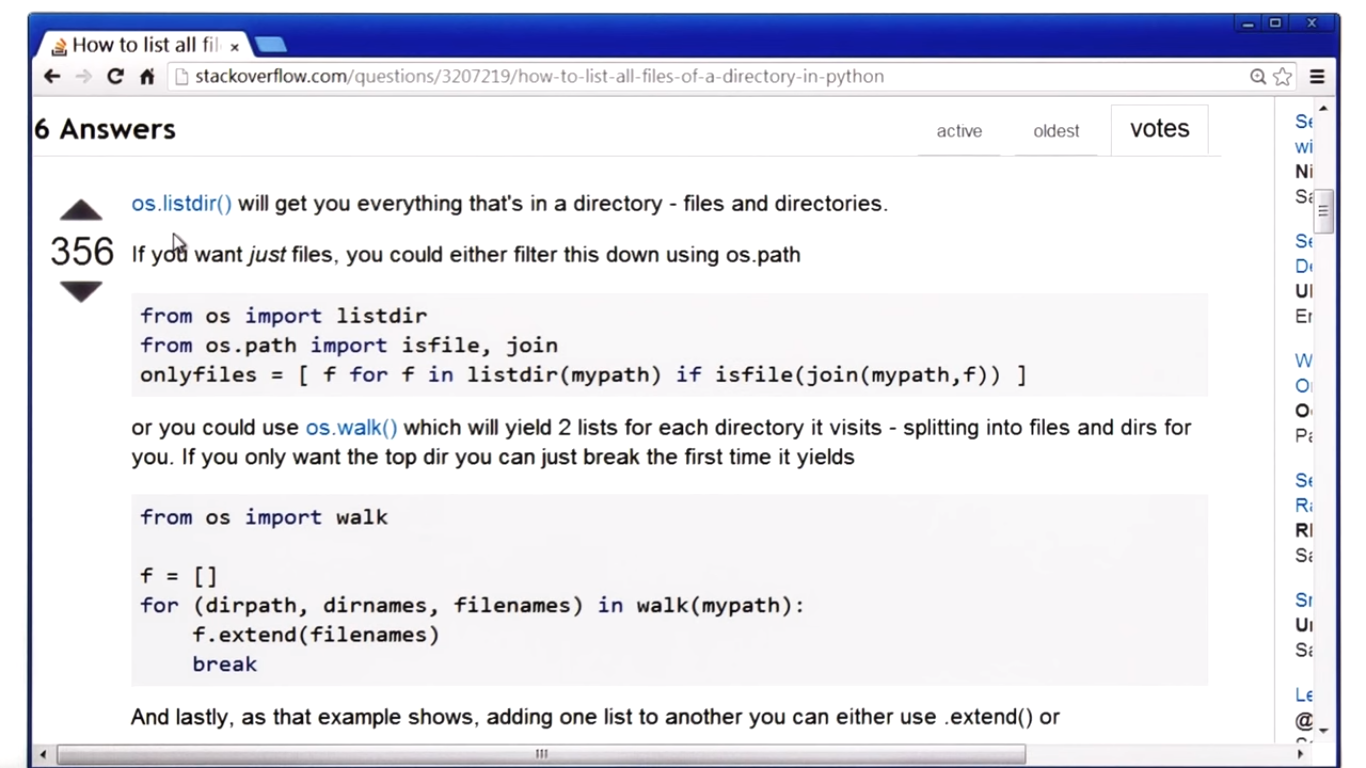 pf12.png-422.7kB
 pf13.png-464.5kB
好了,step 1 is done.
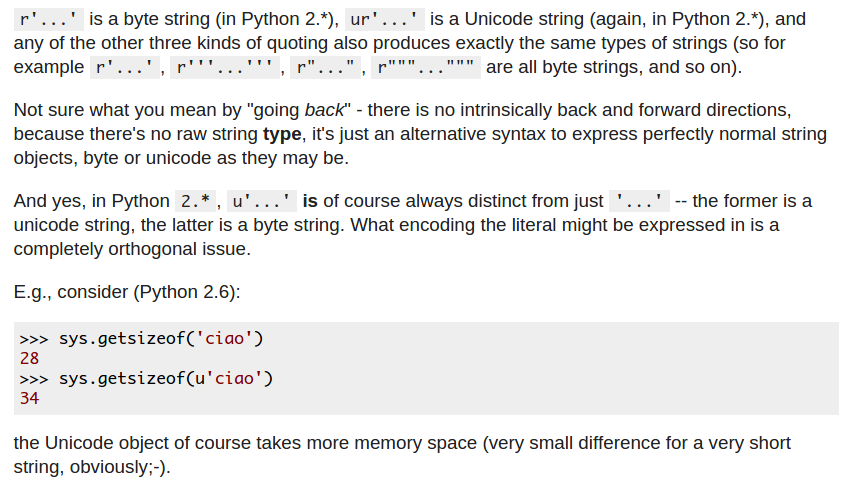
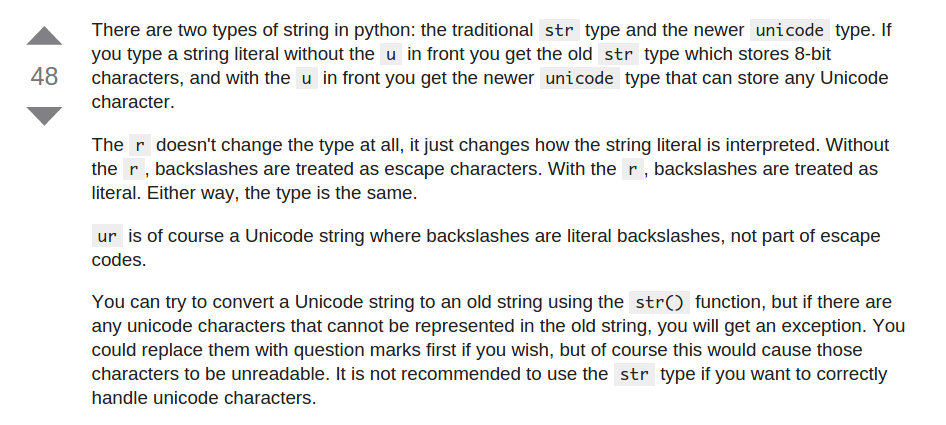
至于为什么要在
"C:\OOP\prank"前加r?参考这个答案的第一第二个答案,贴两张图在这里如果懒得看原文的话。
 pf14.png-79.7kB
 pf15.png-80.6kB
在linux下,只是文件路径不一样而已
import os

file_list = os.listdir(r"/home/xu/Pictures/prank")
print file_list
1.4.4 step 2: Changing_Filenames(For each file: rename it)
先要解决一个小问题,怎么把文件名中的数字去除?
用translate():
#Following is the syntax for translate() method −

str.translate(table[, deletechars]);

'''
Parameters:
table -- You can use the maketrans() helper function in the string module to create a translation table.

deletechars -- The list of characters to be removed from the source string.
'''
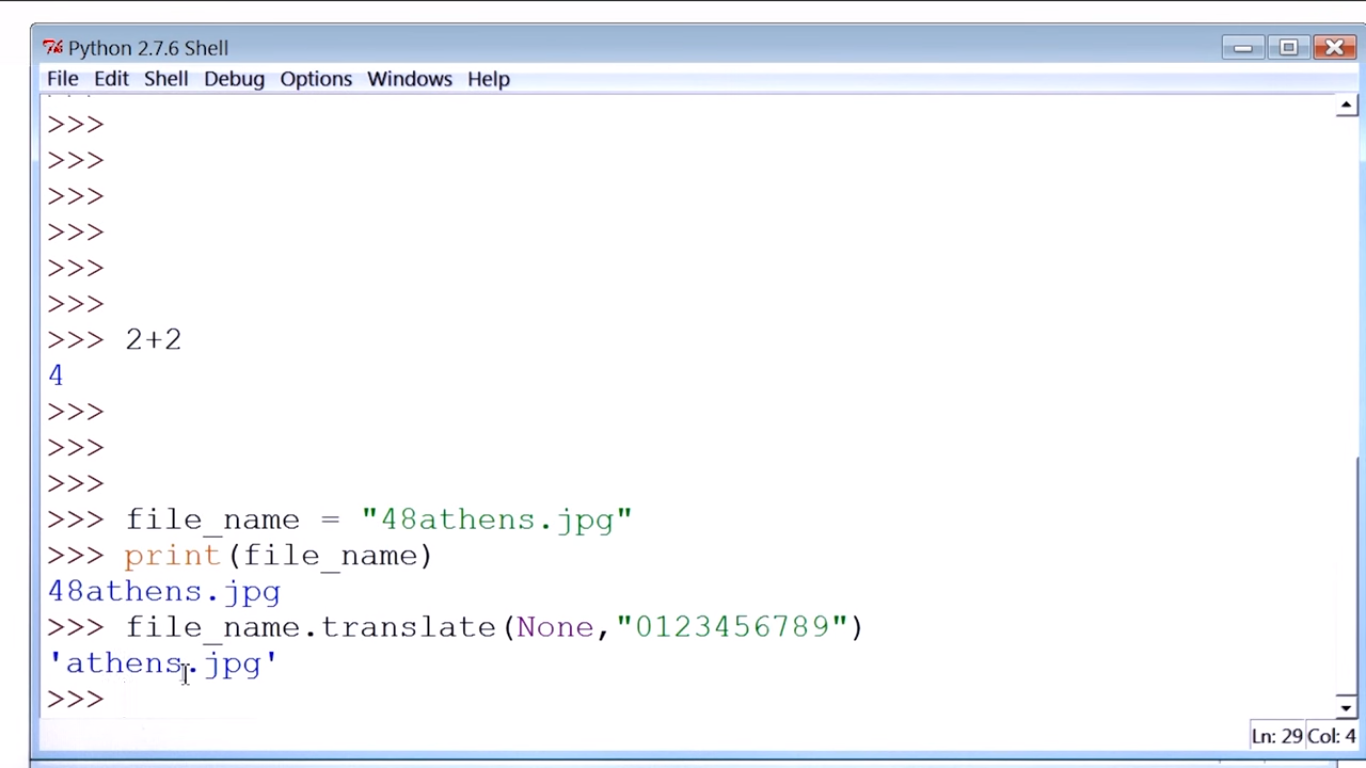 pf16.png-208.1kB
用os.rename()来更换名字
rename(src, dst)
#Rename the file or directory source to dstination.
写好了程序
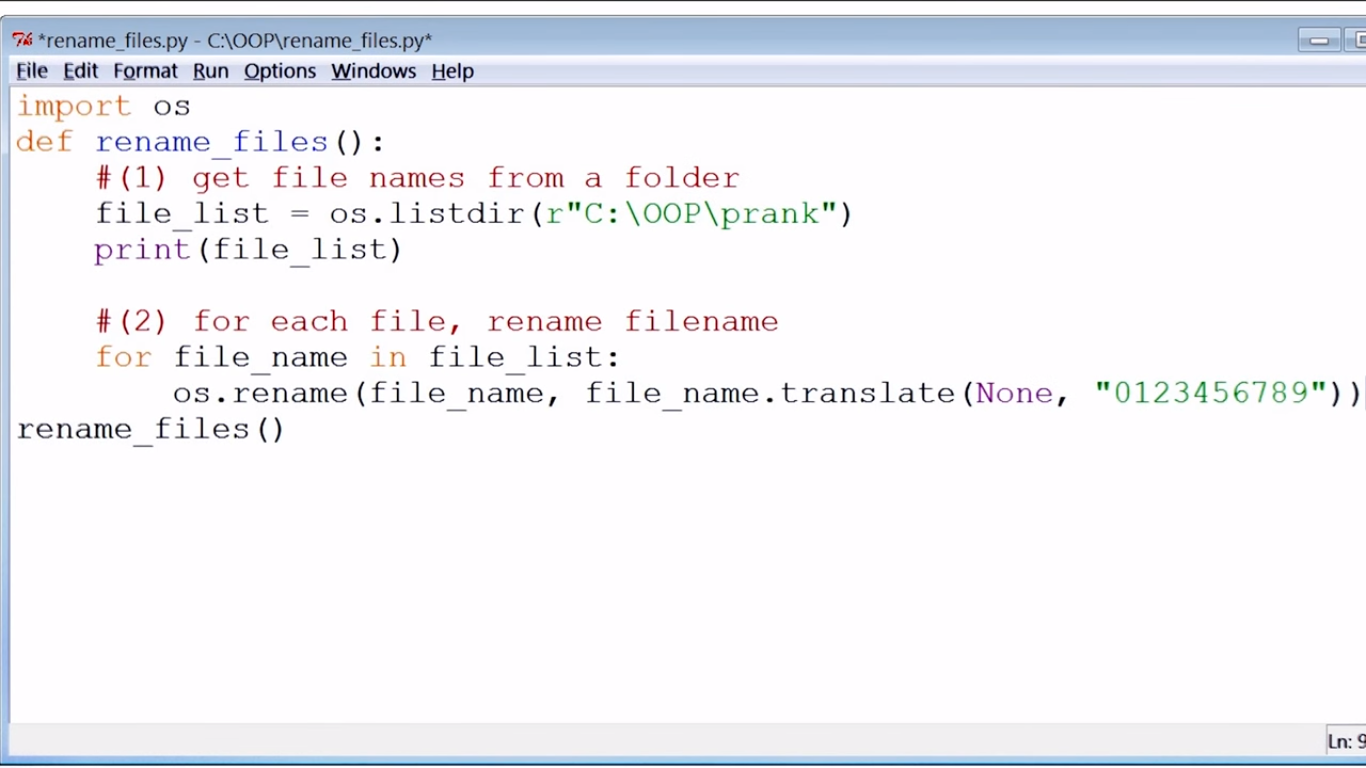 pf17.png-290.7kB
但是在运行后出现了错误
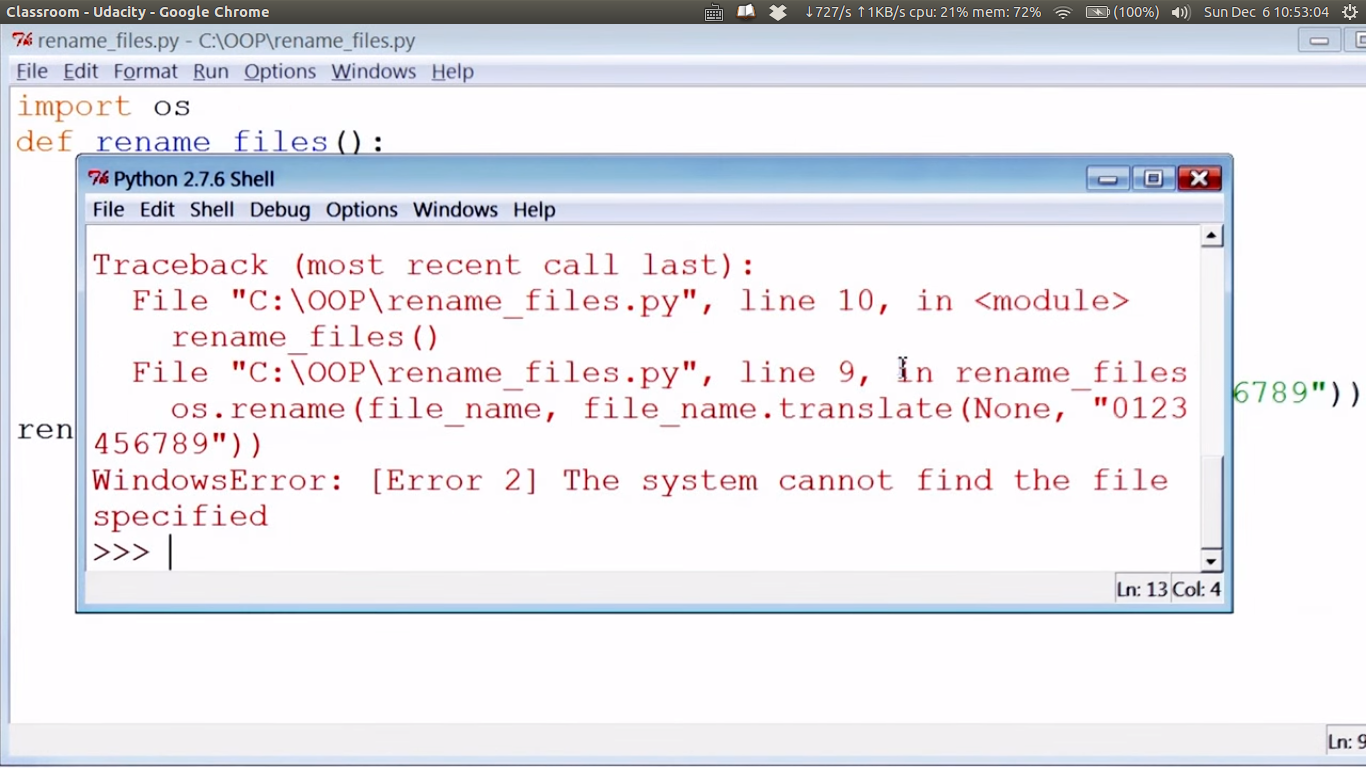 pf18.png-472.7kB
这是怎么回事?
因为当前的path并不是存放图片文件的path。用
os.getcwd()来获得当前work directry.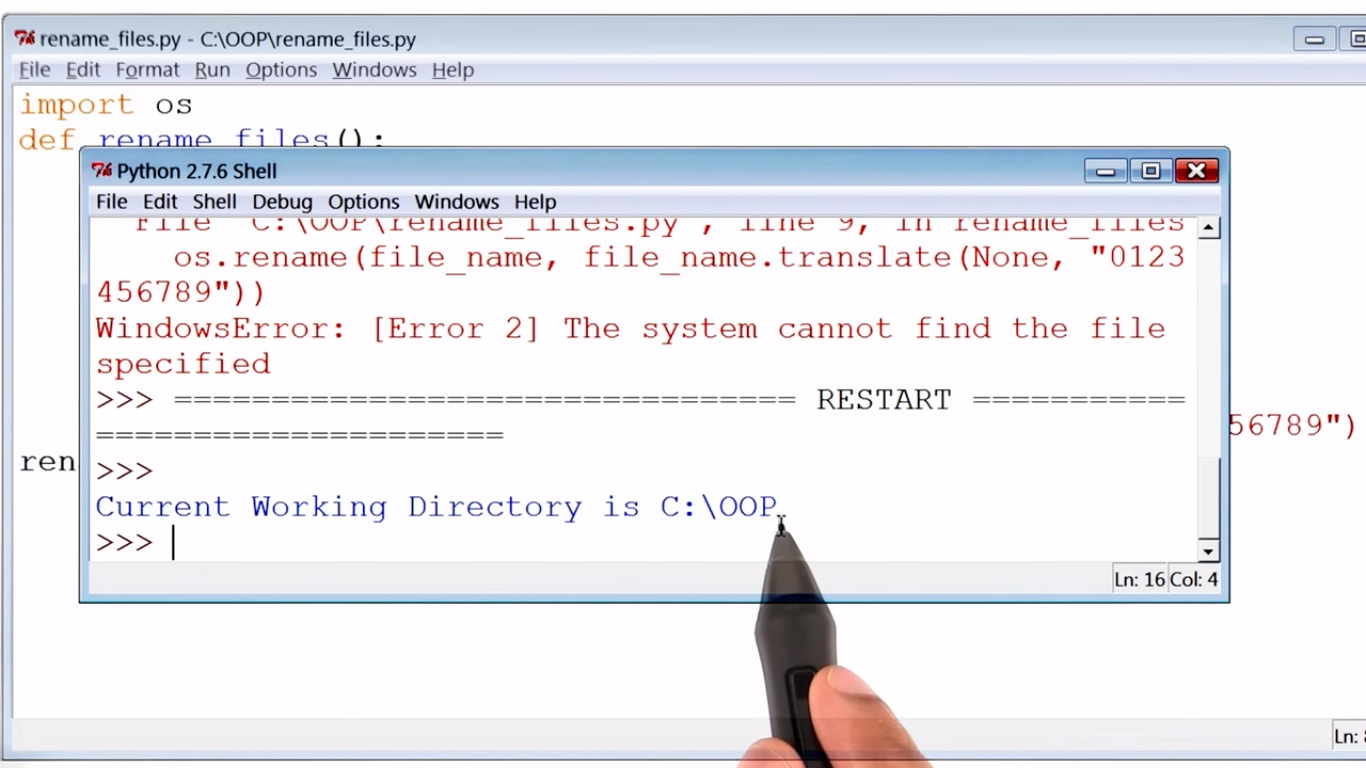 pf19.png-433.1kB
解决方法,用
os.chdir()来更改当前directy.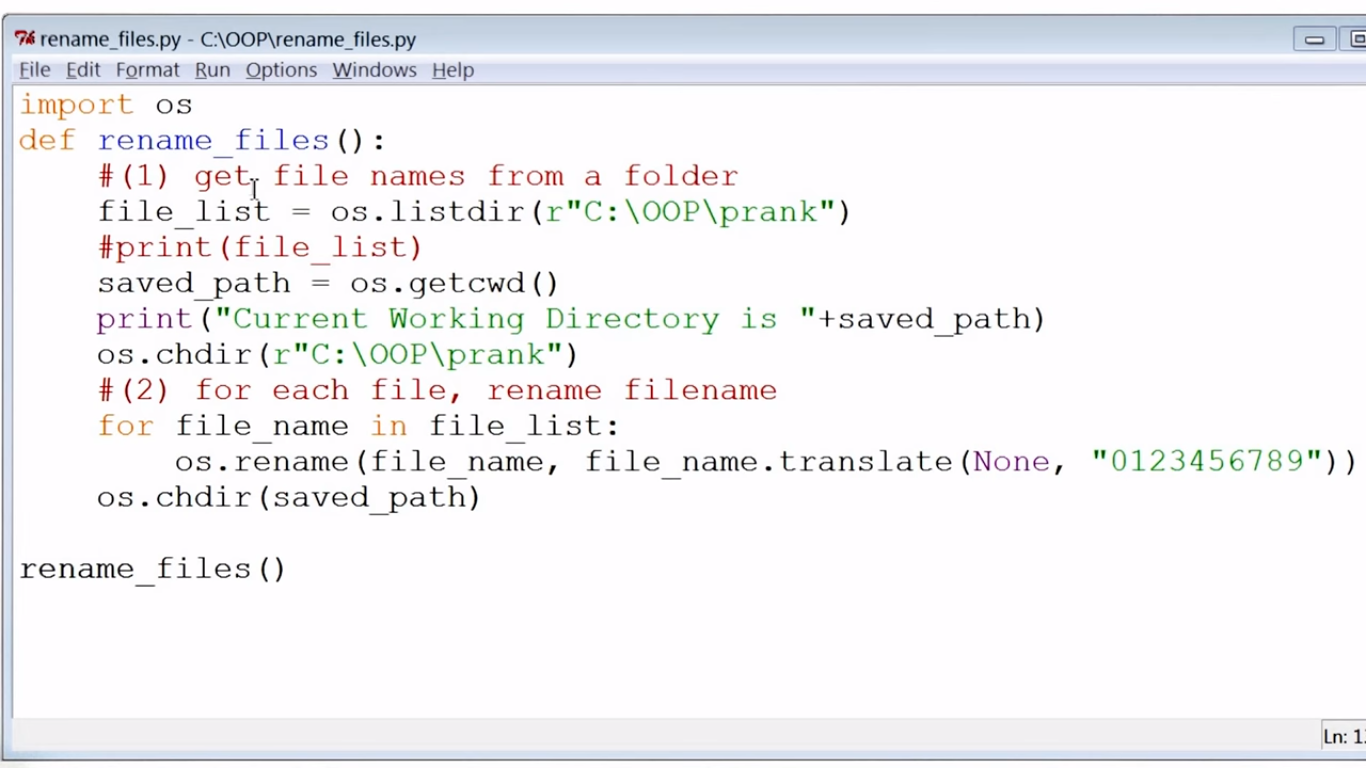 pf20.png-366.3kB
一个小贴士,在执行更改每个文件名的操作前,把就文件名和新文件名都打印出来,这样更直观。不然就算运行成果,没有error,也不会有什么提示。
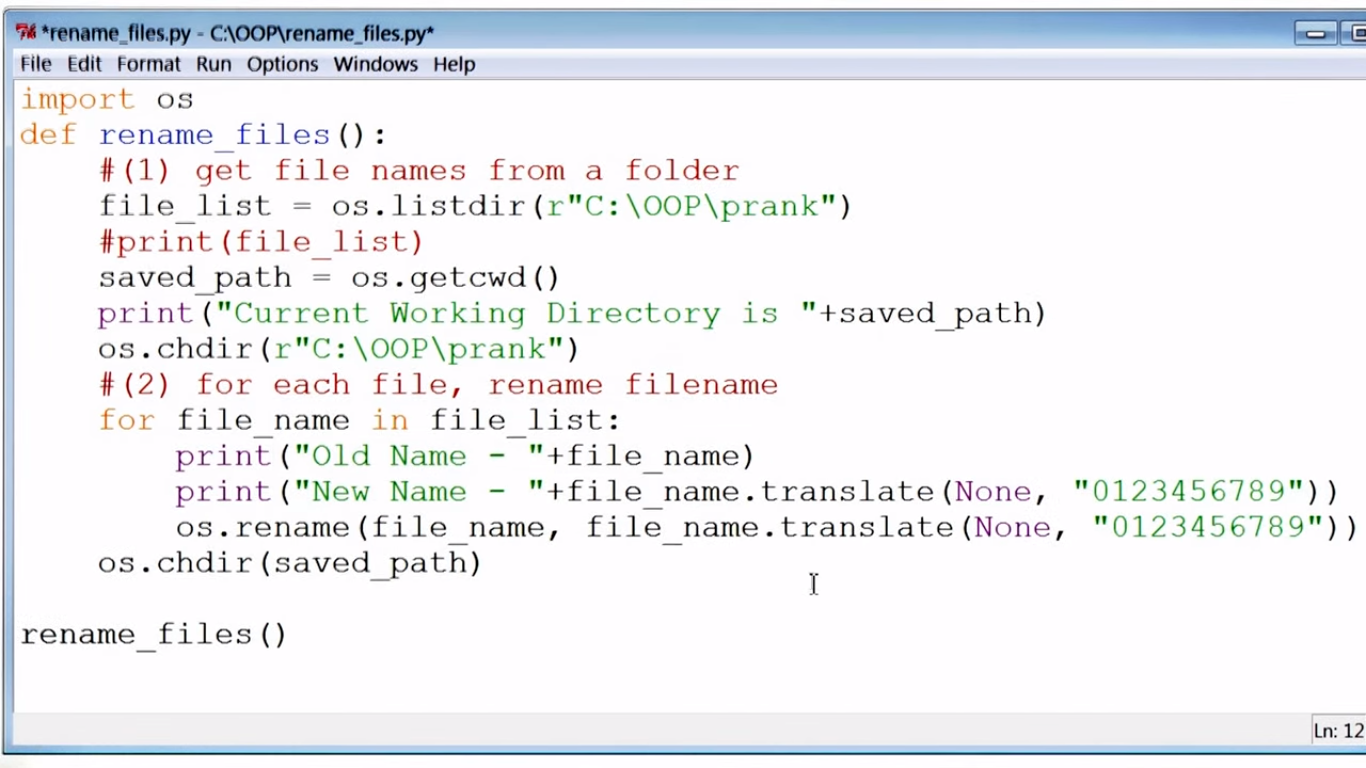 pf21.png-505.6kB
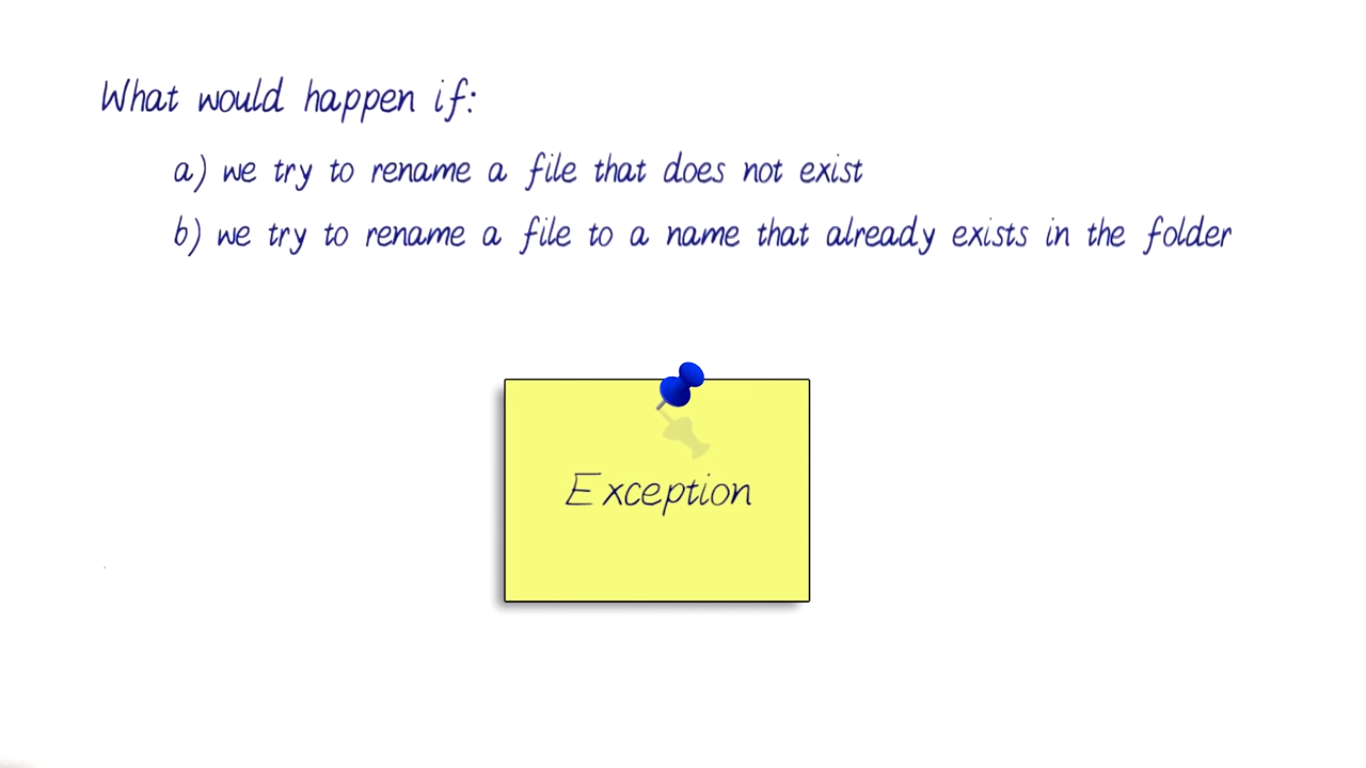
1.4.5 ename Troubles——Exception
当遇到下面两种情况时,会有error发生,这种error叫做Exception。关于这个之后再具体介绍
 pf22.png-113.7kB
1.4.6 rename_files()的完整code
import os

def rename_files():

    # (1)get files name from a folder
    file_list = os.listdir("/home/xu/Pictures/prank")

    # (2) for each file, rename filename
    os.chdir("/home/xu/Pictures/prank")
    for file_name in file_list:
       os.rename(file_name, file_name.translate(None, "0123456789"))

# 以上程序已经完成了rename的功能,但是这些程序并不完善,有很多可以优化的地方,以下是改进版

import os

def rename_files():

    # (1)get files name from a folder
    file_list = os.listdir("/home/xu/Pictures/prank")
    #print file_list  # this is a list of string containing the file name
    saved_path = os.getcwd()
    print ("Current Working Directory is " + saved_path) # python 3中是print(),最好加上
    os.chdir("/home/xu/Pictures/prank")

    # (2) for each file, rename filename
    for file_name in file_list:
        print ("Old Name - " + file_name)
        print ("New Name - " + file_name.translate(None, "01234556789"))
        os.rename(file_name, file_name.translate(None, "0123456789"))

    os.chdir(saved_path)  # 运行完程序后,再把目录变回原先的地址
1.5 When Functions Do Not Suffice
我们的目标是做一个网站,用一个程序显示一部电影的trailer和info。
1.5.1 方法一:function:movies.py
比如下面的movies.py:
 pf23.png-283.2kB
但是这种方法要导入的参数太多,不推荐。
1.5.2 方法二:用Template
写一个template,然后每一步电影都用这个template。这样就可以在调用function的时候不用添加过多参数
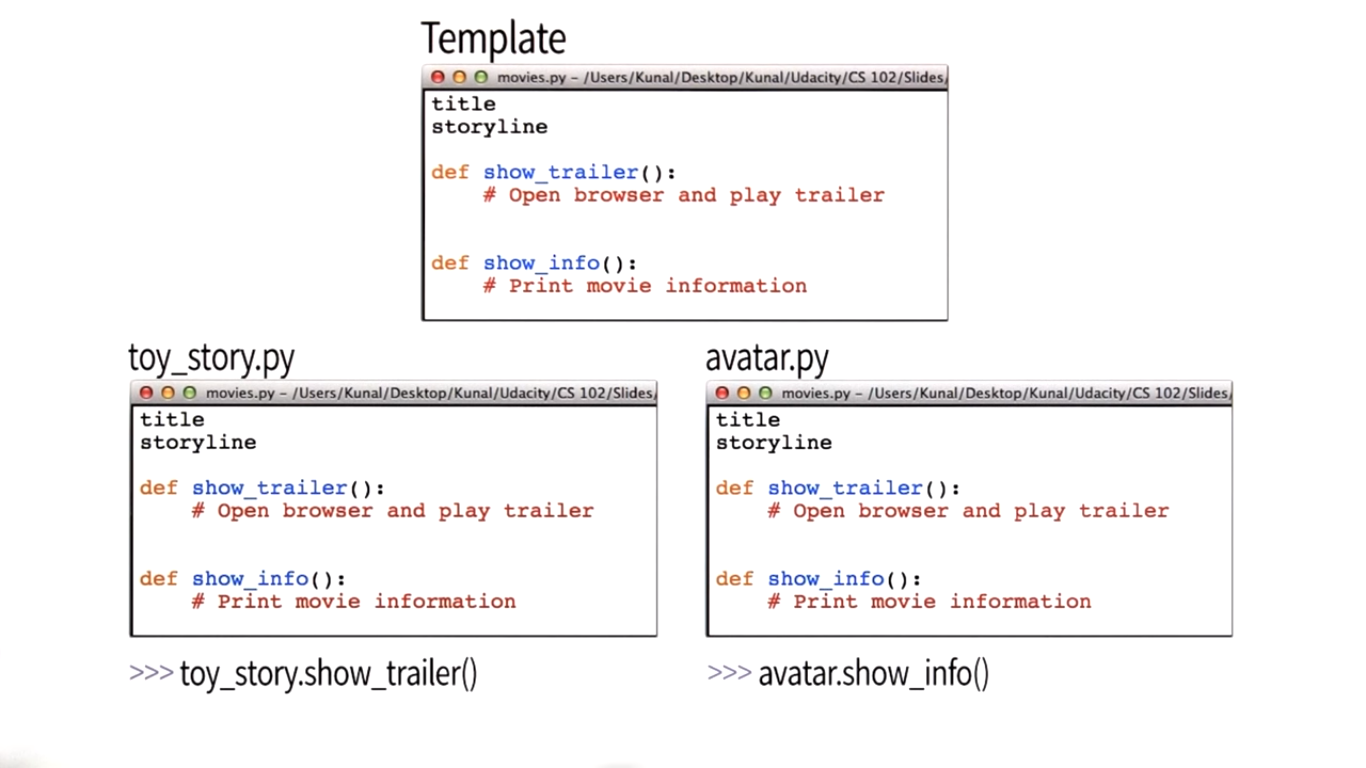 pf24.png-256.1kB
但是这种方法要给每一个电影都写一个.py文件,而且一旦template里做了更改,其他电影.py文件里也要一个个修改,这种方法很不效率。
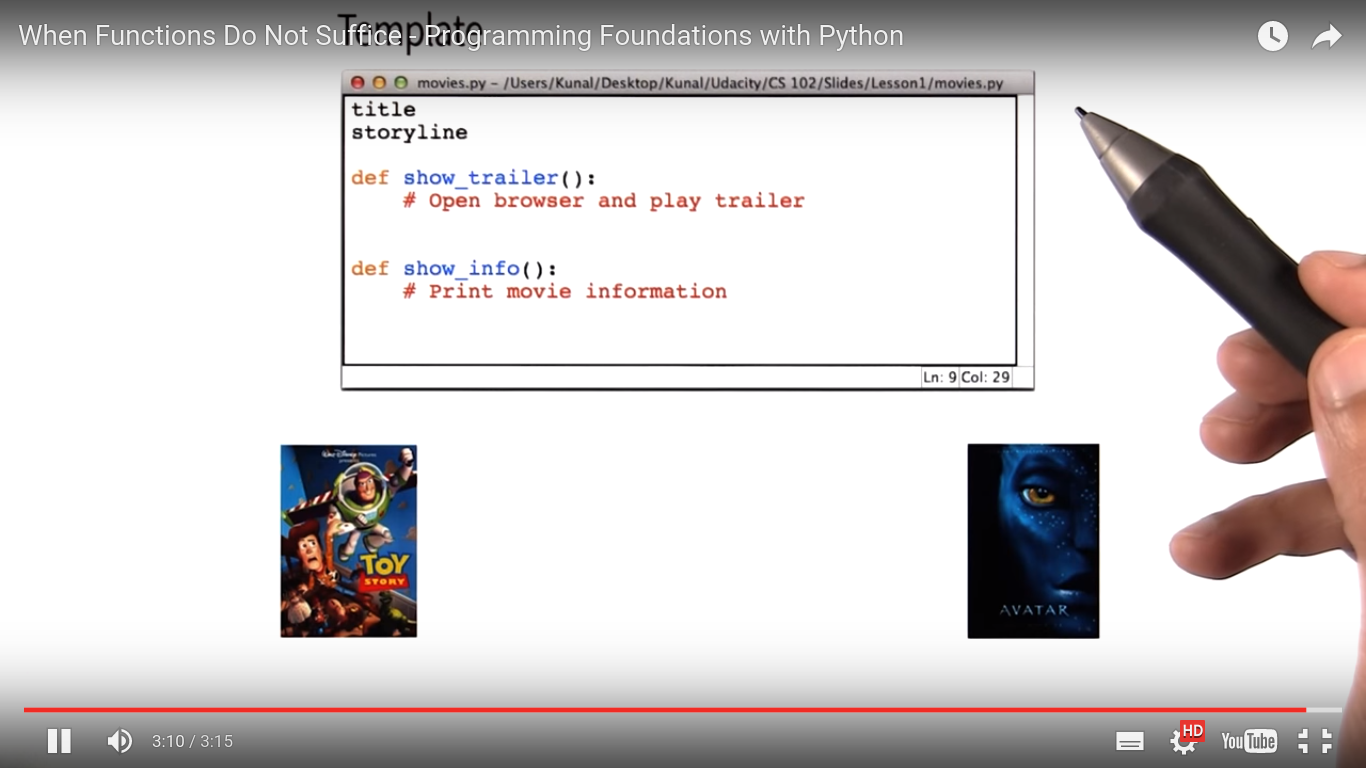
1.5.3 方法三:class
理想的效果是,我们用一个template,但不写multiple files. 而toy_story 和avatar are the tpye of template.为了实现这种效果,我们要使用class,这部分内容在lesson 2.
 pf25.png-283.5kB
Lesson 2: Using Classes
2.1 Lesson 2a(Using Classes): Draw Turtles
本节课的目标是 Drawing Turtles
 pf26.png-285.7kB
2.1.1 Drawing a Square
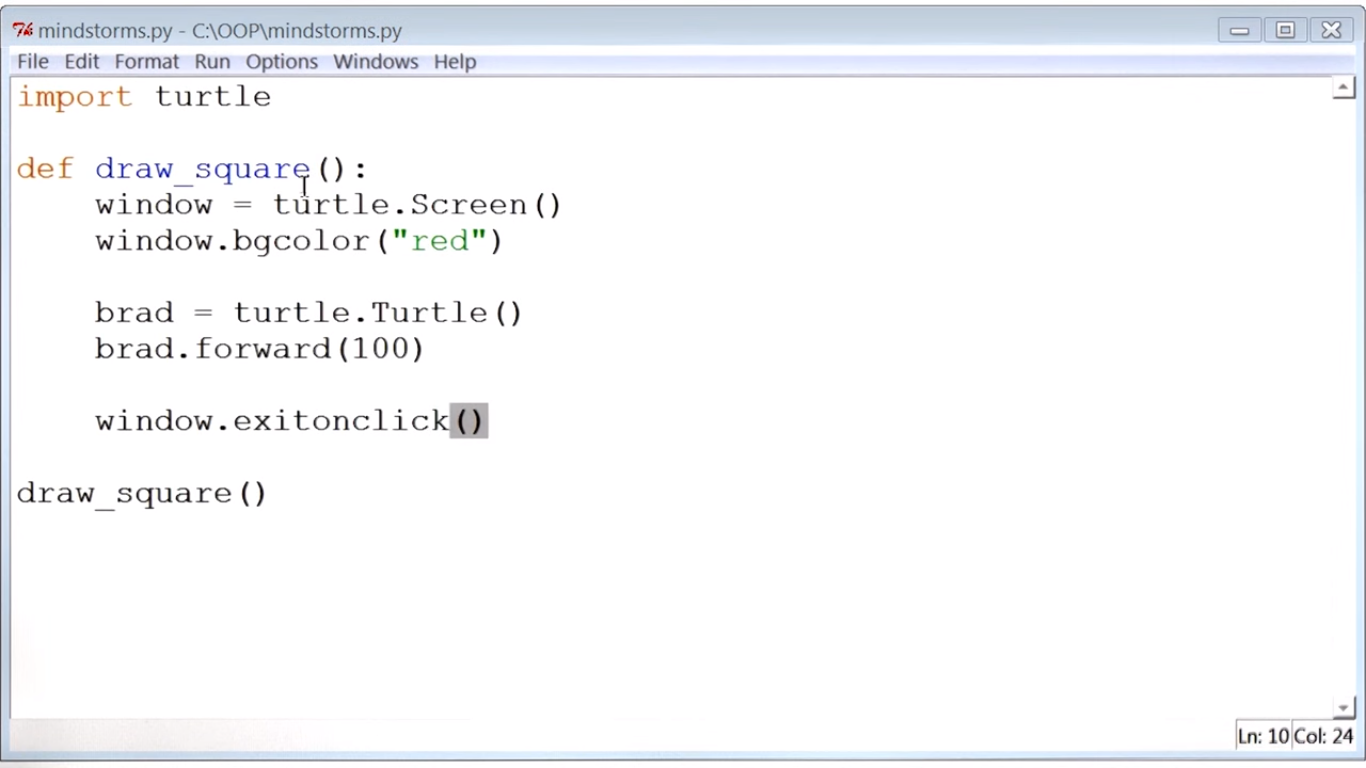 pf27.png-220.4kB
import turtle  #这个是python里用来画graph的包

def draw_square():
    # we need a red carpet as the background
    window = turtle.Screen()  # window 代表carpet
    window.bgcolor("red")

    brad = turtle.Turtle()  # grab the turtle funciton,brad是图像中的指针
    brad.forward(100)  # the distence we want to move forward

    window.exitonclick()  # 功能:当点击图像时,会自动关闭。要是没有的话无法关闭图像所在窗口

draw_square()
因为我们要得到一个squre,所以画线要进行四次,每次转90度。
import turtle

def draw_square():

    window = turtle.Screen()
    window.bgcolor("red")

    brad = turtle.Turtle()
    brad.forward(100)
    brad.right(90)    # 转90度
    brad.forward(100)
    brad.right(90)
    brad.forward(100)
    brad.right(90)
    brad.forward(100)
    brad.right(90)

    window.exitonclick()

draw_square()
2.1.2 Change Turtle Shape, Color, and Speed
import turtle

def draw_square():

    window = turtle.Screen()
    window.bgcolor("red")

    brad = turtle.Turtle()
    brad.shape("turtle")
    brad.color("yellow")
    brad.speed(2)

    brad.forward(100)
    brad.right(90)    # 转90度
    brad.forward(100)
    brad.right(90)
    brad.forward(100)
    brad.right(90)
    brad.forward(100)
    brad.right(90)

    window.exitonclick()

draw_square()
相关文档
效果图
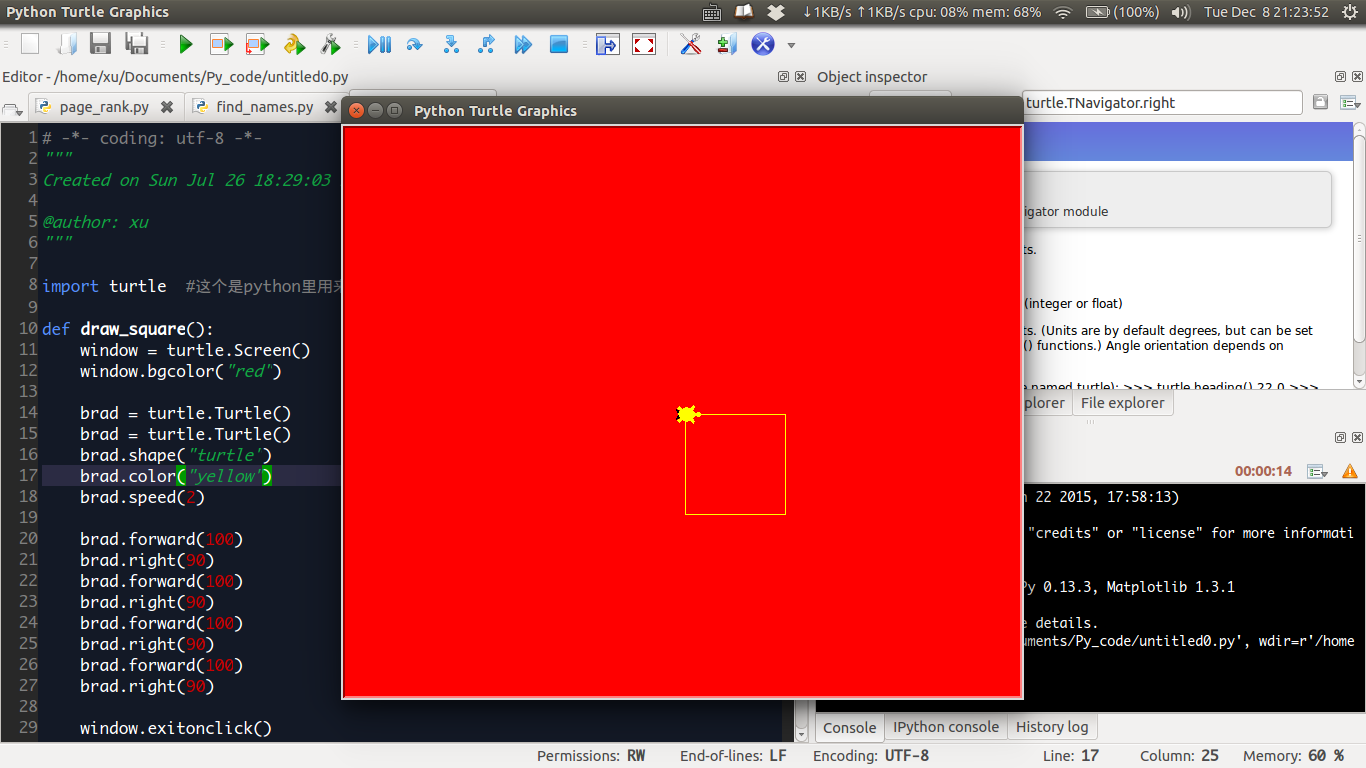 pf28.png-196.3kB
2.1.3 Where Does Turtle Come From?
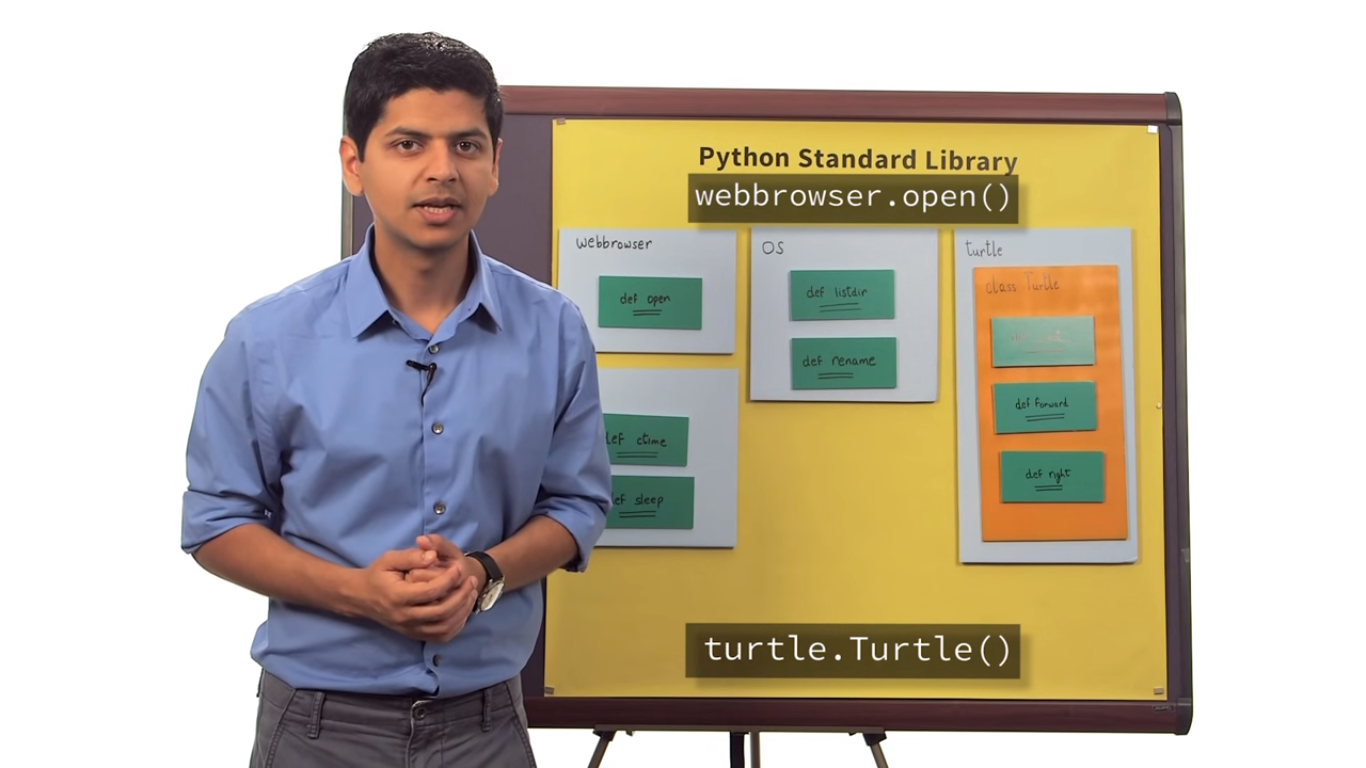
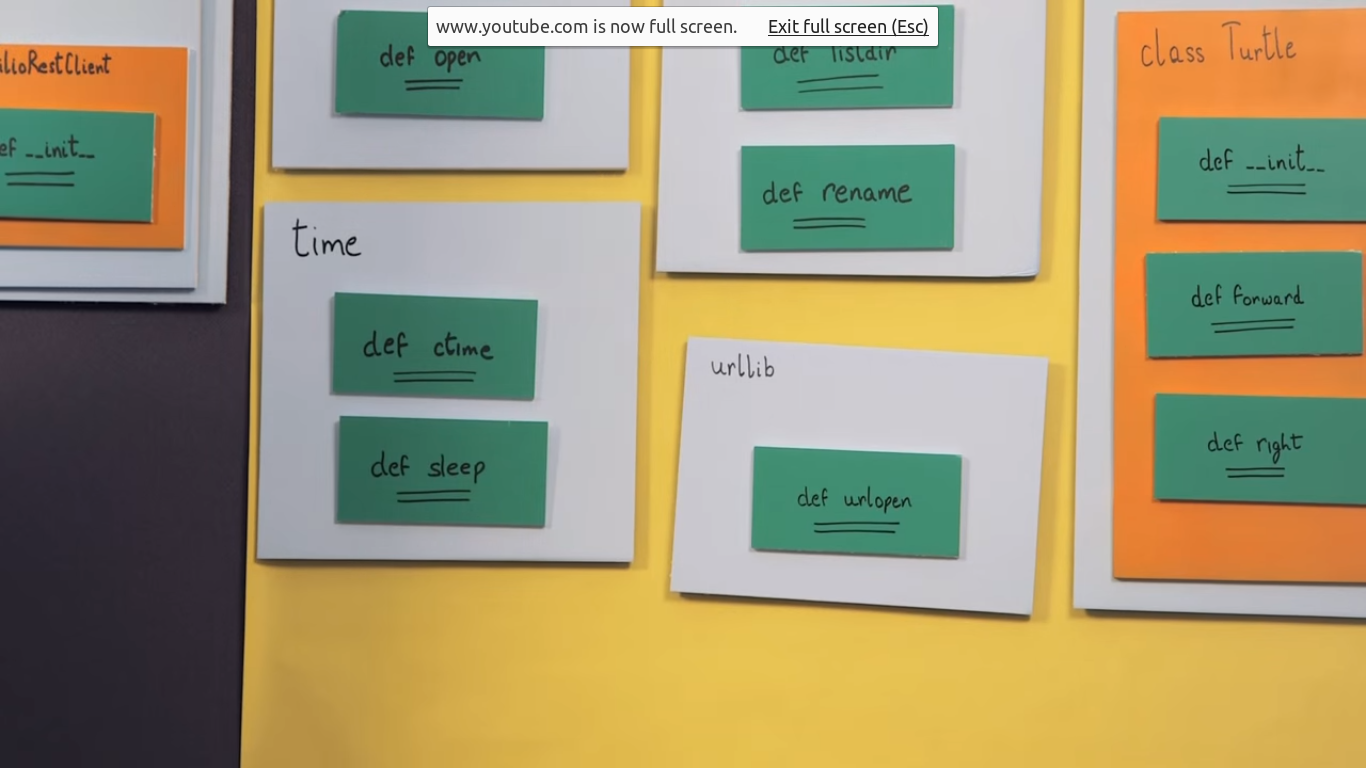
python的标准库里有很多module
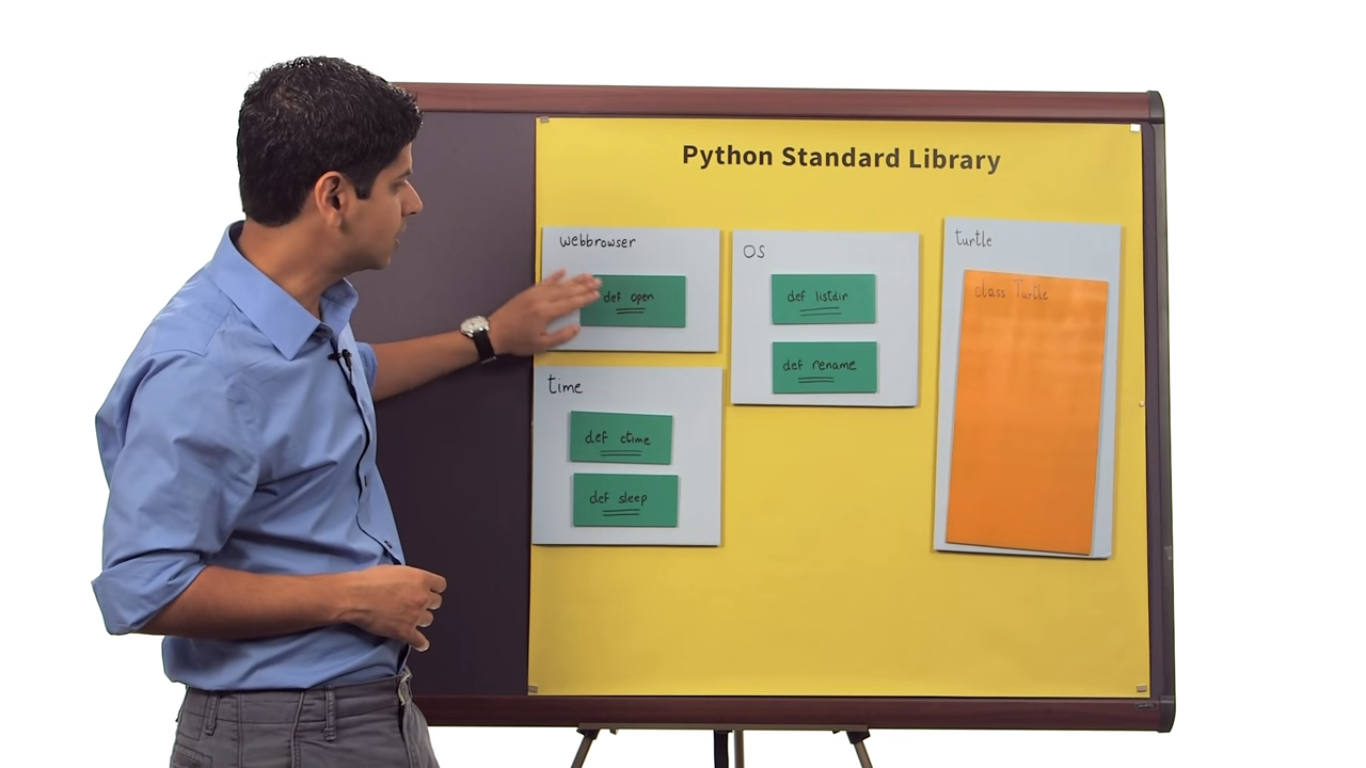 pf29.png-480.7kB
其中的tutle里有一个class,叫Turtle。而我们通过brad = turtle.Turtle()创建了brad。这个brad的类型就是class的name:Turtle. 所以这个brad就像Turtle一样,可以通过brad.forward()这样直接调用function。
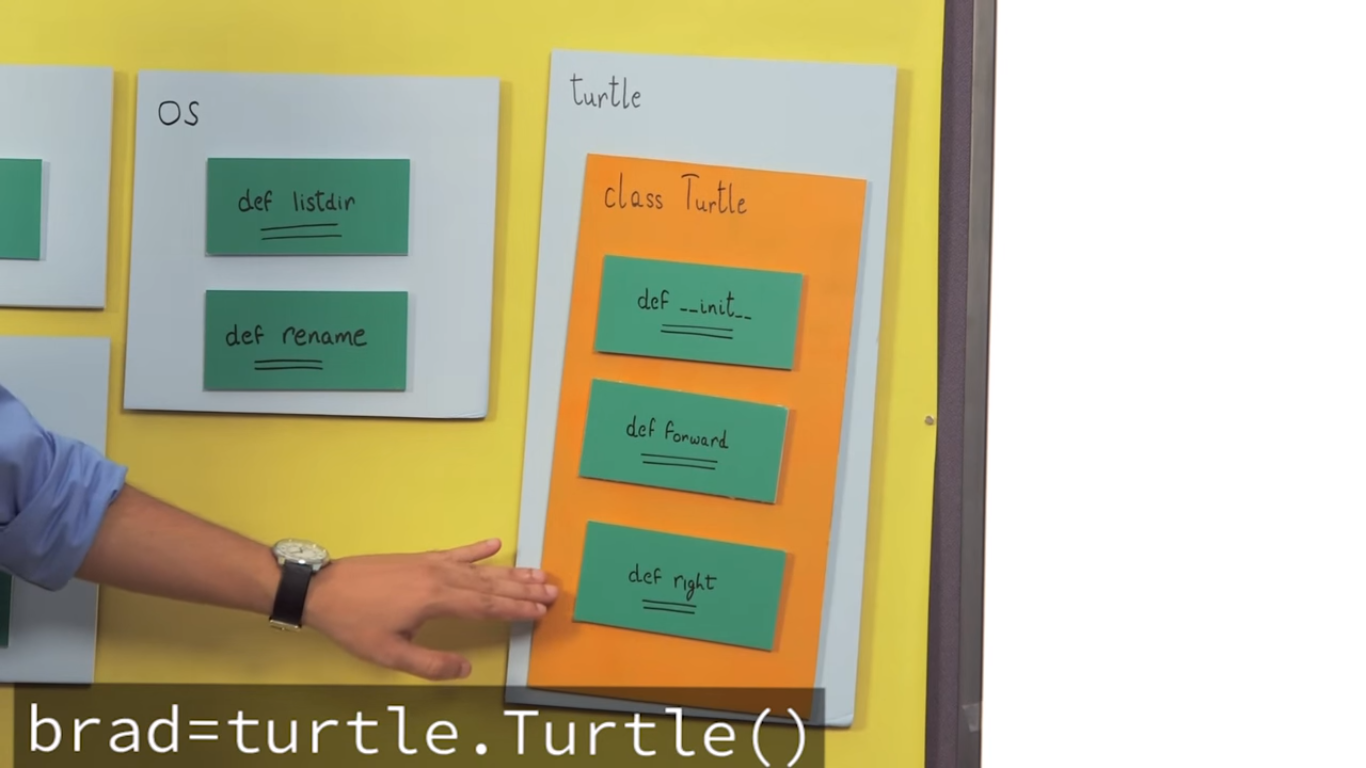 pf30.png-436.1kB
2.1.4 Two Turtles
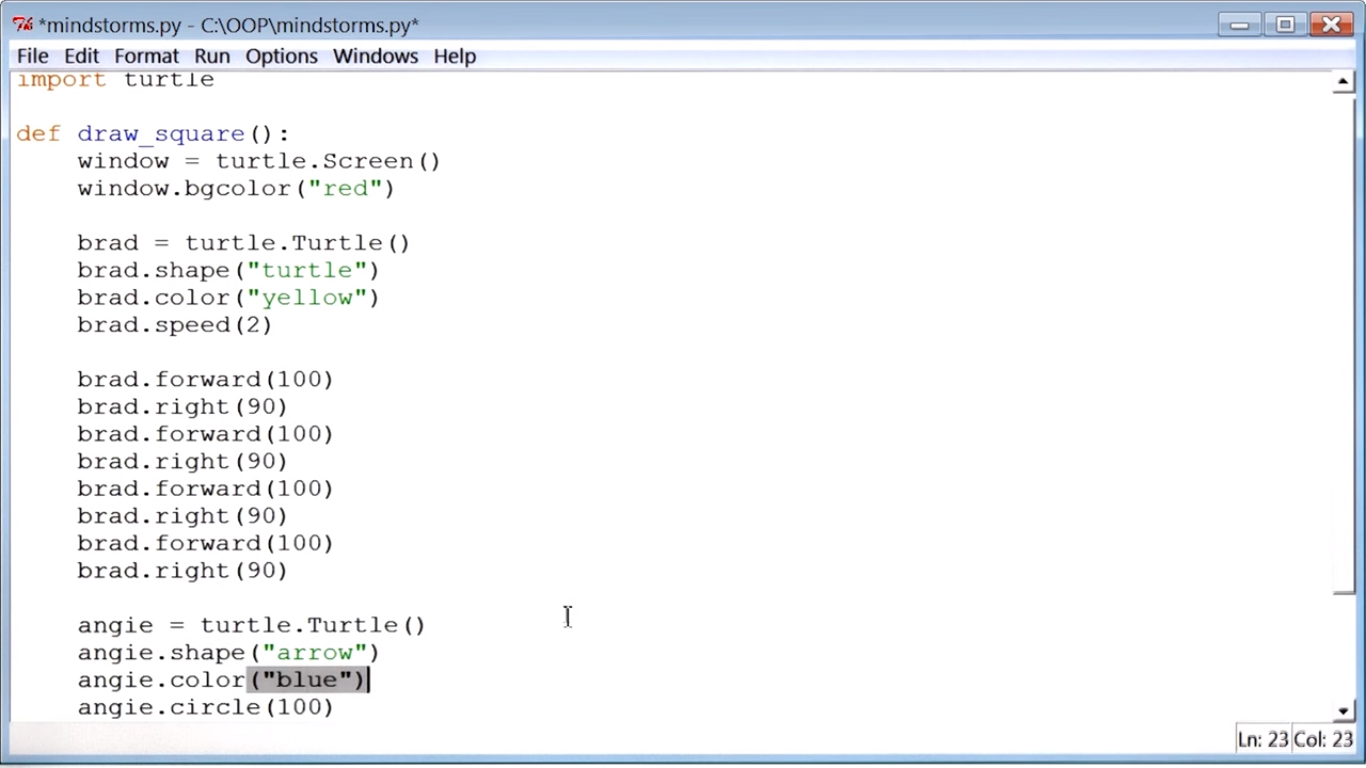 pf31.png-315.6kB
效果图
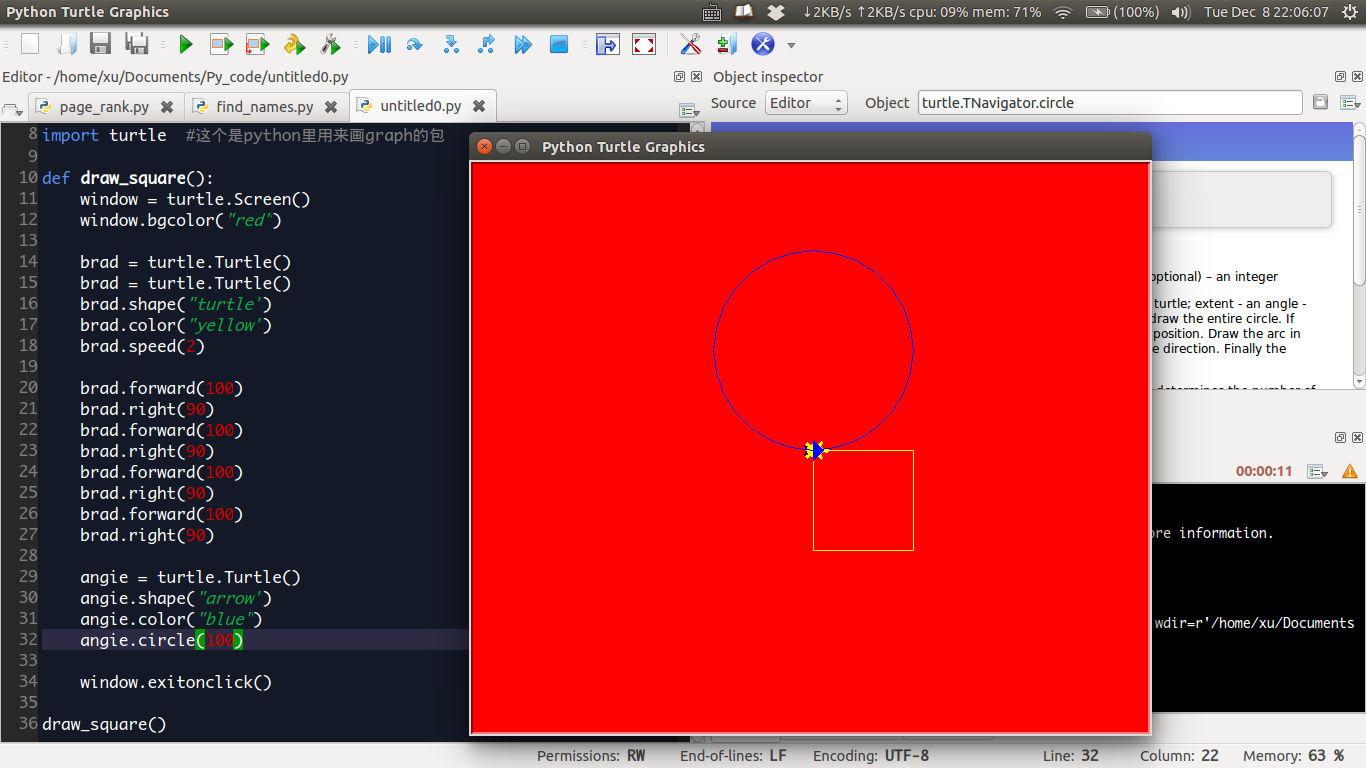 pf32.png-192.2kB
2.4.5 Improving Code Quality
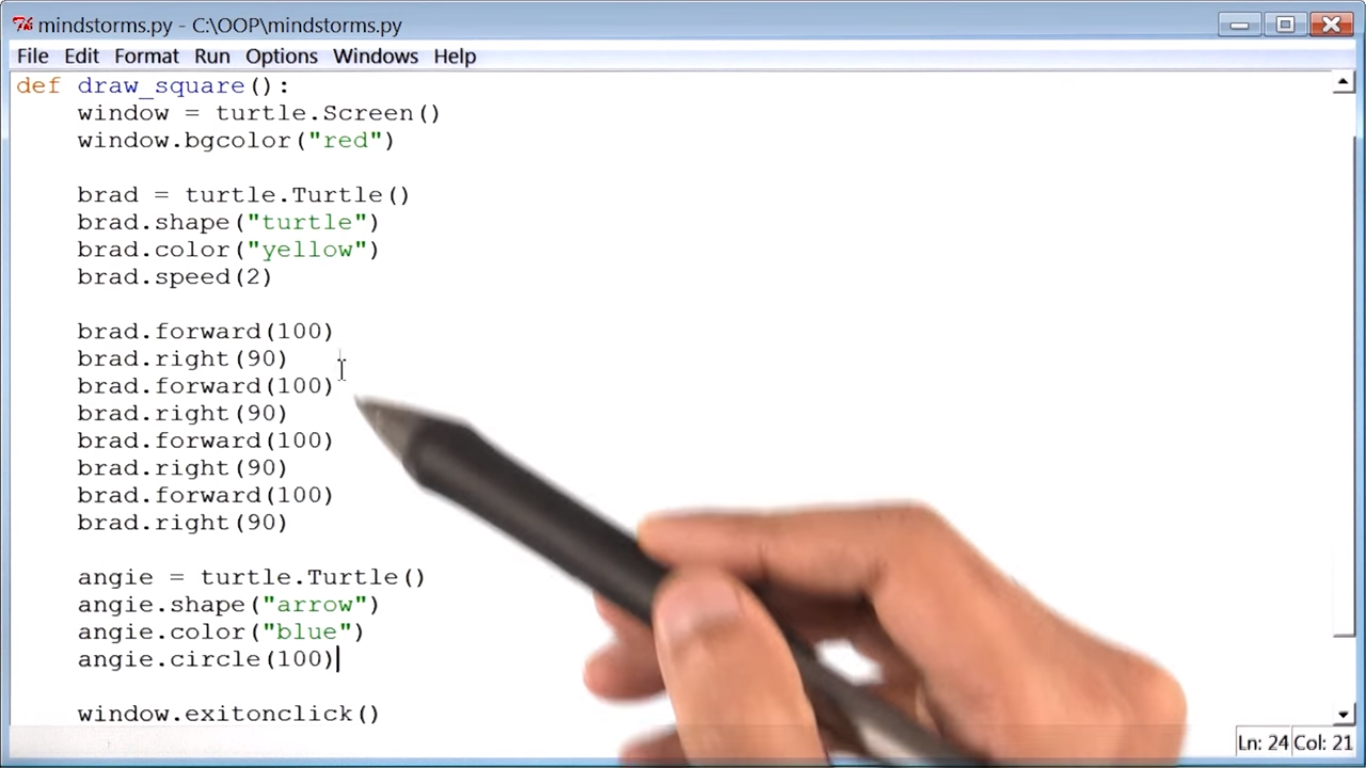 pf33.png-456.8kB
这段代码是不好的
- 里面没有用loop来画squre
- function的名字是
draw_square(),但是第二个图用angie.curcle()画了个圆,没有逻辑性。
修改版
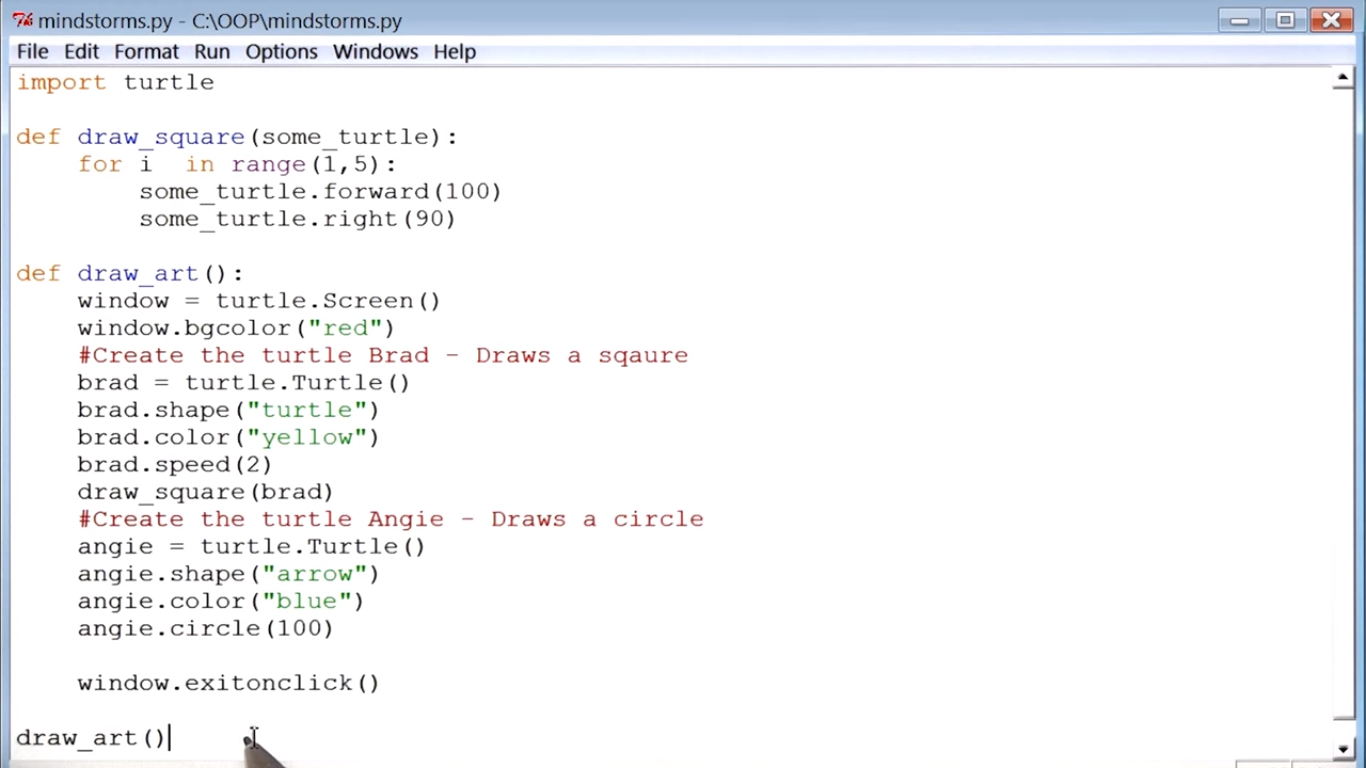 pf34.png-309.9kB
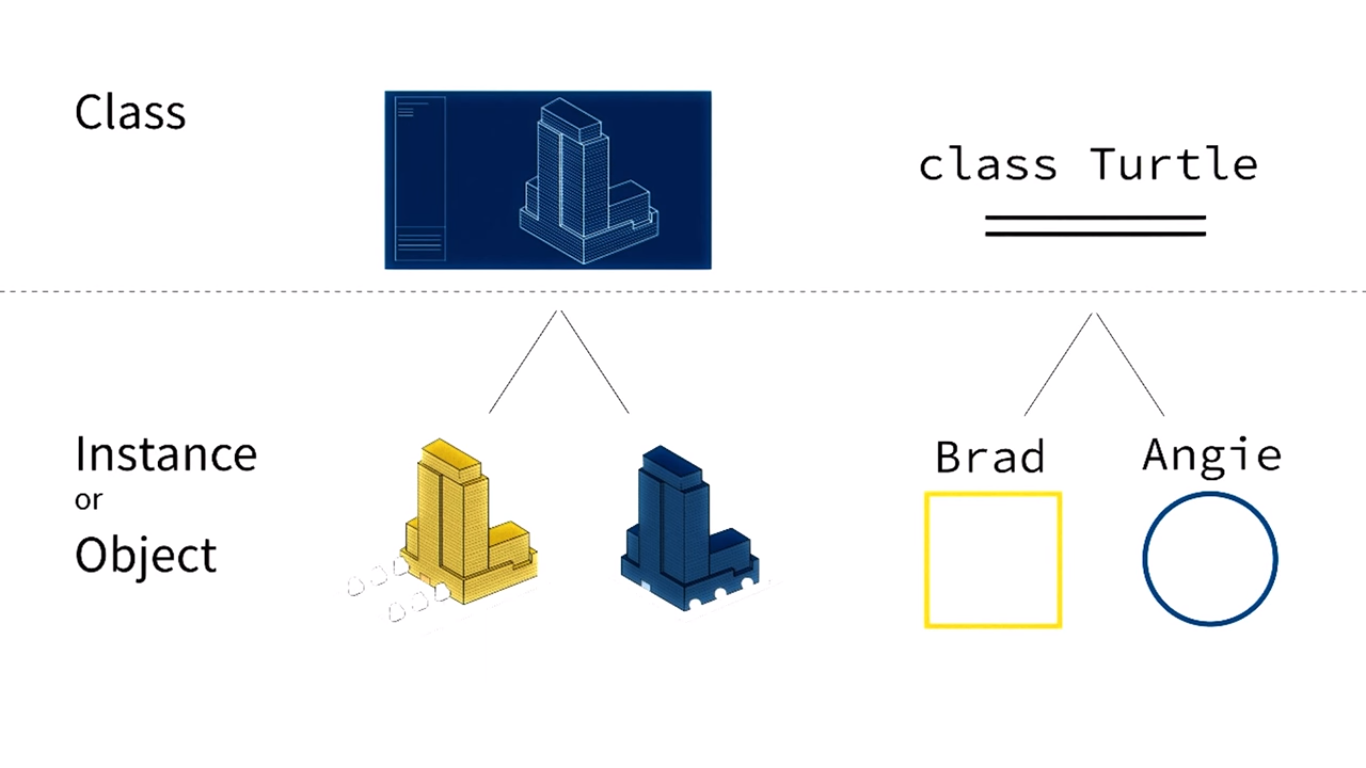
2.4.6 What Is a Class?
In summation, you can think a class as a blueprint, its objects as example or instances of that blueprint
 pf35.png-212.6kB
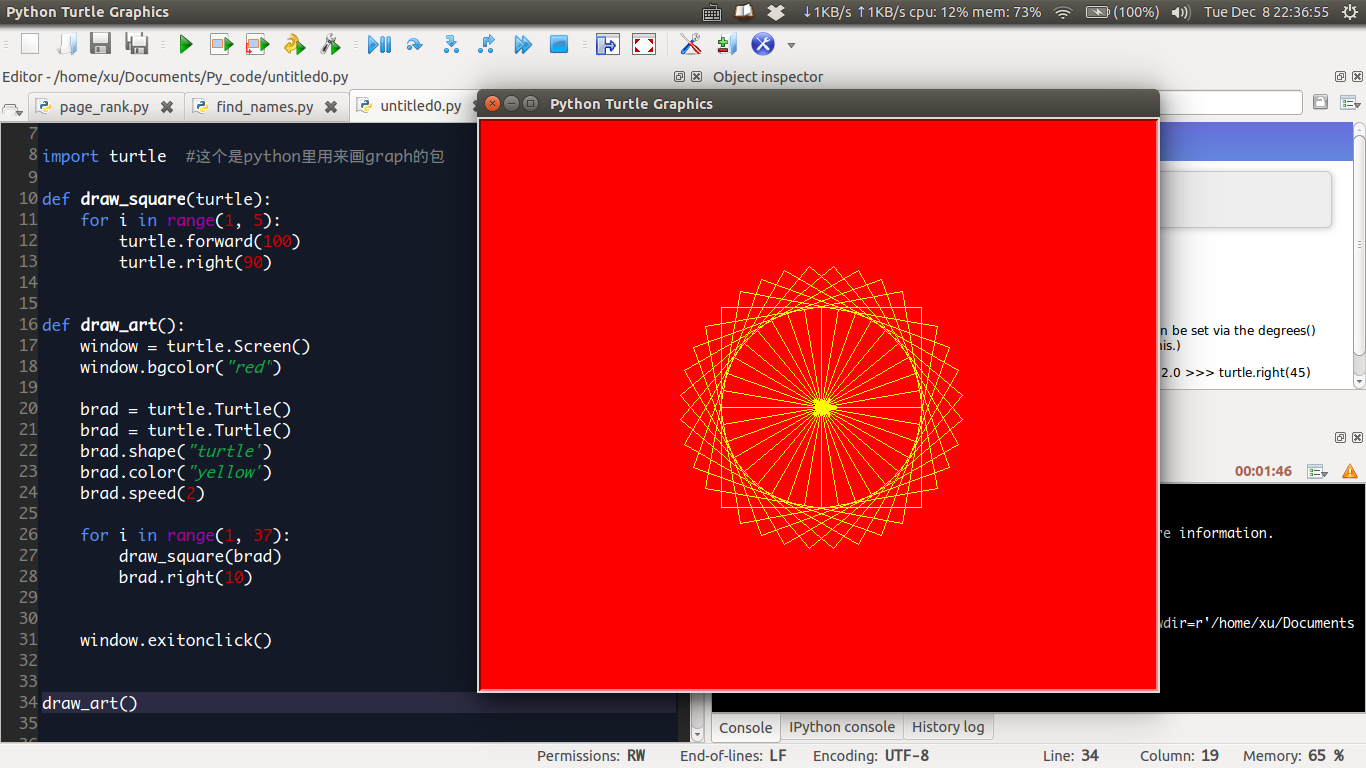
2.4.7 Making a Circle out of Squares
import turtle  #这个是python里用来画graph的包

def draw_square(turtle):
    for i in range(1, 5):
        turtle.forward(100)
        turtle.right(90)

def draw_art():
    window = turtle.Screen()
    window.bgcolor("red")

    brad = turtle.Turtle()
    brad = turtle.Turtle()
    brad.shape("turtle")
    brad.color("yellow")
    brad.speed(2)

    for i in range(1, 37):
        draw_square(brad)
        brad.right(10)

    window.exitonclick()

draw_art()
效果图
 pf36.png-178.5kB
2.4.8 They Look So Similar(function and class)
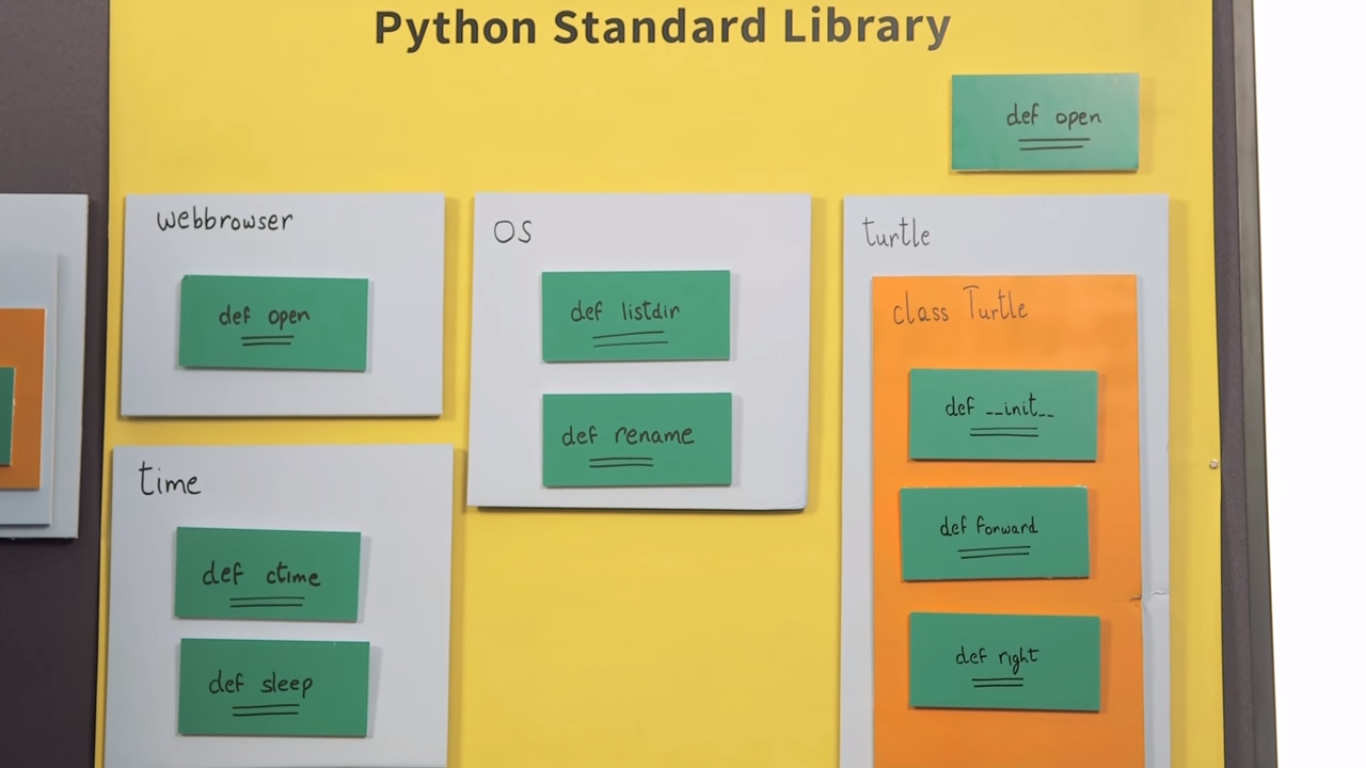
当我们在call webbwroser.open()时,没什么大不了的,只是在call a function.
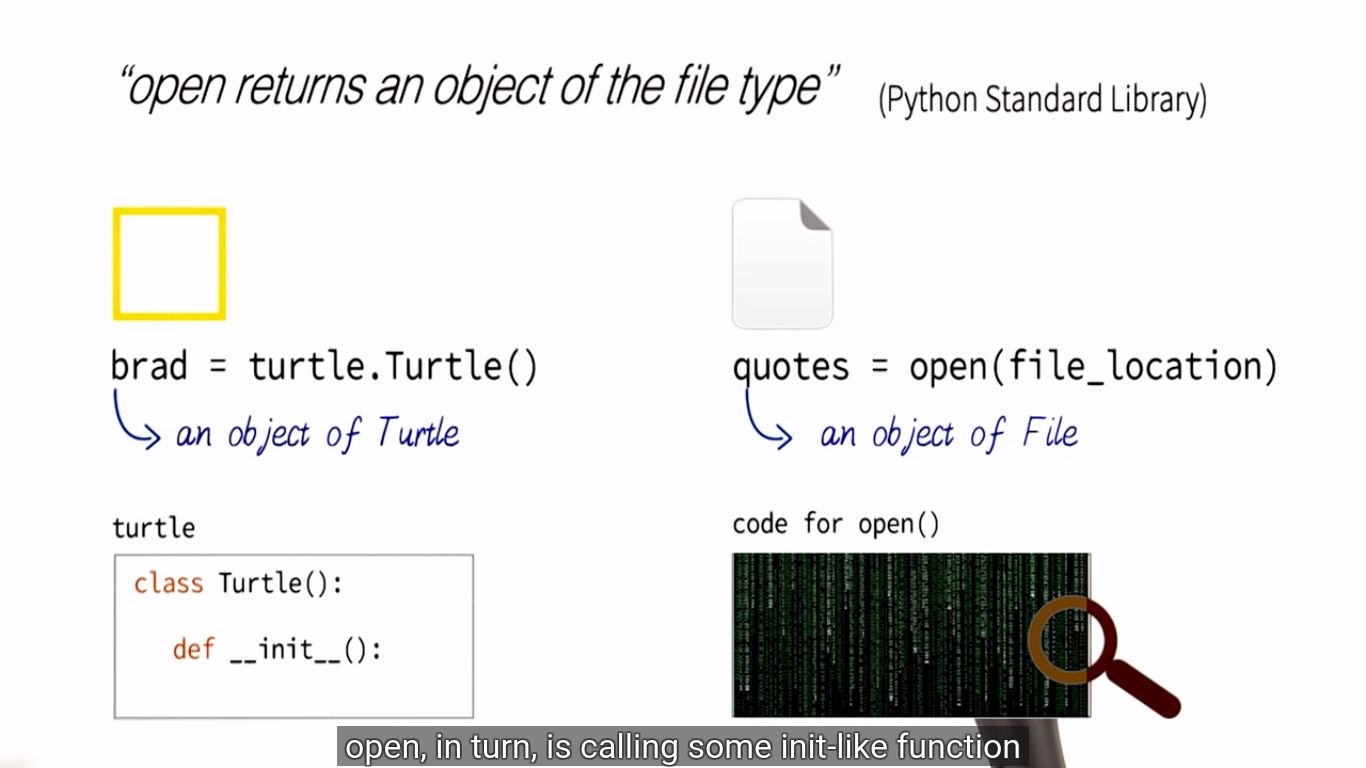
但是党我们在call turtle.Turtle()时,it in turn called the __init_() function, which create or initialized space in memory that didn't exist before.
 pf38.png-537kB
2.2 Lesson 2b(Using Classes): Send Text
2.2.1 Twilio
Our goal is using code to send a message to your phone.
要实现这一功能,需要一个python 标准库以外的一个lib,叫Twilio。只不过这个库并不支持日本的短信服务。
这个页面是Udacity教怎么Download Twilio.
2.2.2 Setting Up Our Code
from twilio.rest import TwilioRestClient

# Your Account Sid and Auth Token from twilio.com/user/account
account_sid = "AC32a3c49700934481addd5ce1659f04d2"
auth_token  = "{{ auth_token }}"
client = TwilioRestClient(account_sid, auth_token)

message = client.messages.create(body="Jenny please?! I love you <3",
    to="+14159352345",    # Replace with your phone number
    from_="+14158141829") # Replace with your Twilio number
print message.sid
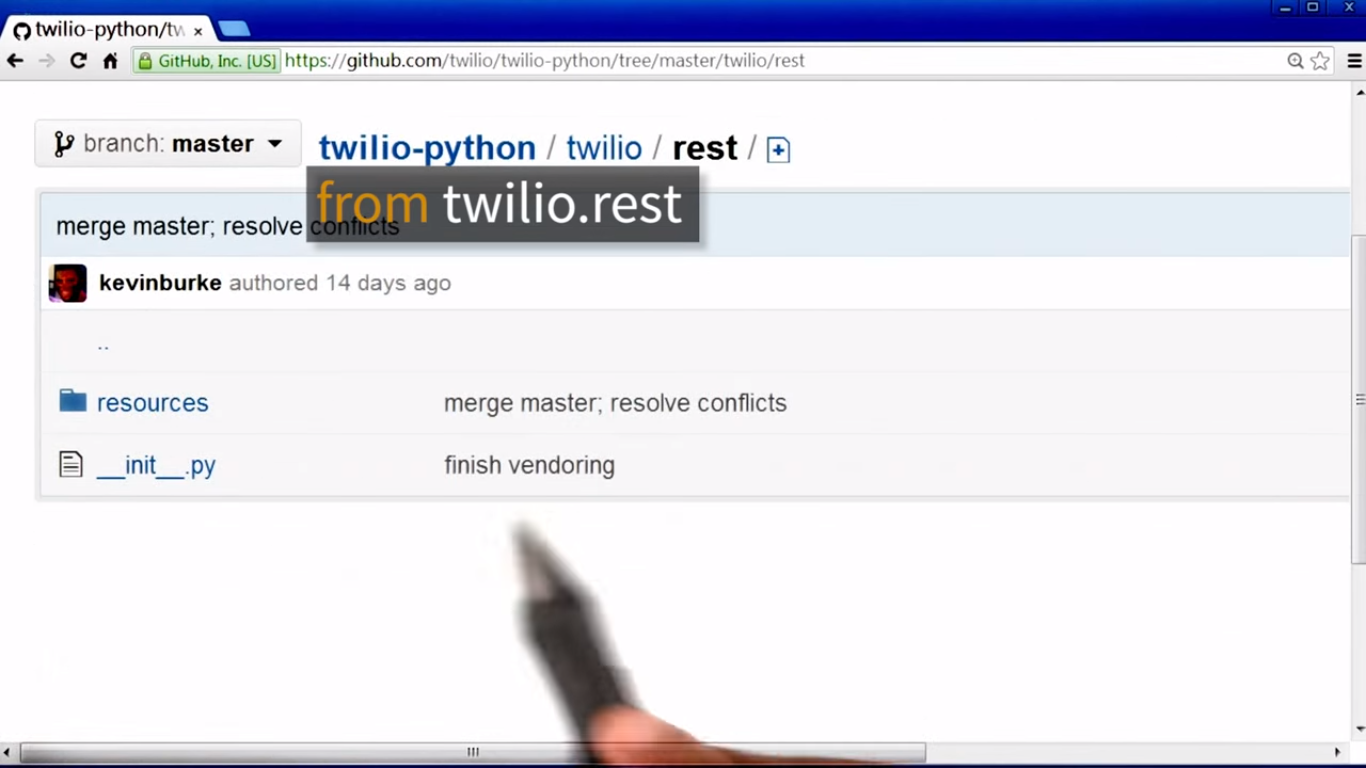
2.2.3 Python Keyword From
在twilio这个floder下,有rest这个floder,在rest这个folder中有__init__.py这个文件,在init.py中有TwilioRestClient这个class。
 pf39.png-298.3kB
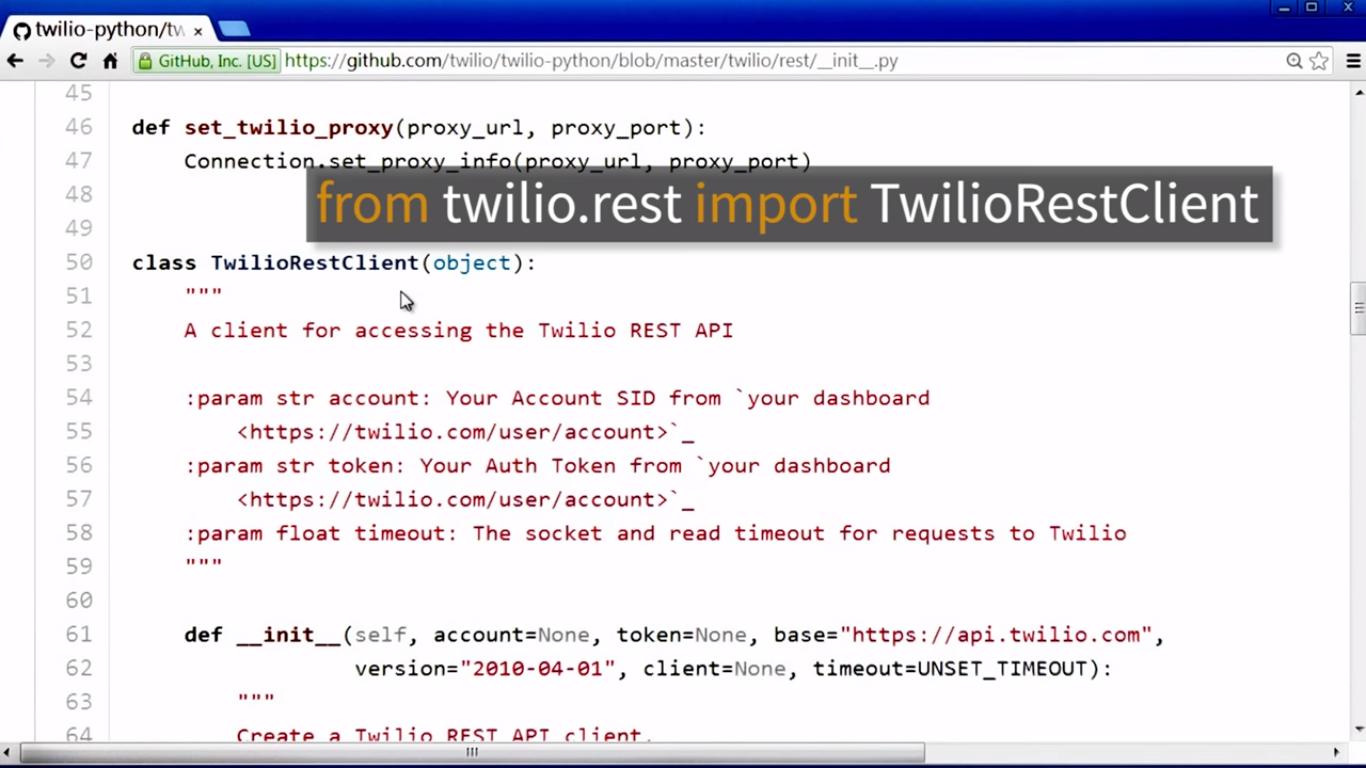 pf40.png-484.7kB
case 1:
from twilio.rest import TwilioRestClient

client = TwilioRestClient(account_sid, auth_token)
case 2:
from twilio import rest

client = rest.TwilioRestClient(account_sid, auth_token)
2.2.4 Where Does Twilio Come From?
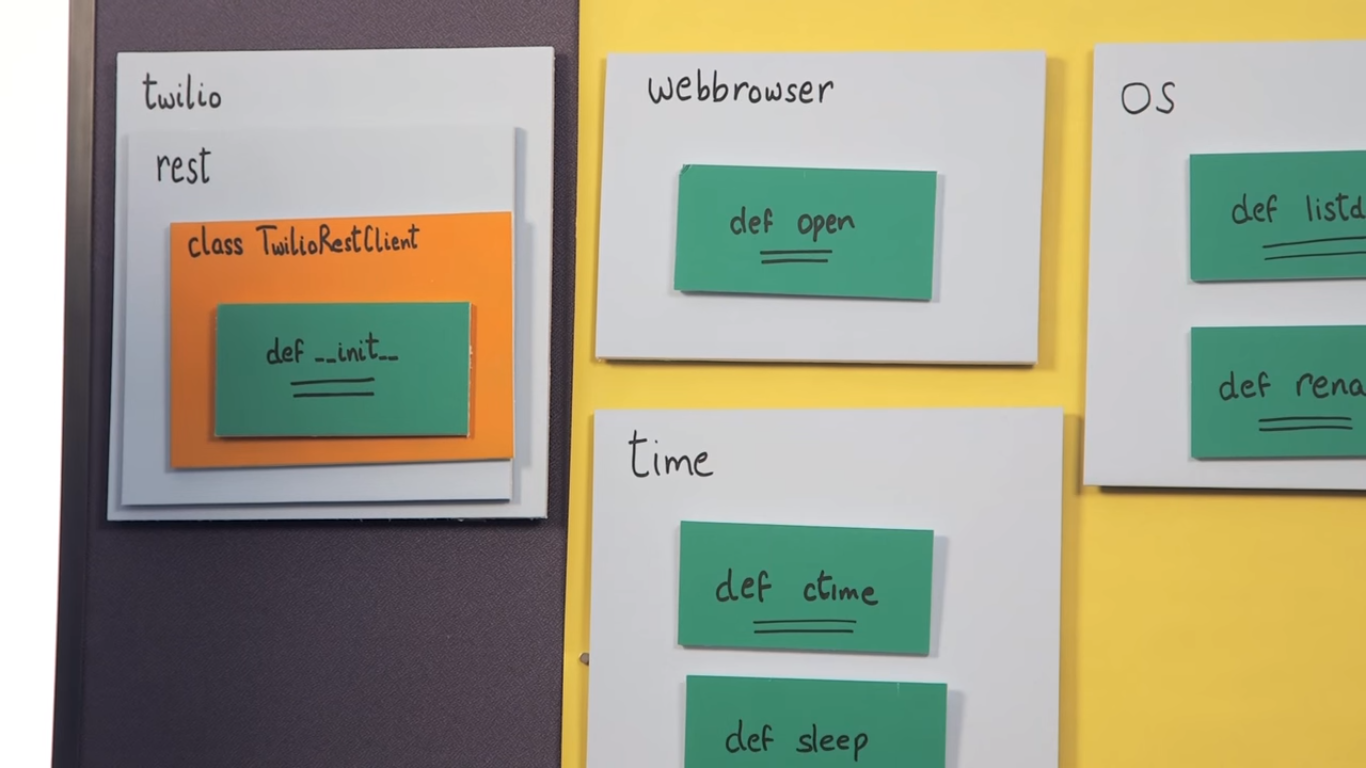 pf41.png-528.7kB
we use the rest.TwilioRestClient to create a instace, and call this instace client. we could do something to this instance, like send SMSes, etc. 其实我们是用TwilioRestClient这个class中的__init__()来creat sapce,创建新的instance叫clent.
 pf42.png-526.1kB
2.2.5 Connecting Turtle and Twilio
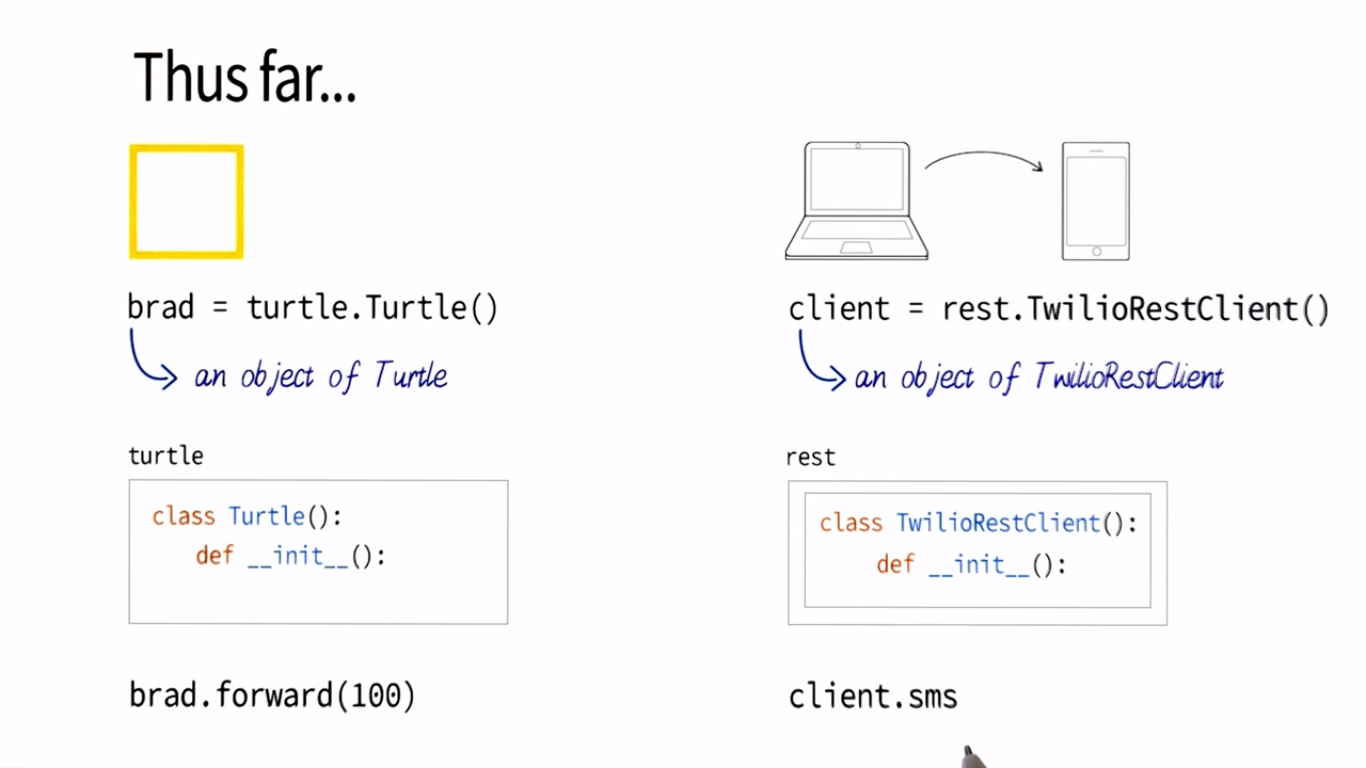 pf43.png-193.1kB
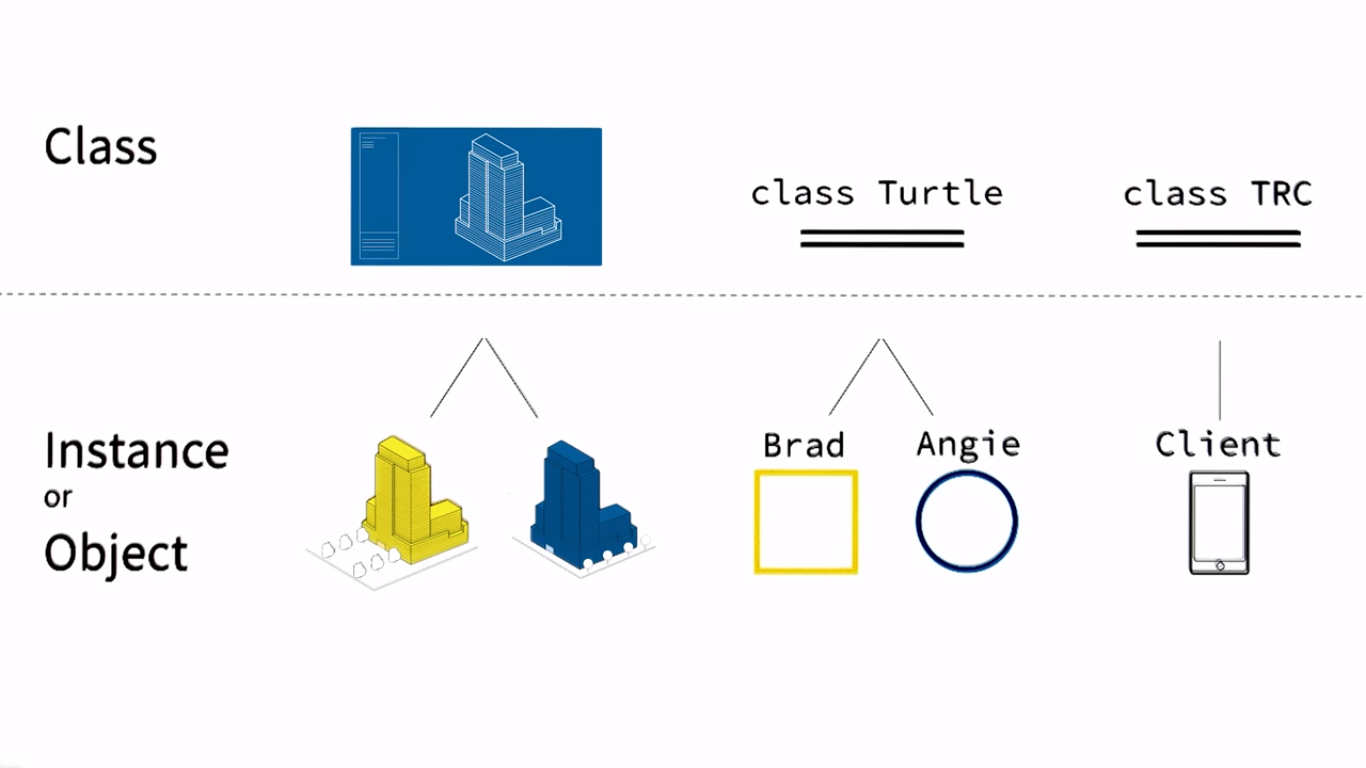 pf44.png-202.4kB
2.3 Lesson 2c(Using Classes): Profanity Editor
通过一个program来检测document里是否有curse word
2.3.1 Planning Profanity Editor
one way to do
 pf45.png-407.2kB
2.3.2 Reading from a File
the movie_quotes.txt file:
-- Houston, we have a problem. (Apollo 13)

-- Mama always said, life is like a box of chocolates. You never know what you are going to get. (Forrest Gump)

-- You cant handle the truth. (A Few Good Men)

-- I believe everything and I believe nothing. (A Shot in the Dark)
read code
def read_text():
    quotes = open("/home/xu/Desktop/movie_quotes.txt")
    contents_of_file = quotes.read()
    print(contents_of_file)
    quotes.close()

read_text()
执行后就能得到movie_quotes.txt中的文本
但是其中的open()是从哪里来的呢?
2.3.3 Where Does Open Come From?
使用open()时不用import任何东西,因为open() is used so commenly, so it always avilable. These functions are called built-in funcitons
 pf46.png-421.4kB
2.3.4 Connecting Turtle and Open
 pf47.png-337.7kB
2.3.5 Checking for Curse Words
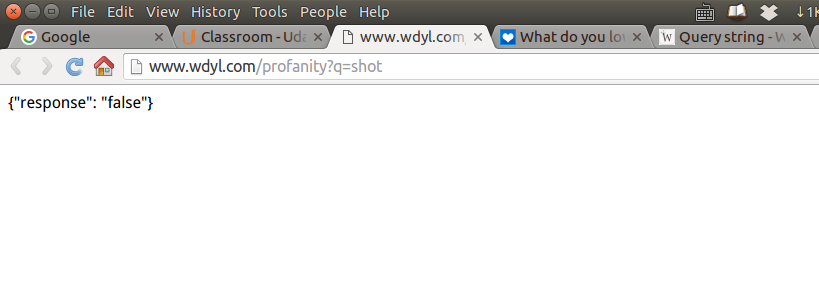
这个google 提供的网站可以检测是否是curse words。而我们可以利用这个网站来帮我们检测,不用自己准备语料库对比。
如果把url中的shot改为shit,返回就会时true.
 pf48.png-29.1kB
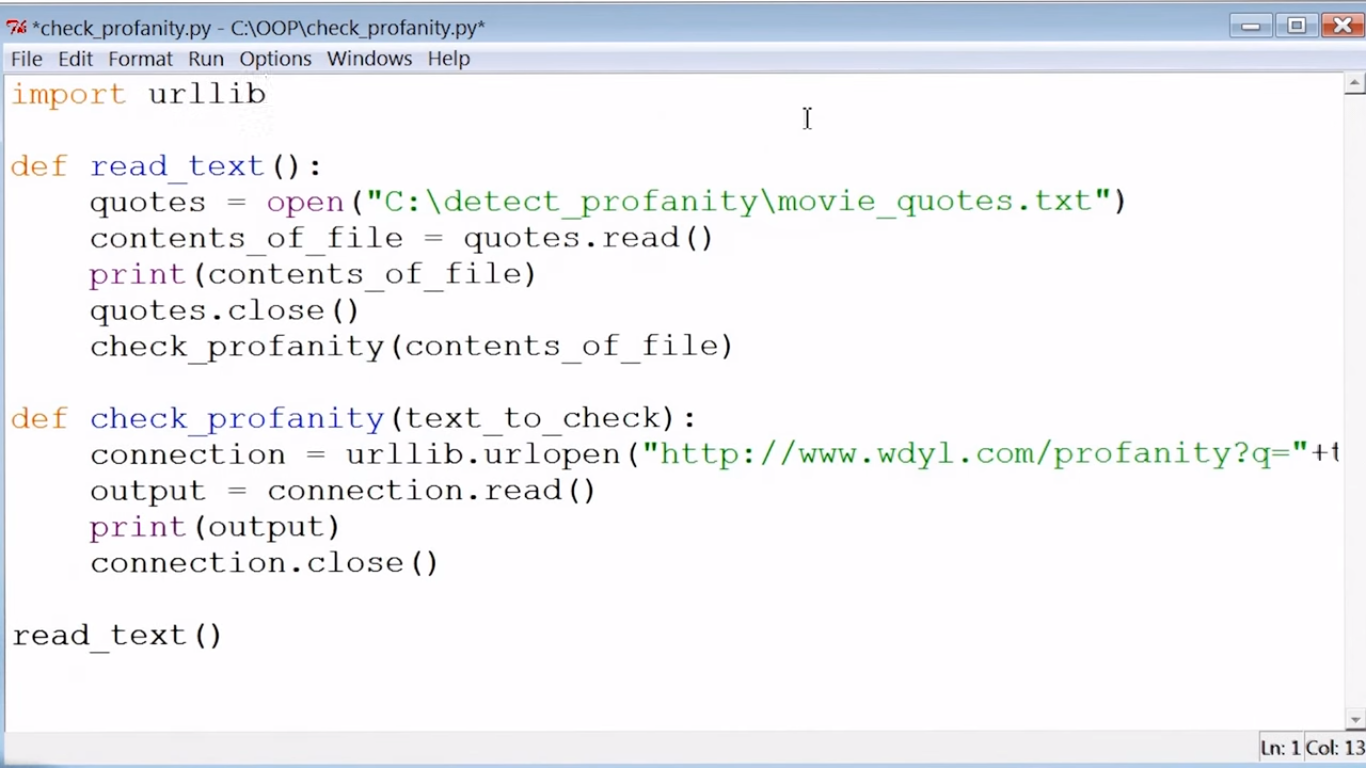
2.3.6 Accessing a Website with Code
connection = urllib.urlopen("http://www.wdyl.com/profanity?q=" + text_to_check) # 把文本传给url
 pf49.png-397.2kB
如果文本里有curse words,返回true.
 pf50.png-394.5kB
2.3.7 Place Urllib and Urlopen
 pf51.png-402.5kB
2.3.8 Printing a Better Output
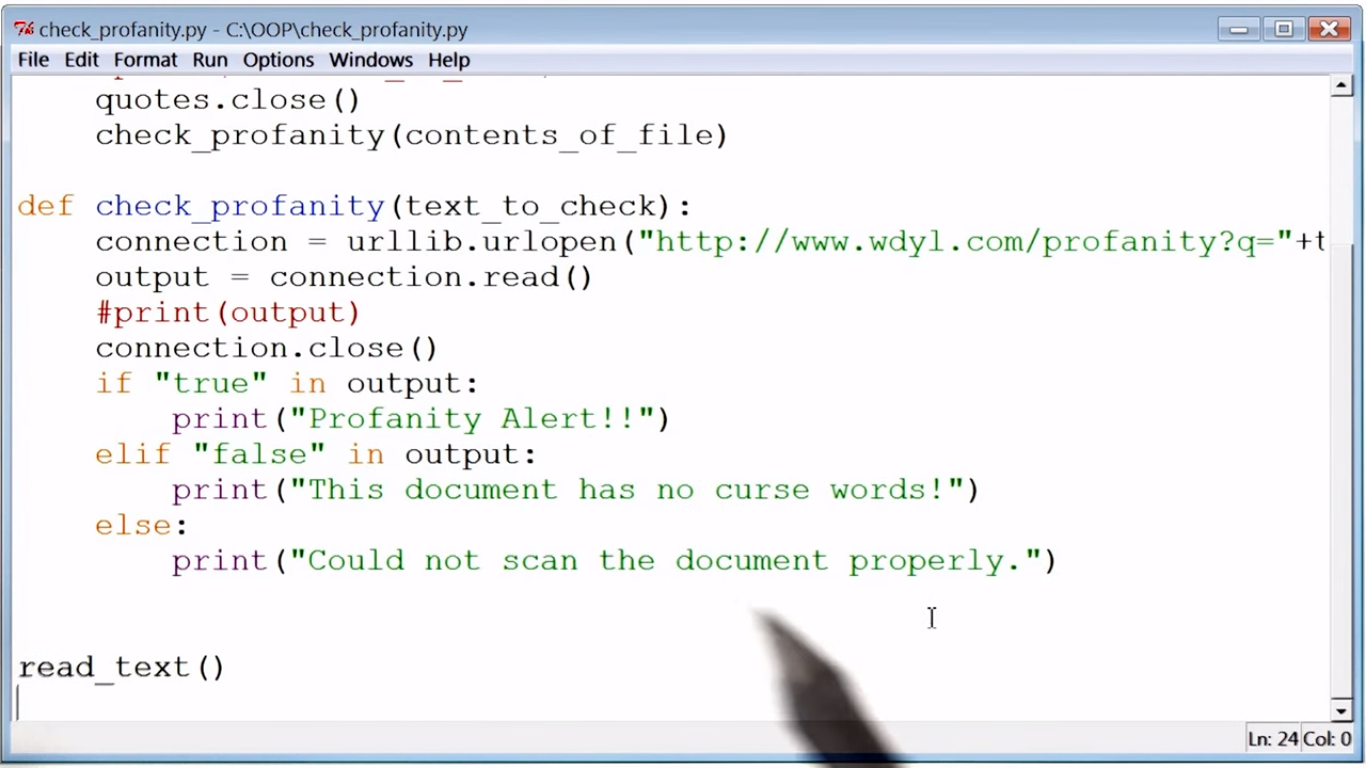 pf52.png-457.7kB
2.3.9 Connecting Turtle, Open, and Urllib
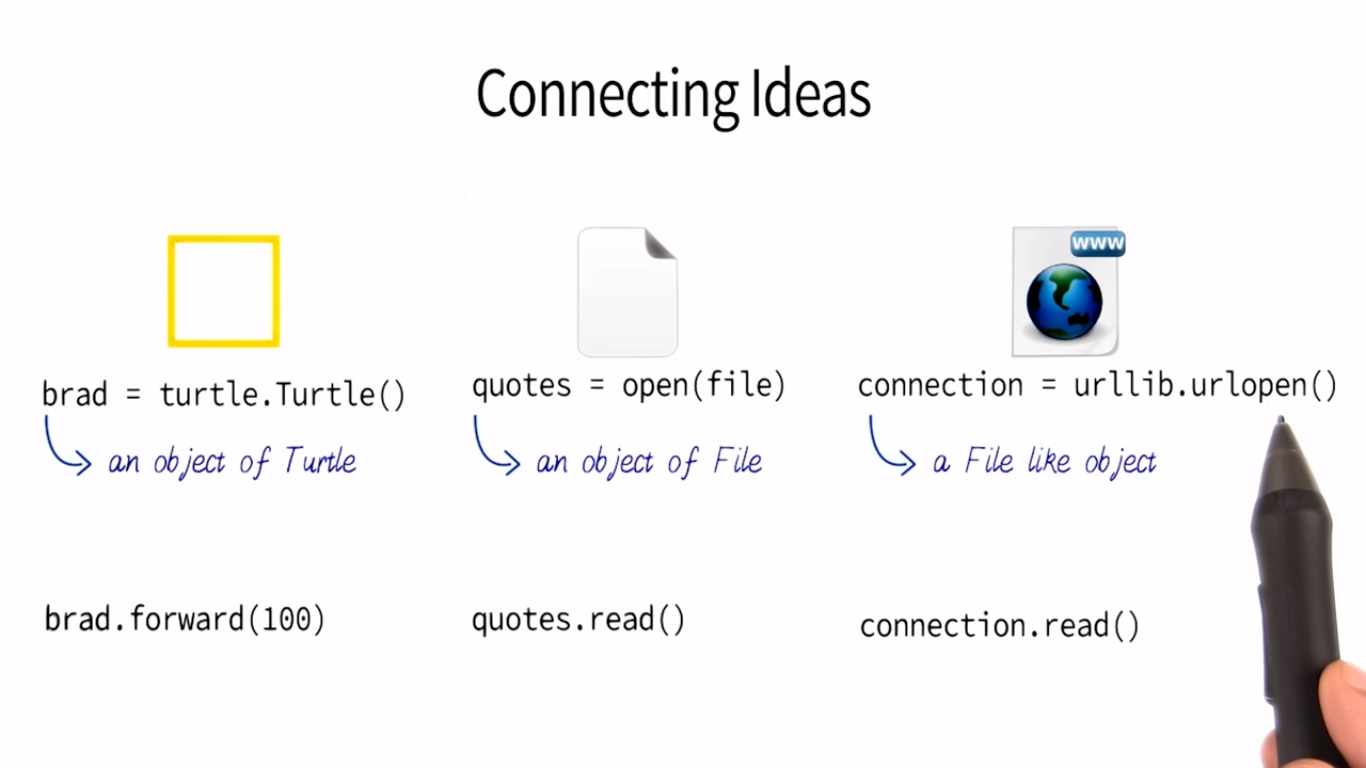 pf53.png-229.4kB
Lesson 3: Making Classes
3.1 Lesson 3a(Making Classes): Movie Website
我们的goal是建一个下面一样的Movie Website,收集你喜欢的movie。点击图片后,会播放trailer。
 pf54.png-535kB
3.1.1 What Should Class Movie Remember?
class movie 和我们之间创建的几个class是同一种类型.下图是class design:
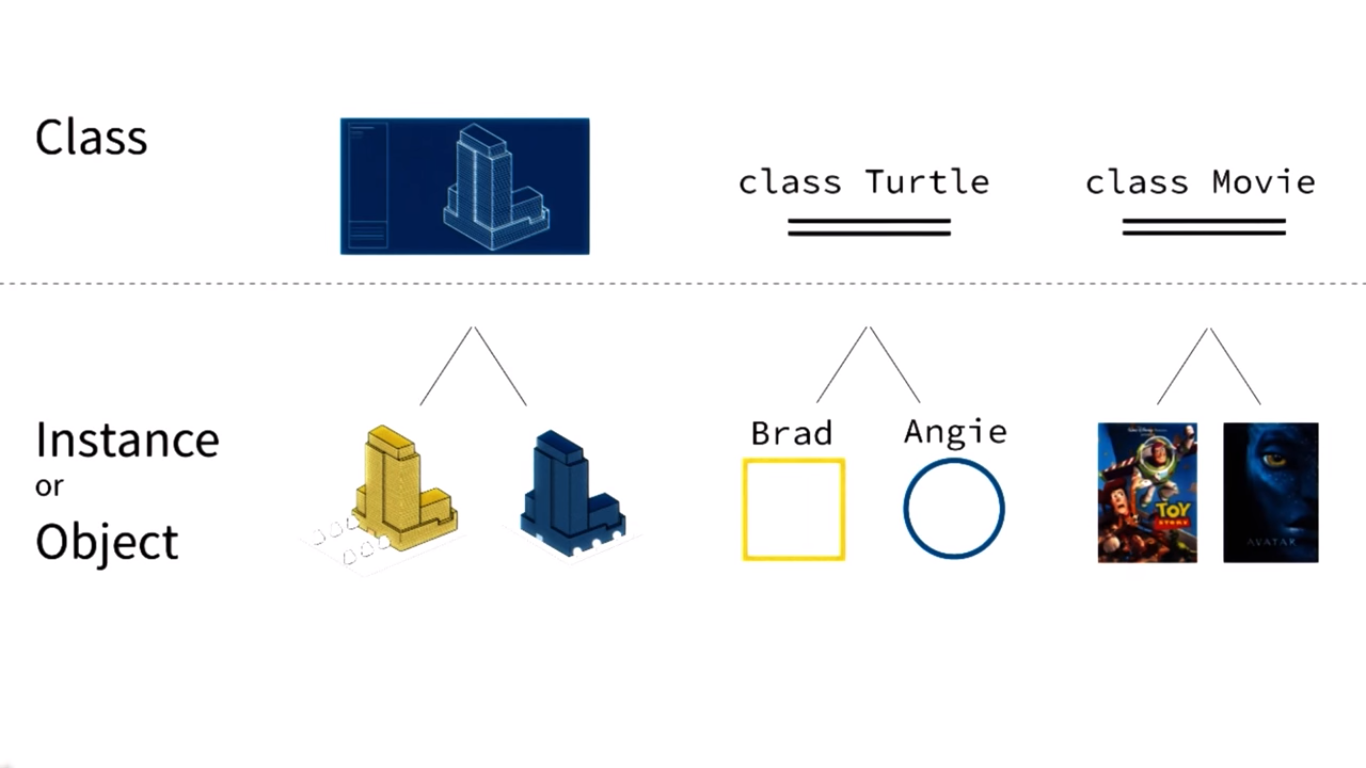 pf55.png-206kB
那么,在class movie中,我们想让它记住关于电影的哪些信息呢?
 pf56.png-236.6kB
可以实现的functions,举例
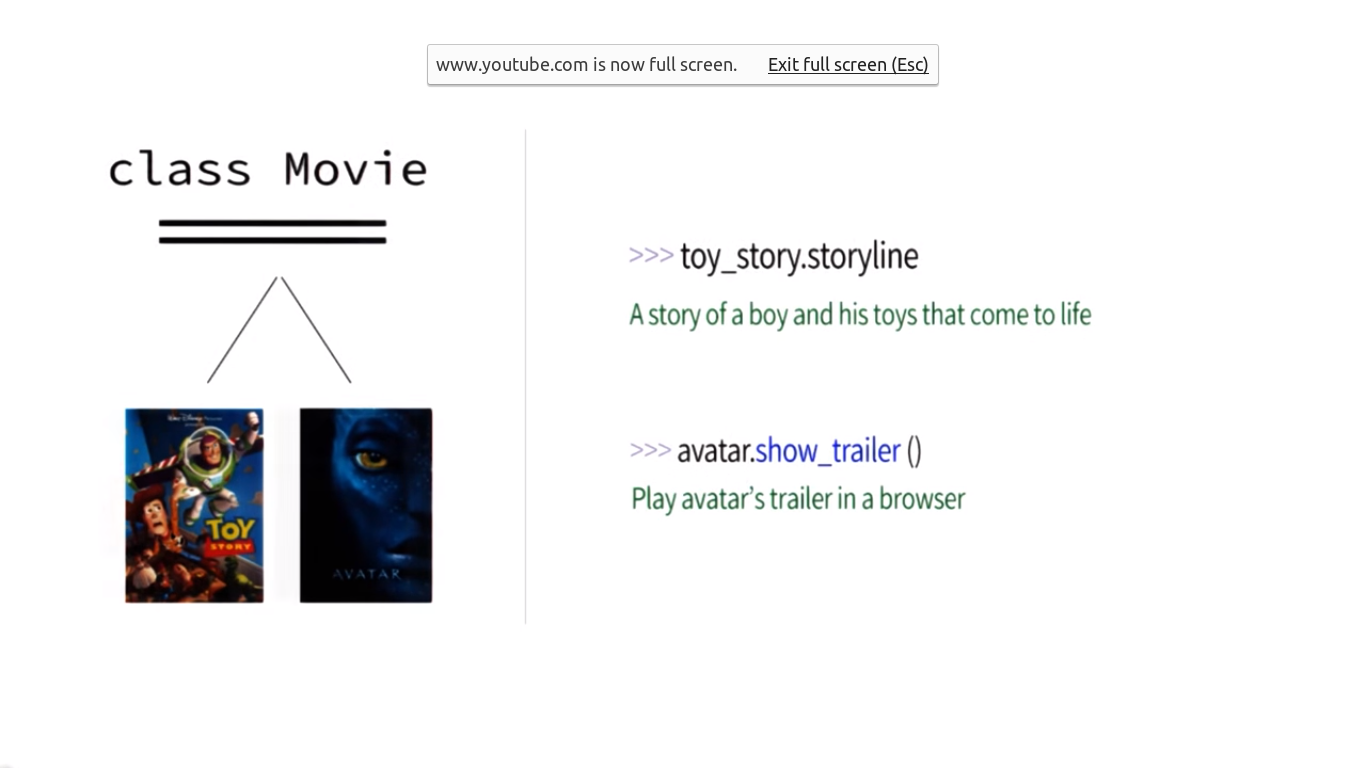 pf57.png-190kB
想让class movie实现的functions:
除了记住一些数据外,还想让class movie实现播放trailer的功能。
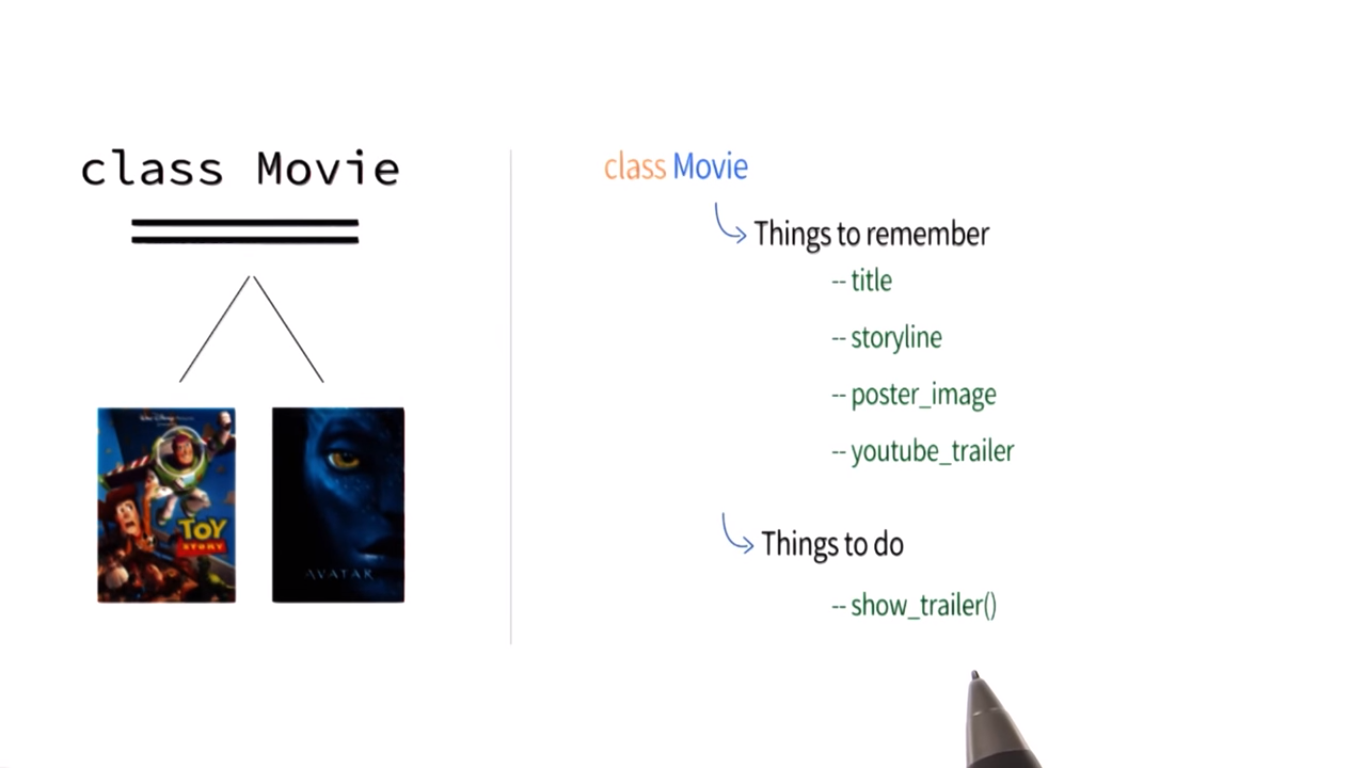 pf58.png-178.9kB
3.1.2 Defining Class Movie
Google Python Style Guide这个是google写的关于python代码规范的文档。里面提到了怎么命名(naming)。关于classname, the first character should be upper case. So we use class Movie rather than class movie
我们在同一个folder movie下创建了两个.py文件,一个是media.py,另一个是entertainment_center.py. 规范的用法,在一个文件里定义class,在另一个文件里通过import这个class来使用它。
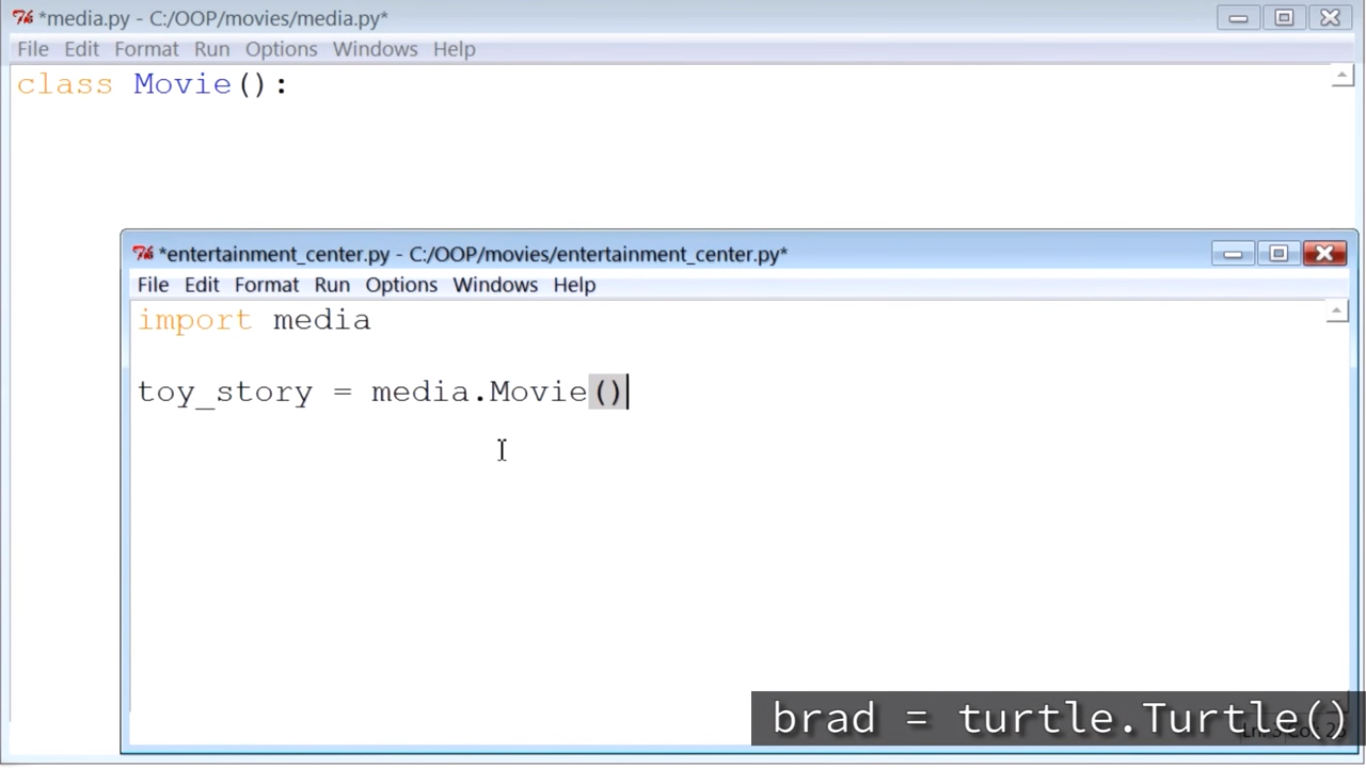 pf59.png-215kB
现在我们想要搞清楚的是,执行toy_story = media.Movie()时到底发生了什么。这个和我们之前用的brad = turtle.Turtle()一样。虽然之前提到过,但这次我们要理清楚。
3.1.3 Where Does Class Movie Fit?
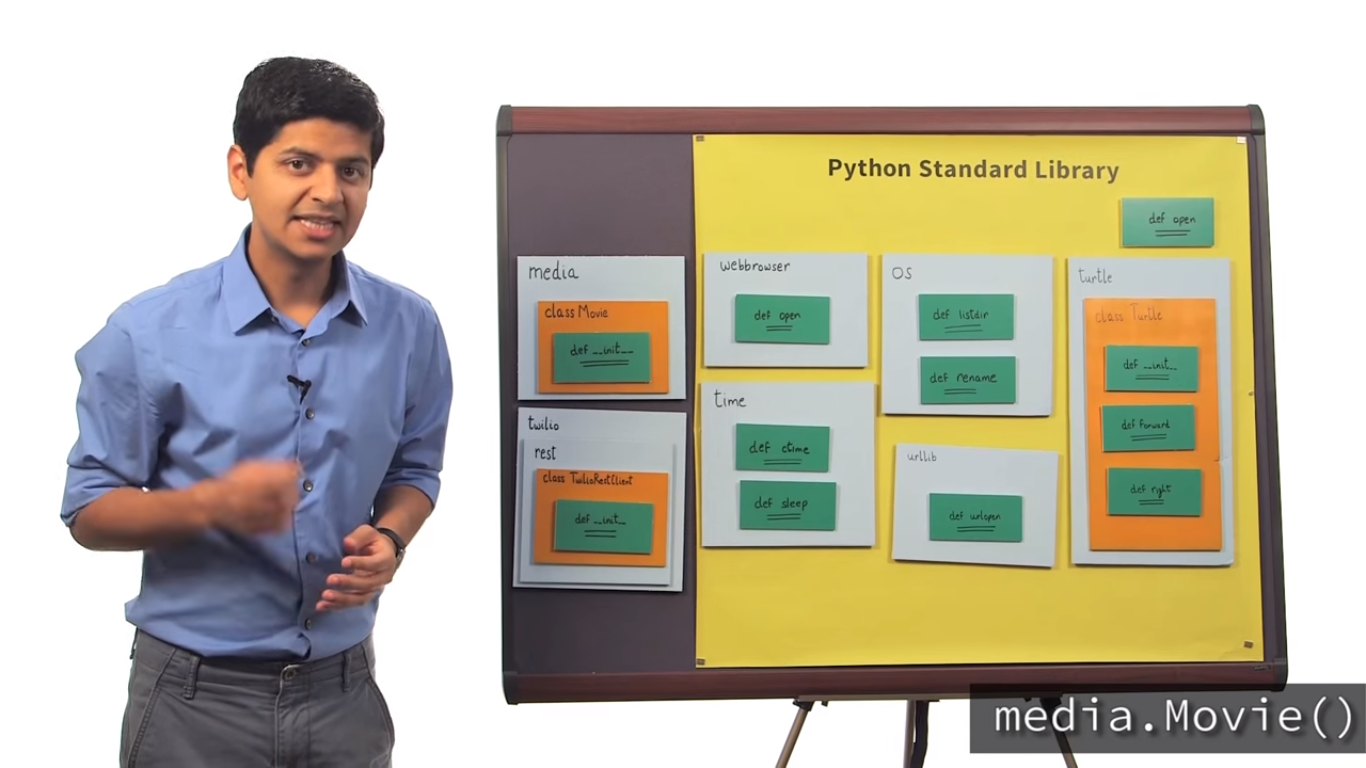 pf60.png-550.4kB
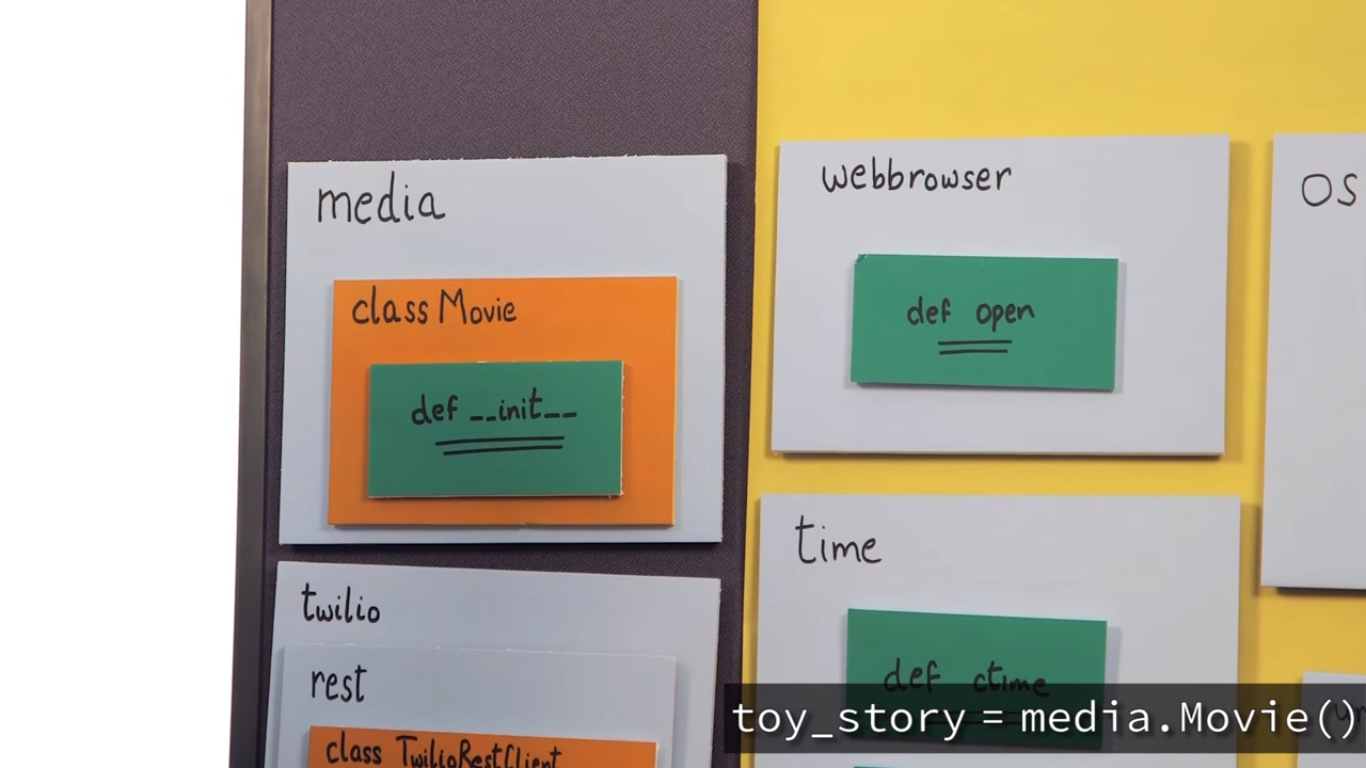
call toy_story = media.Movie() 的时候,我们创建了一个instance,叫toy_story, class Media里的__init__()叫做constructor,因为它construc the new space and memry for the new instance.
 pf61.png-531.7kB
要分清这几个名词
 pf62.png-520.7kB
3.1.4 Defining __init__
要注意__init__() 中的underscore。 These underscores are a way for Python to tell us, the name init, is essentially reserved in Python, and that, this is a special function or method. What's special about init? Is that, it initializes or creates space in memory.
 pf63.png-306.3kB
 pf64.png-237.1kB
 pf65.png-271kB
为了实现右上角几个要初始化的值,我们要somehow someway 去初始化图中的代码。
we want init, to initialize pieces of information like title, story line, and others that we want to remember inside our class. Here's a way to do that. self.title, self.storyline, self.poster_image_url and self.trailer_youtube_url . Now, we have to somehow initialize these variables, with information init is going to receive. And in particular, it's going to receive, four pieces of information.
 pf66.png-221.6kB
在__init__()的括号里,直接导入参数,把这些参数赋给self.xxxx就完成了初始化。
 pf67.png-247.8kB
media.py里的内容:
class Movie():
    def __init__(self, movie_title, movie_storyline, poster_image,
                 trailer_youtube):
        self.title = movie_title
        self.storyline = movie_storyline
        self.poster_image_url = poster_image
        self.trailer_youtube_url = trailer_youtube
但我们在entertainment_center.py中运行
import media

toy_story = media.Movie()
会得到错误,因为没有导入参数。所以要在加上参数才行。
import media

toy_story = media.Movie("Toy Story",
                        "A story of a boy and his toys that come to life",
                        "http://upload.wikimedia.org/wikipedia/en/1/13/Toy_Story.jpg",
                        "https://www.youtube.com/watch?v=vwyZH85NQC4")

print (toy_story.storyline)
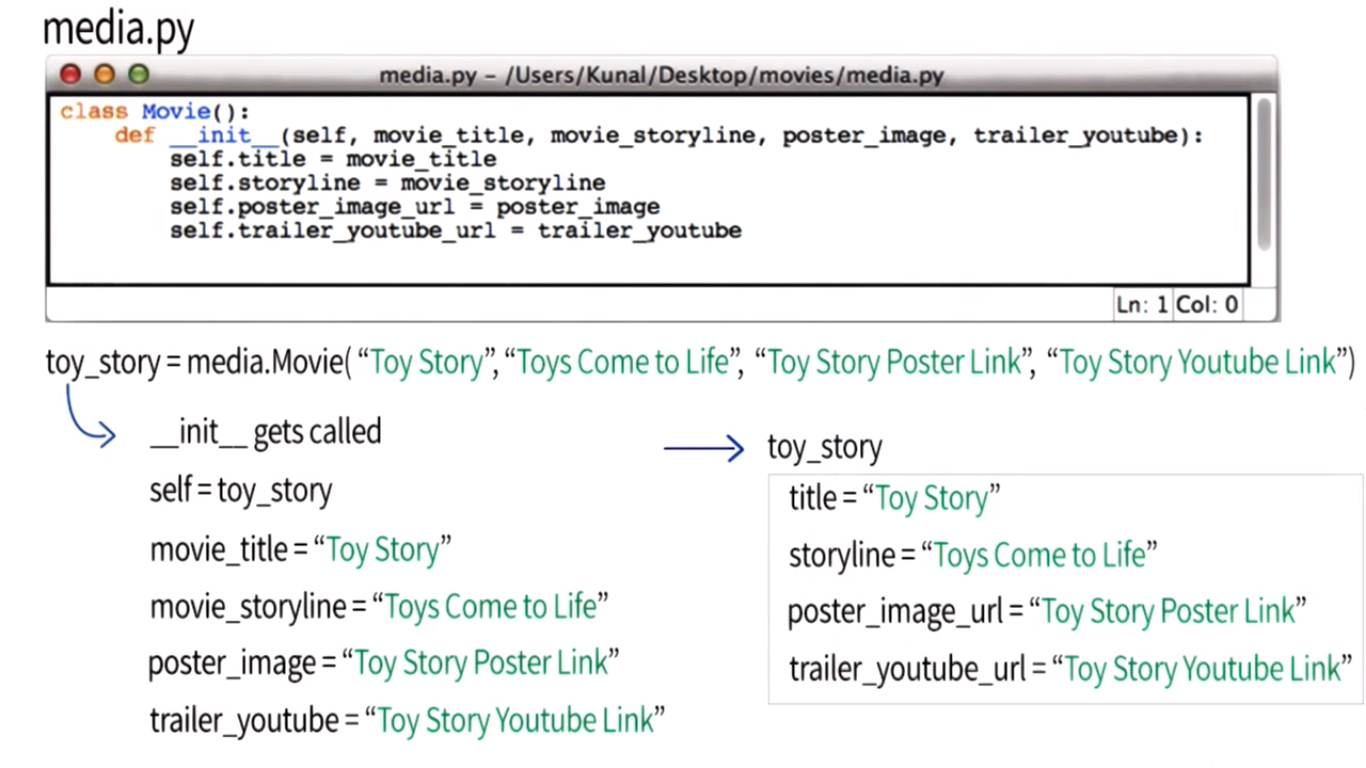
3.1.5 What Is Going On Behind the Scenes
 pf68.png-472.4kB
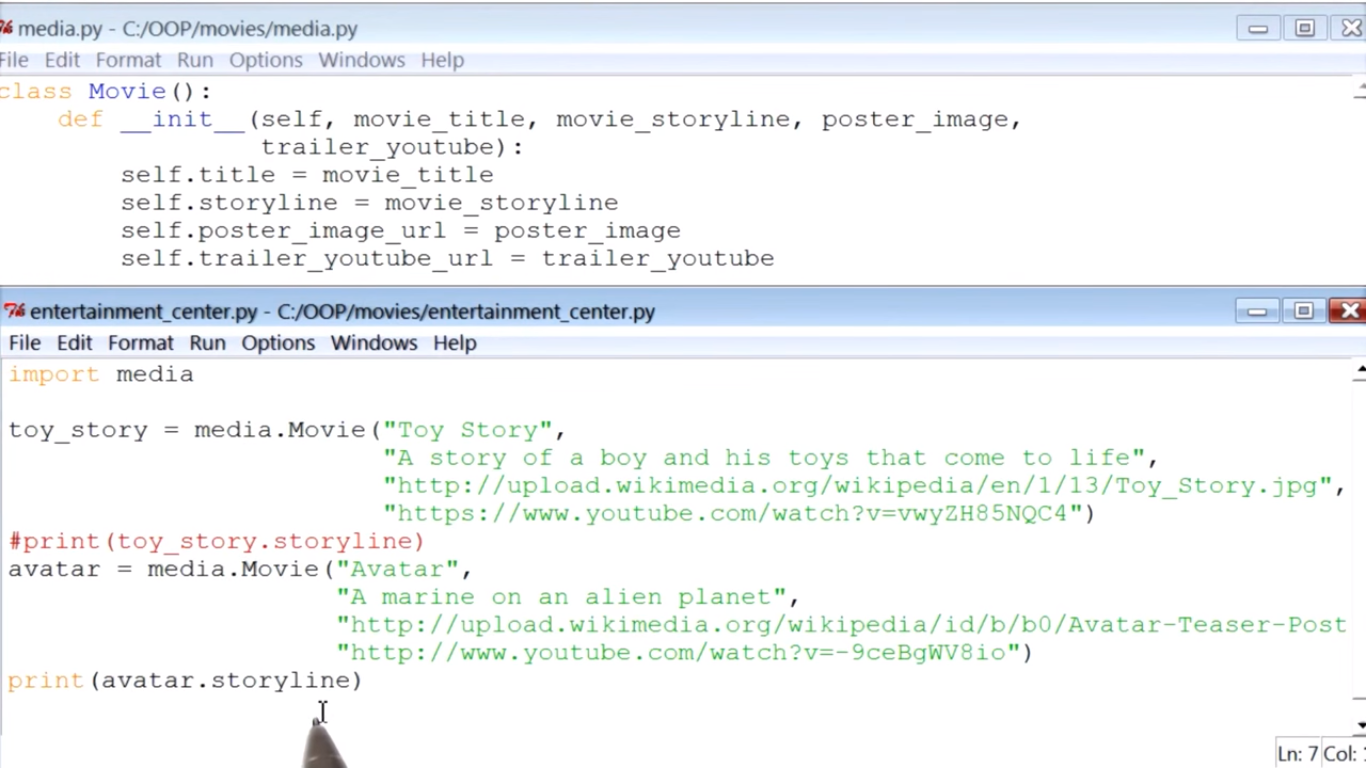
3.1.5 the Avatar
我们再添加一部电影——Avatar
 pf69.png-473.1kB
3.1.6 Behind the Scenes
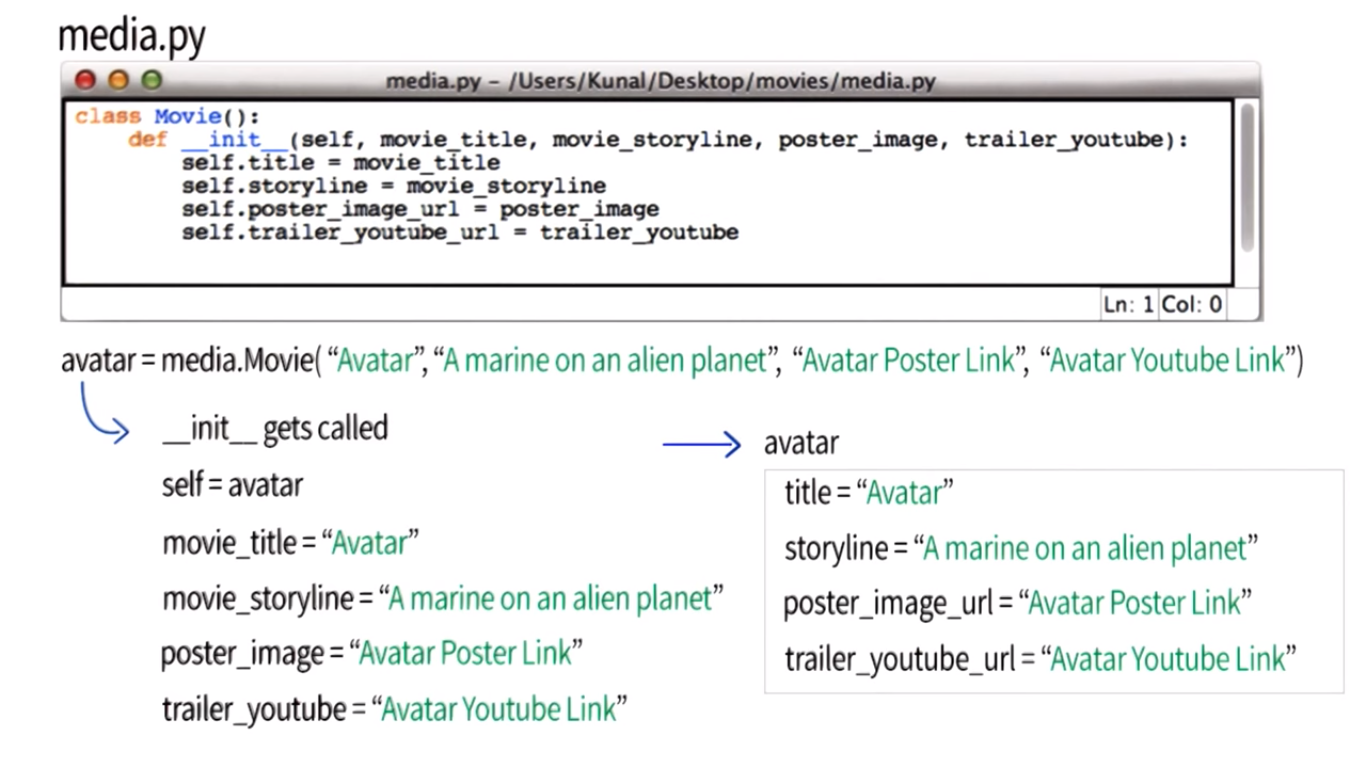
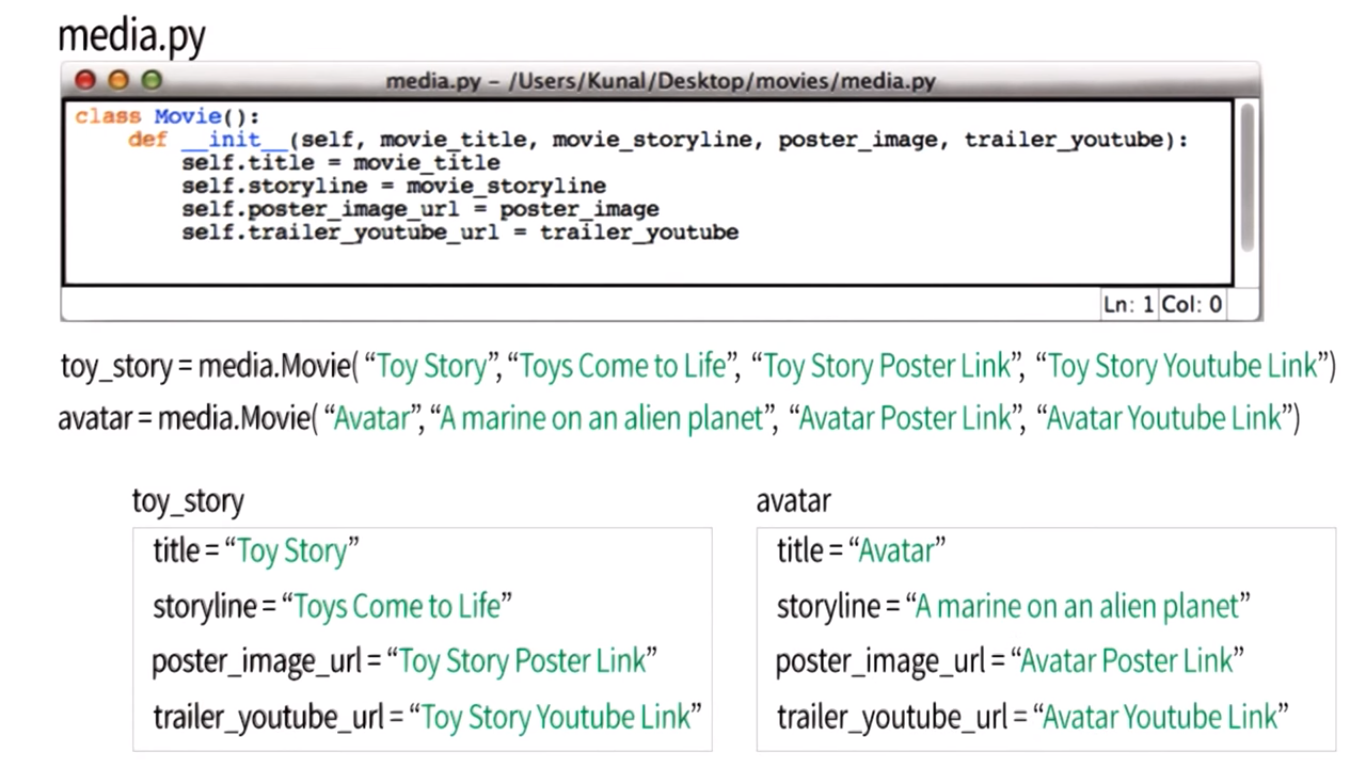
Avatar 的示意图。Now, once init gets called and all of these four arguments receive their appropriate values, all of the variables that are associated with the instance avatar, they get initialized appropriately.
 pf71.png-447kB
Here is our class Movie. And after defining the class Movie, I created two of its instances, toy_story and avatar. I could have created more instances, but for now, I've just created these two.
Now, when I created these two instances, what I was really doing behind the scenes, is I was setting aside space for each instance. And within that space, each instance had their own copy of variables. These variables include title, storyline, poster_image_url and trailer_youtube_url.
Now, because these variables are unique to each instance of class movie, these variables are called instance variables.
 pf72.png-489kB
 pf73.png-531.7kB
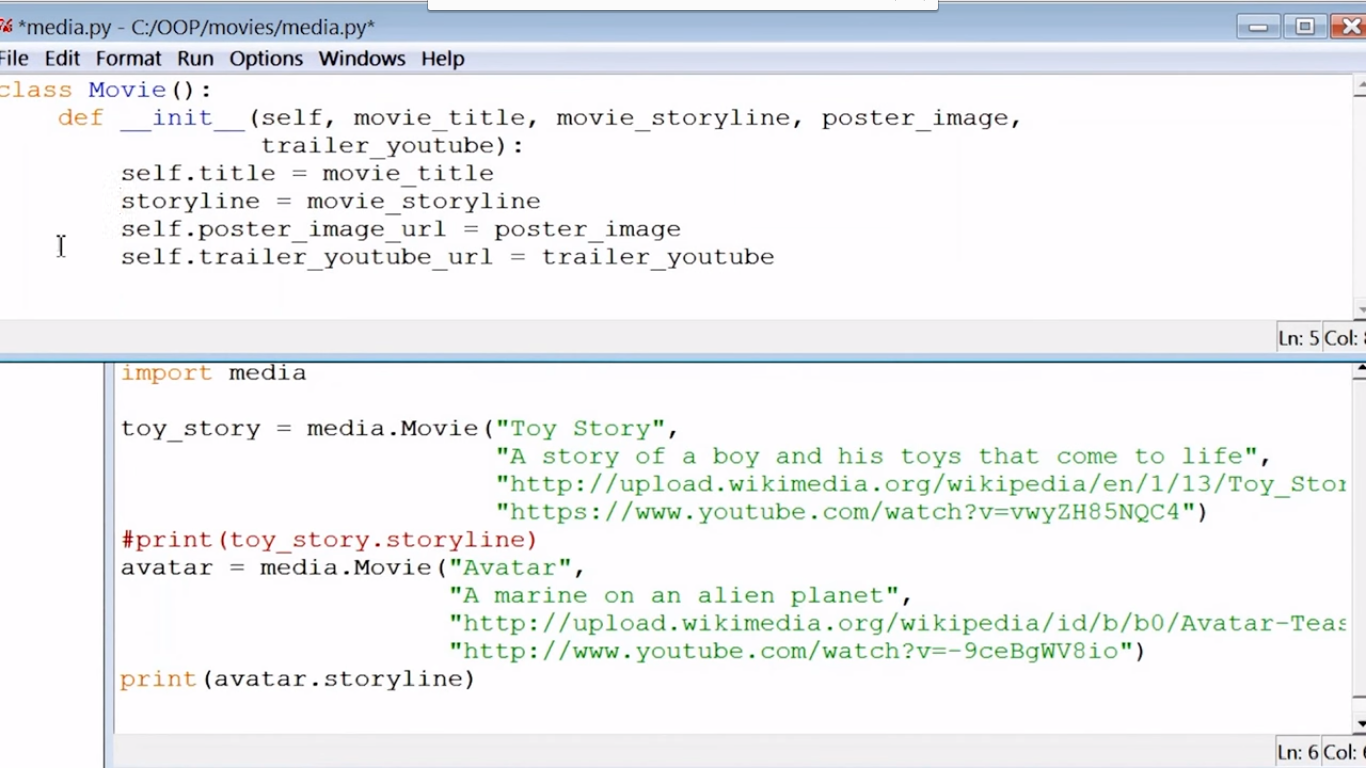
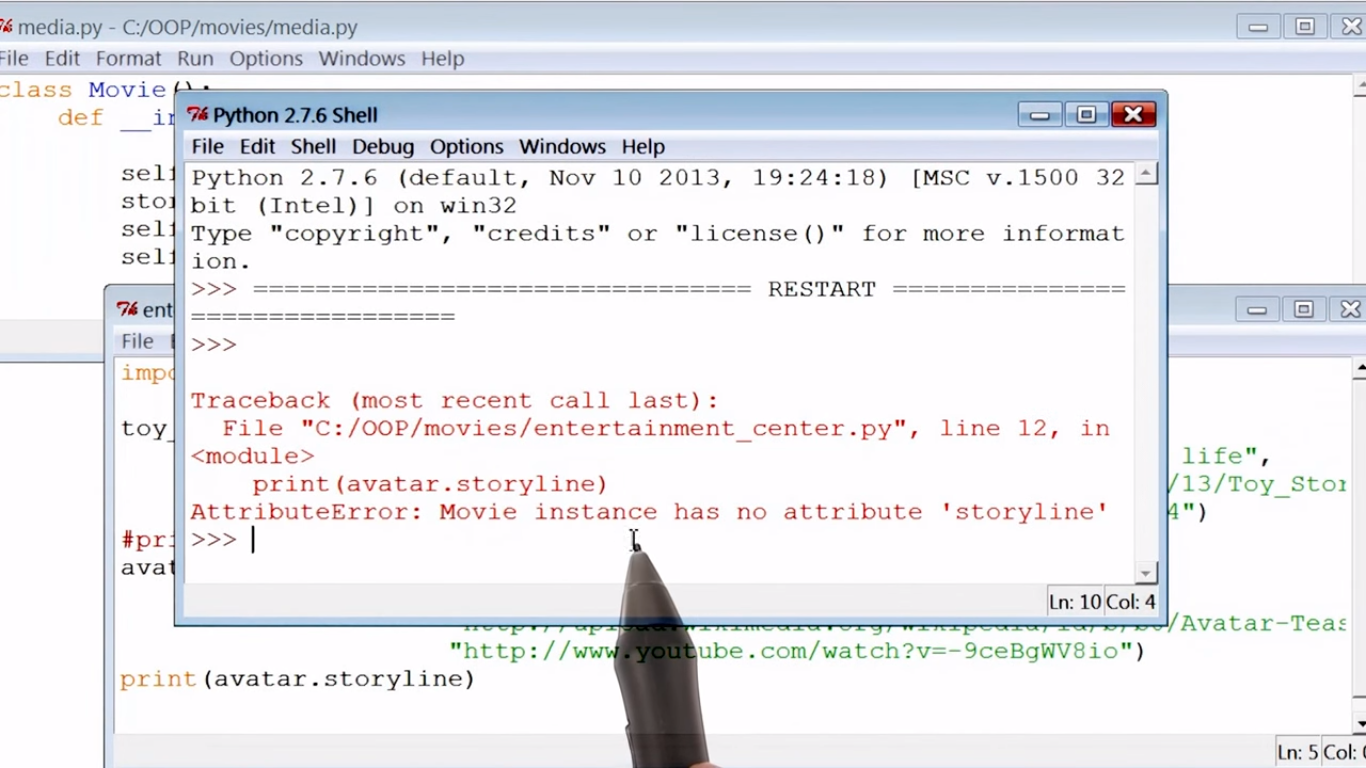
3.1.7 Is Self Important? (remove self)
从self.storyline = movie_storyline 中把self去掉。在运行程序时会有error。
 pf74.png-498.5kB
 pf75.png-570.5kB
3.1.8 Next Up: Show_trailer
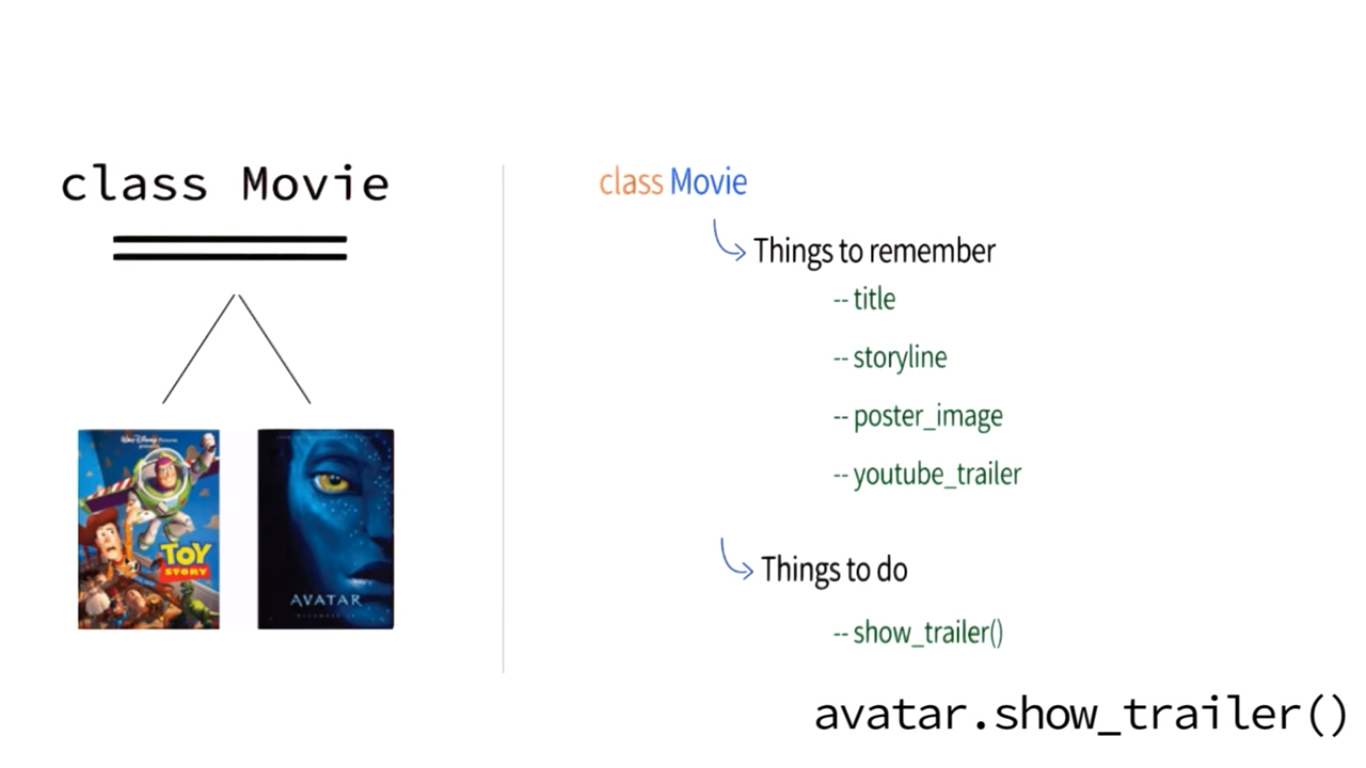
看一下我们之前的设计图,让class movie该记的东西都记住了,接下来要实现播放trailer的function.what we want to do is run a line of code like this: avatar.show_trailer(). And when that runs, we want it to[br]play the trailer of the movie Avatar.
 pf76.png-211kB
a function that[br]is defined inside a class and is associated with an instance[br]is called an instance method.
 pf77.png-279.6kB
3.1.9 Playing Movie Trailer
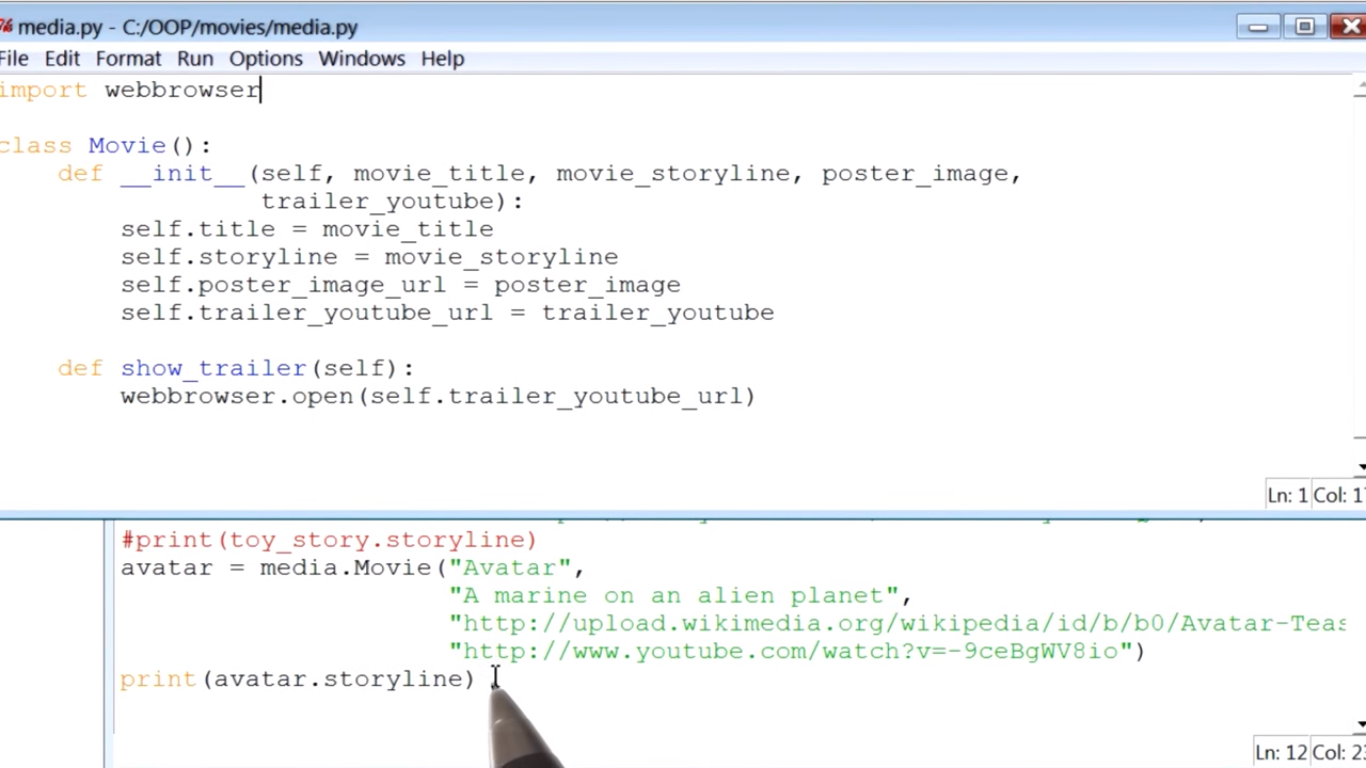 pf78.png-348.2kB
然后在另一个.py里调用刚才定义好的播放trailer的function
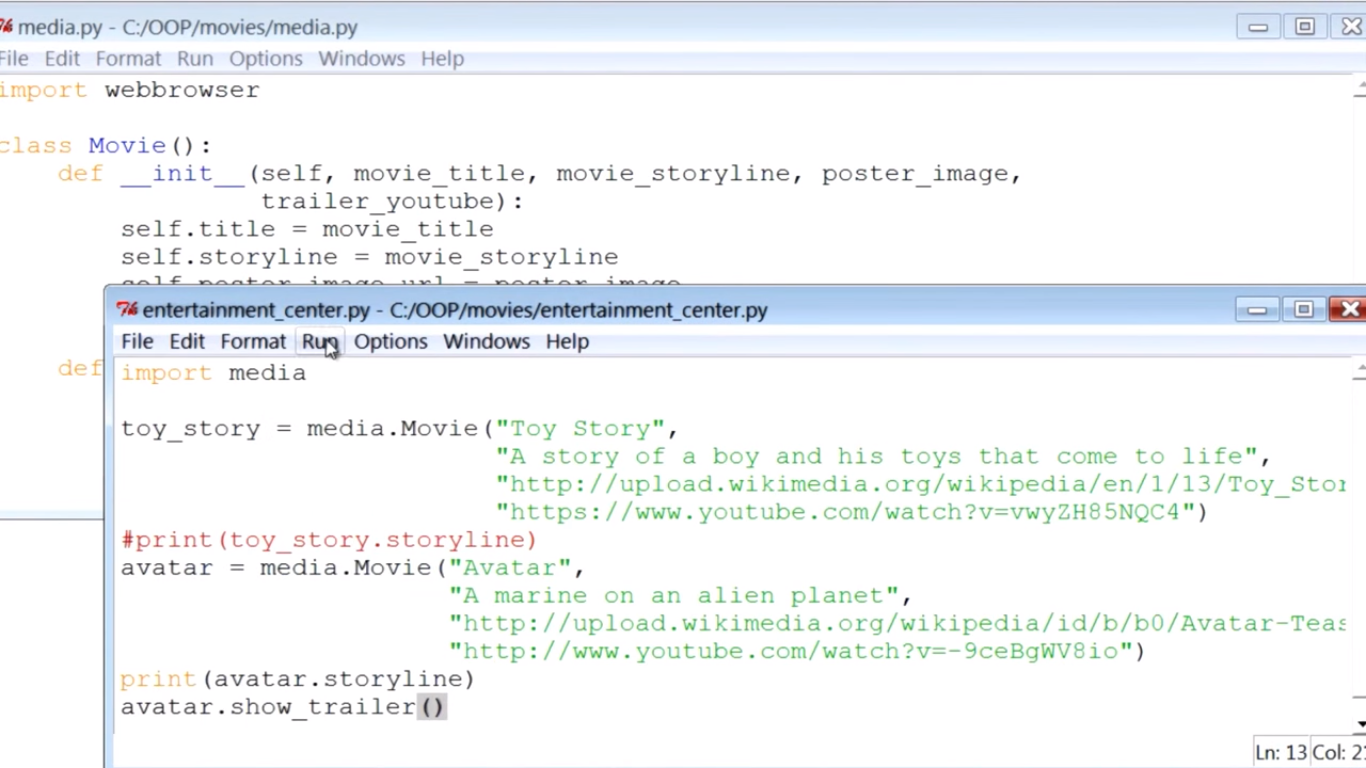 pf79.png-460.8kB
3.1.10 Recap Vocab
这张总结class的图要好好理解和记忆。
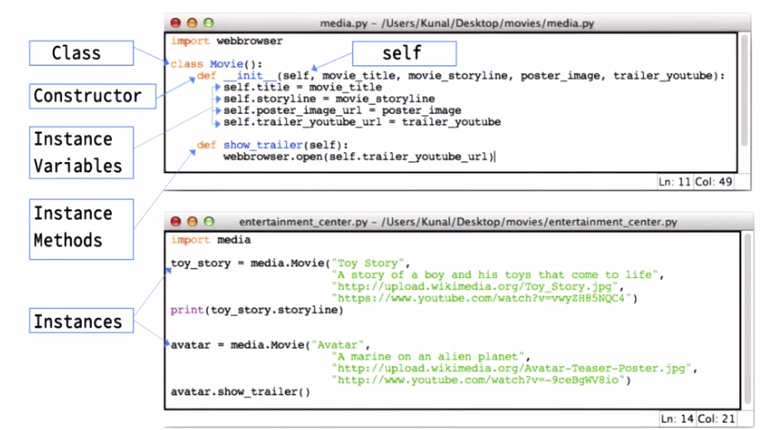 pf80.png-226.7kB
3.1.11 Designing the Movie Website
设计展示movie的website
在entertainment_center.py中添加更多的的movies
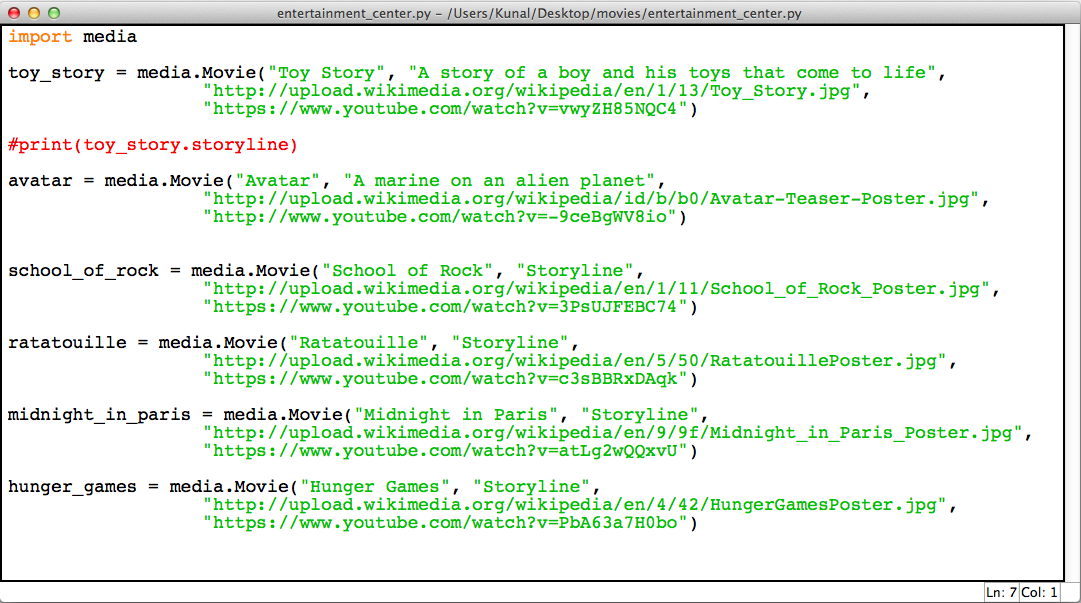 pf81.png-191.1kB
但想要turn this into a movie website, we need a piece of code that weed out.
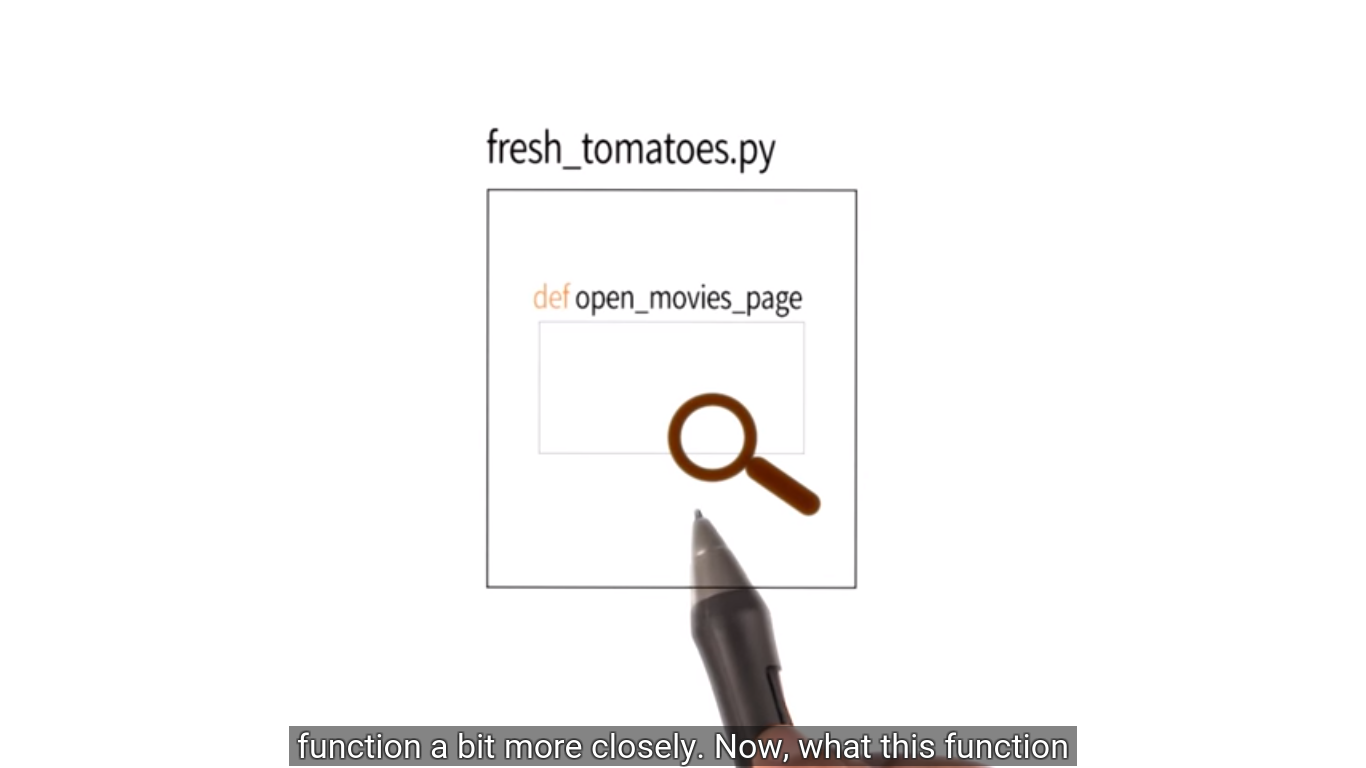
we call this code, fresh_tomatoes.py.
 pf82.png-105.9kB
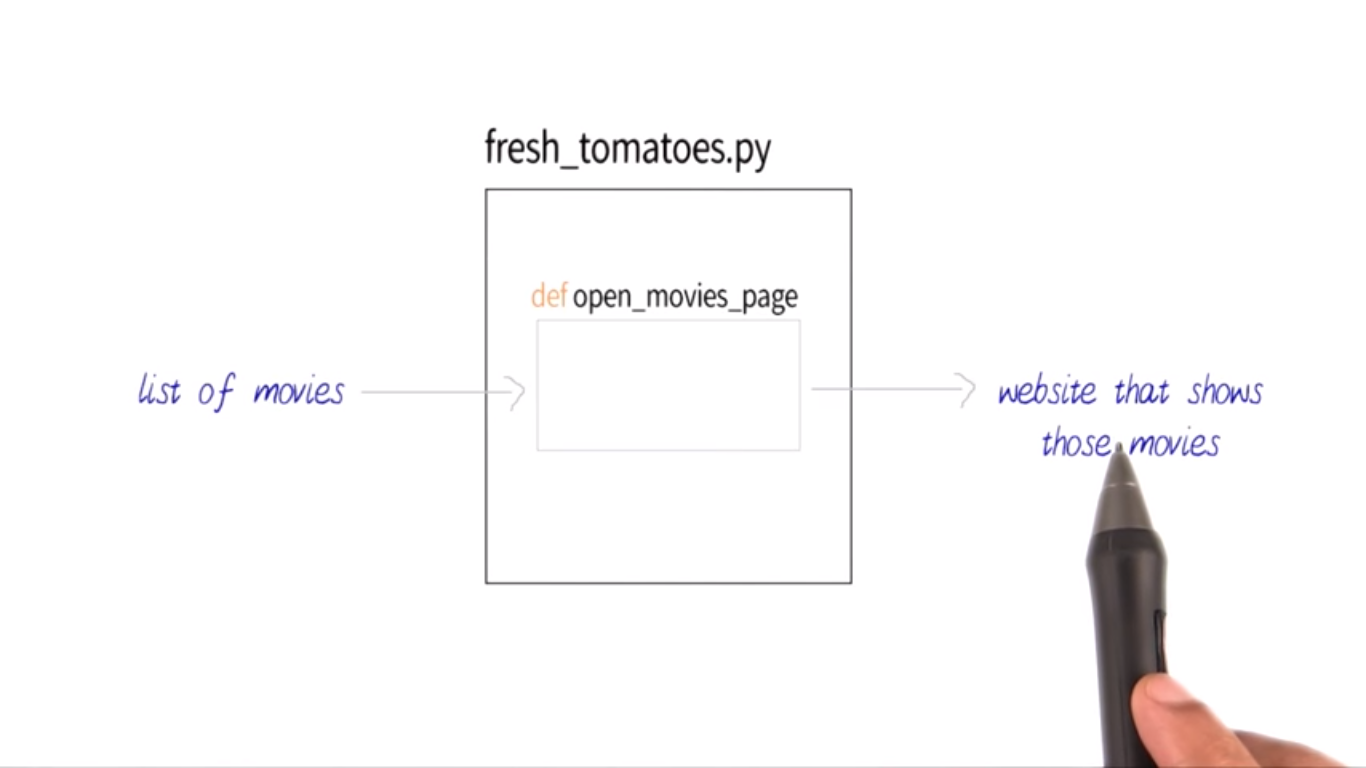
This file, fresh_tomatoes.py, has a function inside it called, open_movies_page. What this function does, is that it takes in, a list of movies as input, and as output it creates and opens an HTML page or a website, that shows the movies you gave it in the first place.
 pf83.png-110.7kB
3.1.12 Coding the Movie Website
open_movies_page need a list of movies.
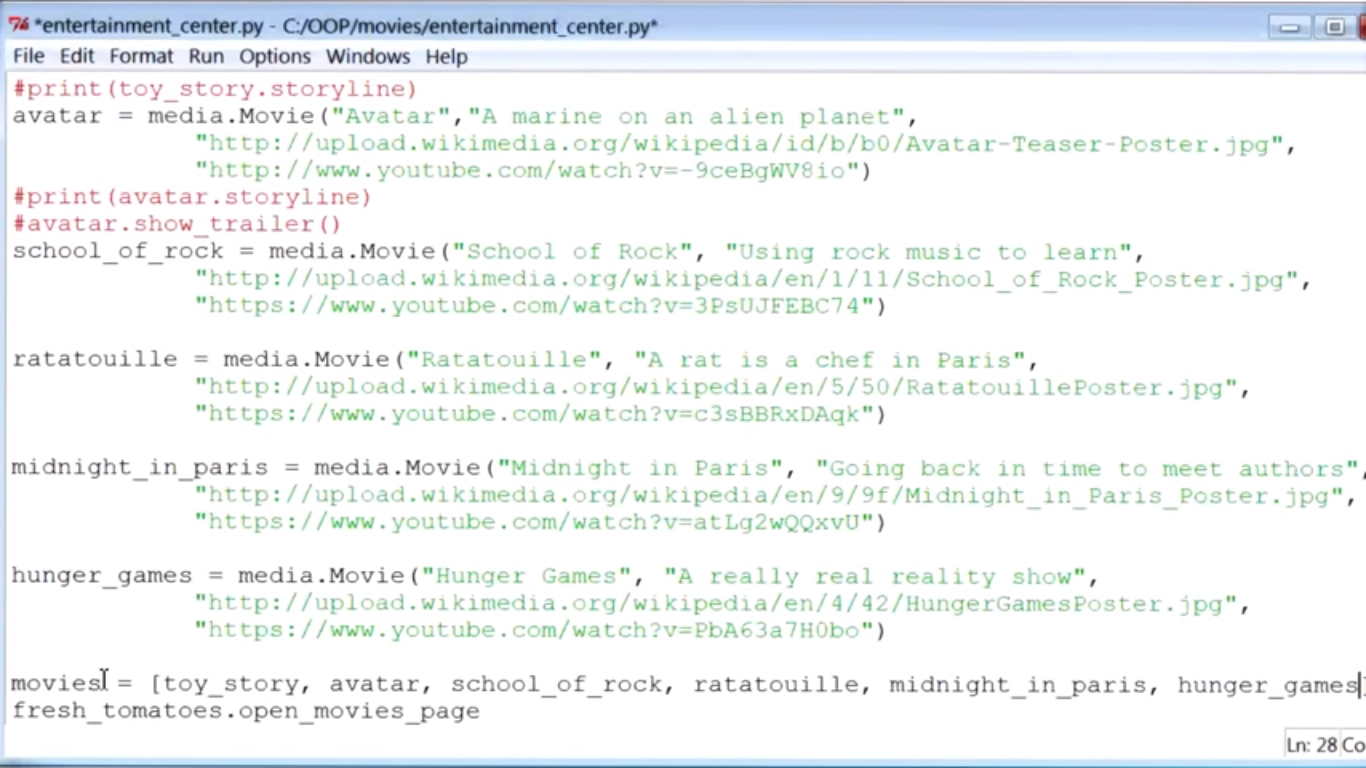 pf84.png-631.9kB
code:
# -*- coding: utf-8 -*-
"""
Created on Thu Dec 10 20:39:06 2015

@author: xu
"""

from media import Movie
import fresh_tomatoes


avatar = Movie('Avatar',
                     'A marine on an alien planet.',
                     'http://upload.wikimedia.org/wikipedia/id/b/b0/Avatar-Teaser-Poster.jpg',
                     'https://www.youtube.com/watch?v=5PSNL1qE6VY')

ghd = Movie('Groundhog Day',
                     'A man re-lives the same day until he gets it right.',
                     'http://upload.wikimedia.org/wikipedia/en/b/b1/Groundhog_Day_(movie_poster).jpg',
                     'https://www.youtube.com/watch?v=wE8nNUASSCo')

imitation_game = Movie('The Imitation Game',
                     'A man invents computer science and a computer to win a war.',
                     'http://upload.wikimedia.org/wikipedia/fi/a/a1/The_Imitation_Game.jpg',
                     'https://www.youtube.com/watch?v=S5CjKEFb-sM')

matrix = Movie('The Matrix',
                     'A computer hacker takes the wrong colored pill.',
                     'http://upload.wikimedia.org/wikipedia/en/c/c1/The_Matrix_Poster.jpg',
                     'https://www.youtube.com/watch?v=m8e-FF8MsqU')

wizard = Movie('The Wizard of Oz',
                     'Transported to sureal landscape, a young girl kills the first person she meets and then teams up with three strangers to kill again.',
                     'http://ia.media-imdb.com/images/M/MV5BMTU0MTA2OTIwNF5BMl5BanBnXkFtZTcwMzA0Njk3OA@@._V1_SX640_SY720_.jpg',
                     'https://www.youtube.com/watch?v=VNugTWHnSfw')

live = Movie('Live Nude Girls',
                     'A chick flick (without nudity) yet named to make it easier to get your boyfriend to watch it with you.',
                     'http://upload.wikimedia.org/wikipedia/en/5/53/Live_nude_girls.jpg',
                     'https://www.youtube.com/watch?v=8vXCajxxPcY')

#creates a list of the movies defined above and launches the web site.
movies = [avatar, ghd, imitation_game, matrix, live, wizard]
fresh_tomatoes.open_movies_page(movies)
效果图
 pf85.png-584.6kB
总结一下整个流程
 pf86.png-112.3kB
最左侧的html文件是我们在运行了程序后自动产生的。
 pf87.png-272.7kB
3.2 Lesson 3b(Making Classes): Advanced Topics
本3.2节的内容是为了介绍Advanced Ideas in OOP。
3.2.1 Class Variables
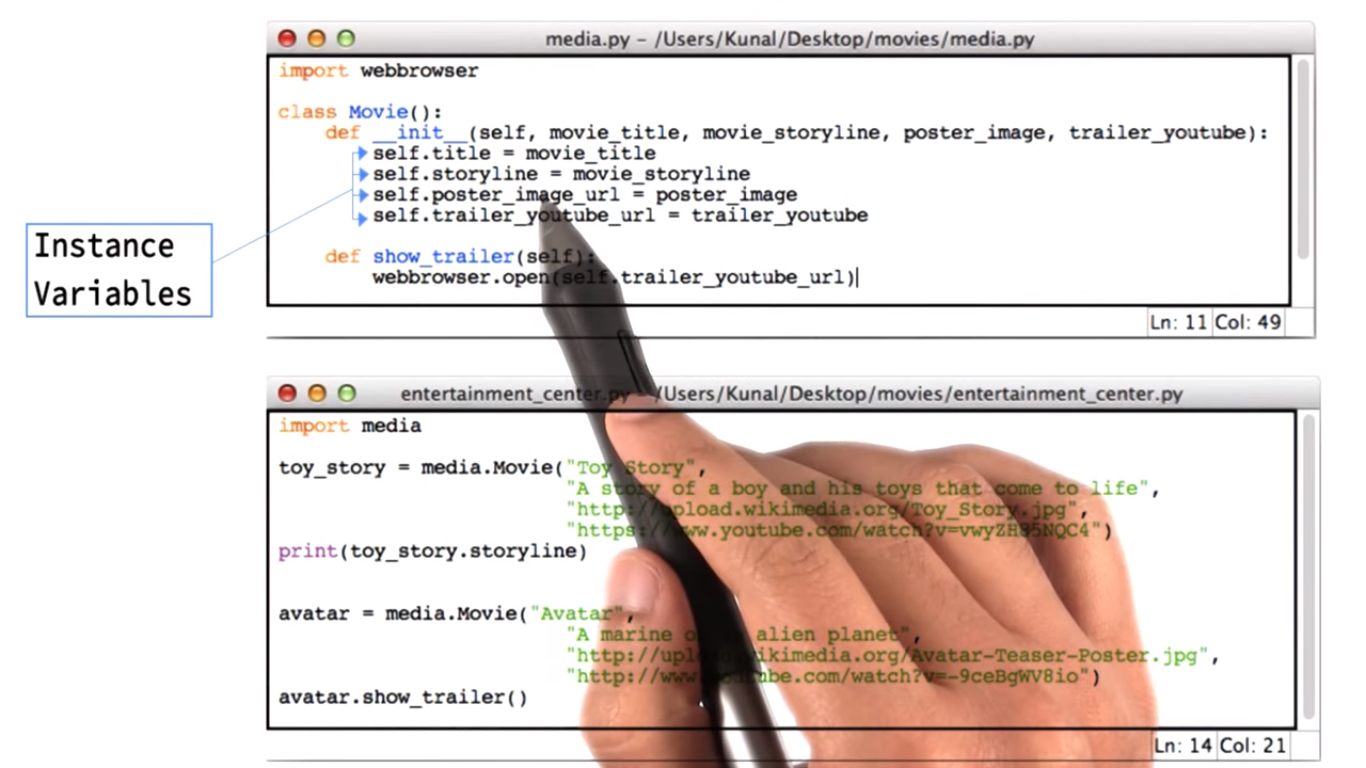
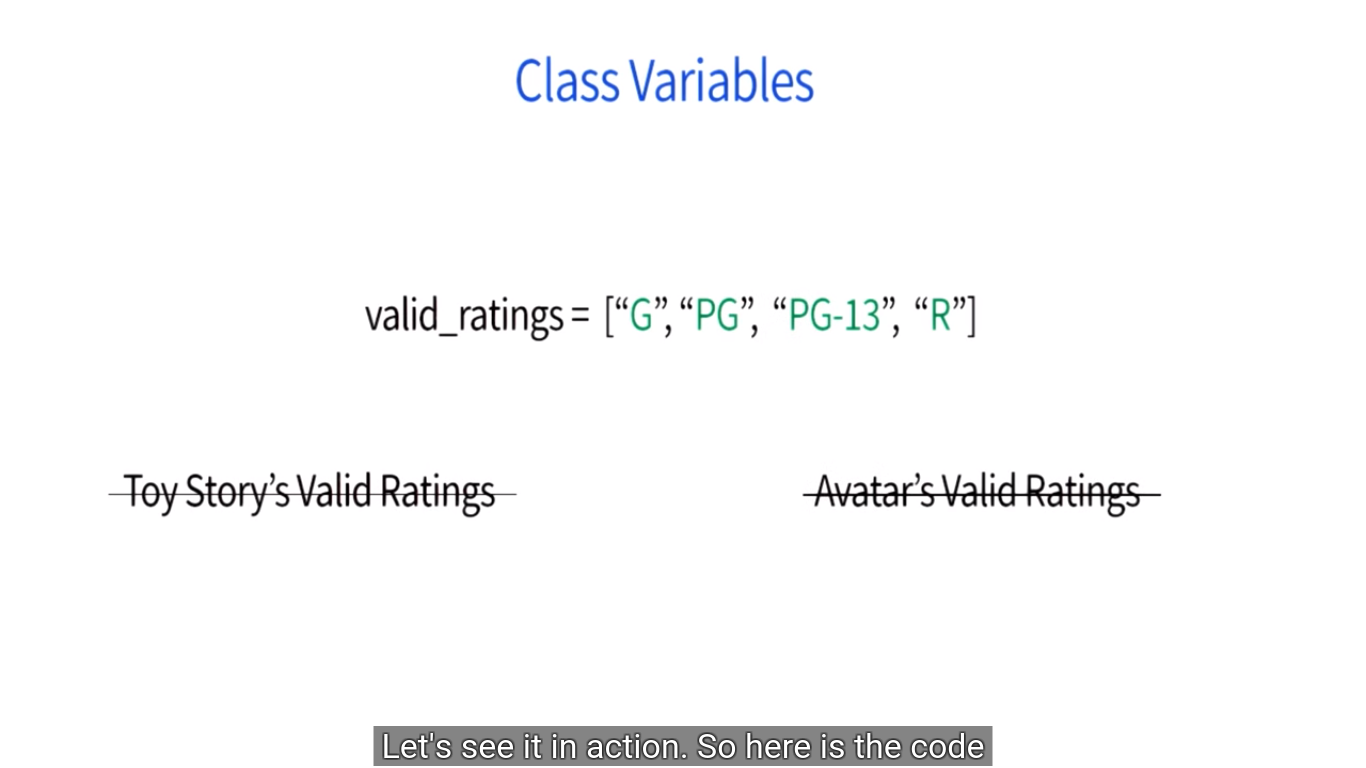
之前我们介绍过instance varibables, 这些是在def的function里的. 每个instance有自己的 variables, 互相不能共享。
 pf88.png-572.8kB
 pf89.png-360.2kB
Sometimes however, we need variables that we want all of our instances to share. So consider the variable valid ratings for a movie。比如电影的评分,这个每部电影都有的东西就不用在每个instance里单独创建,互相共享的话会更方便。
而我们这次要介绍的是 class variables, 这些定义在def 的函数之外。也就是说创建的所有instance都能使用这些class variables.
 pf90.png-122.3kB
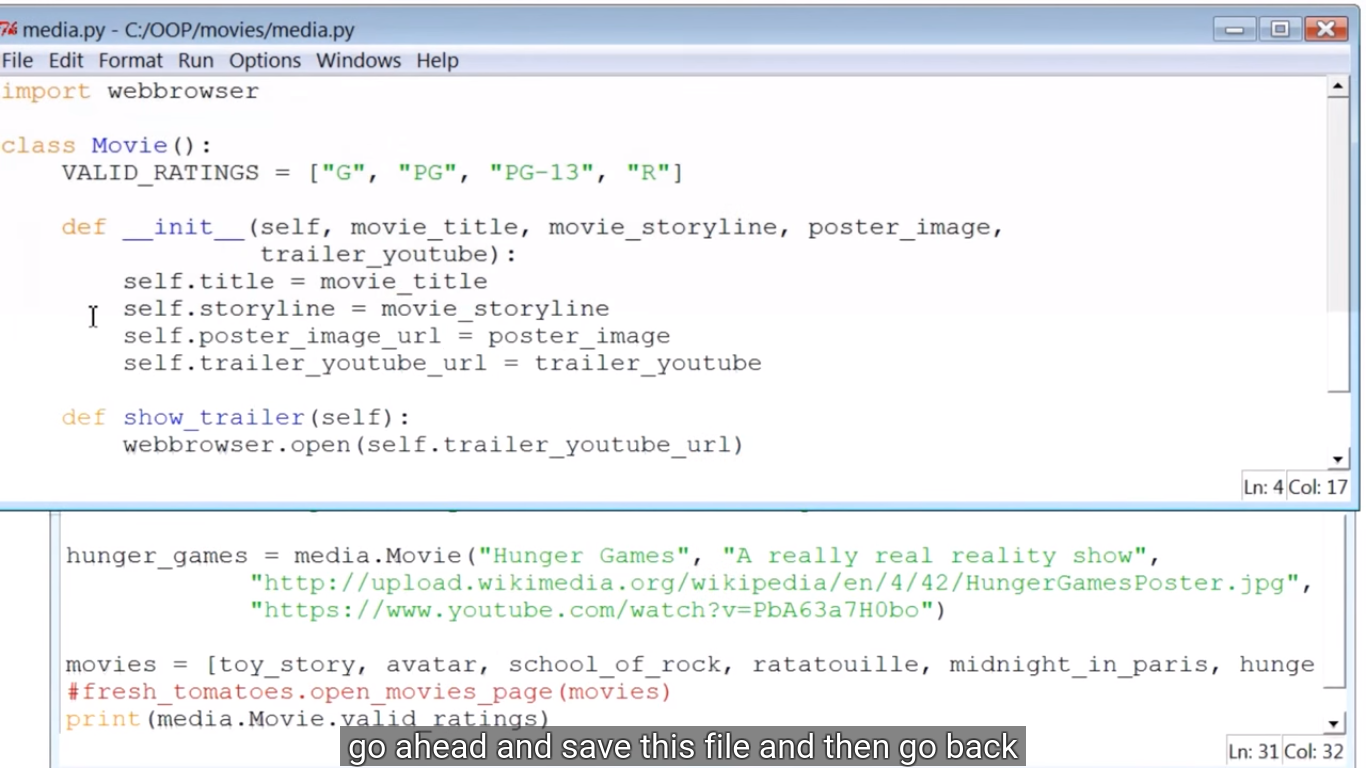
我们在class movie 所在的media.py中添加class variables. 推荐全用大写。
the value of this variable valid_strings is probably a constant, that the value of this variable is probably not going change every now and then. When we define a constant like this, the Google Style Guide for Python recommends that we use all caps or an upper case to define a variable like that.
 pf91.png-459.4kB
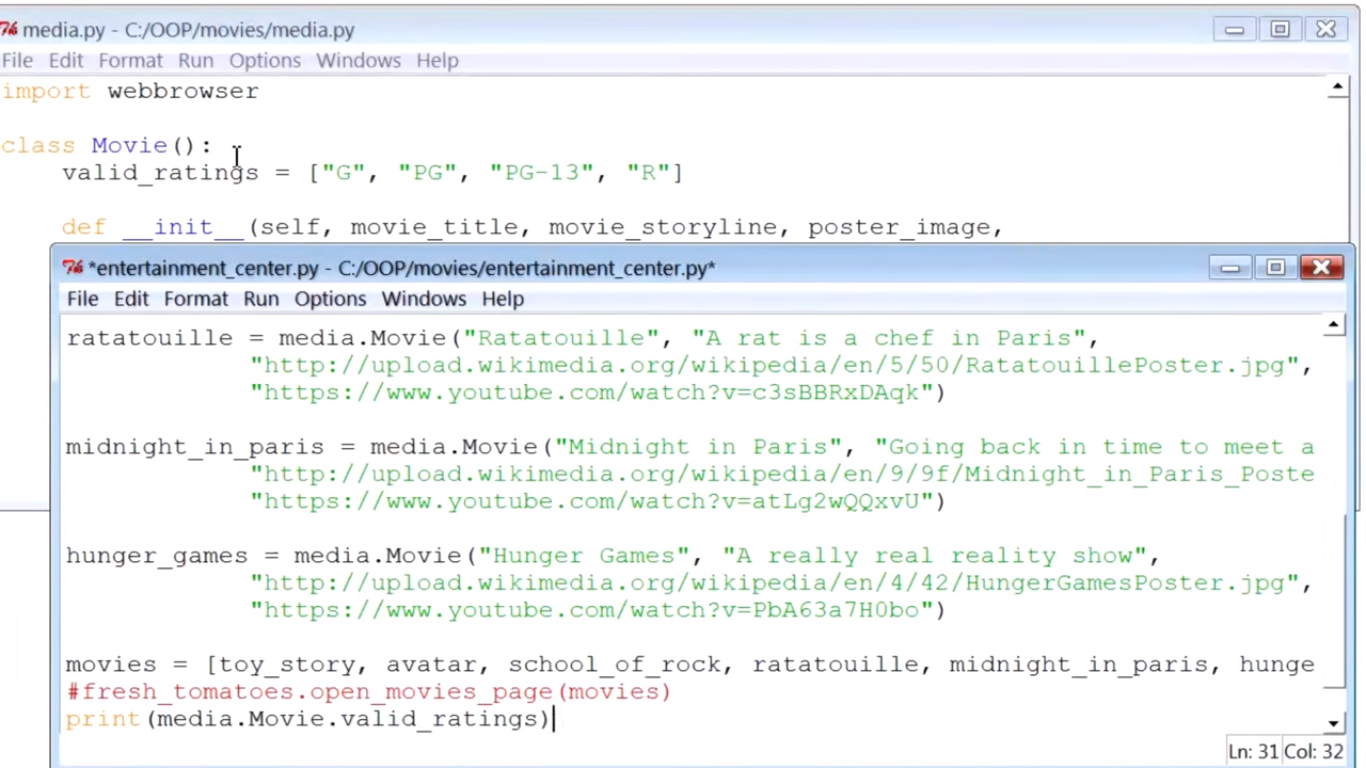
注意在entertainment_center.py文件的最后,我们是如何call class variables的。
 pf92.png-570.8kB
结果图
 pf93.png-424.2kB
3.2.2 Doc Strings
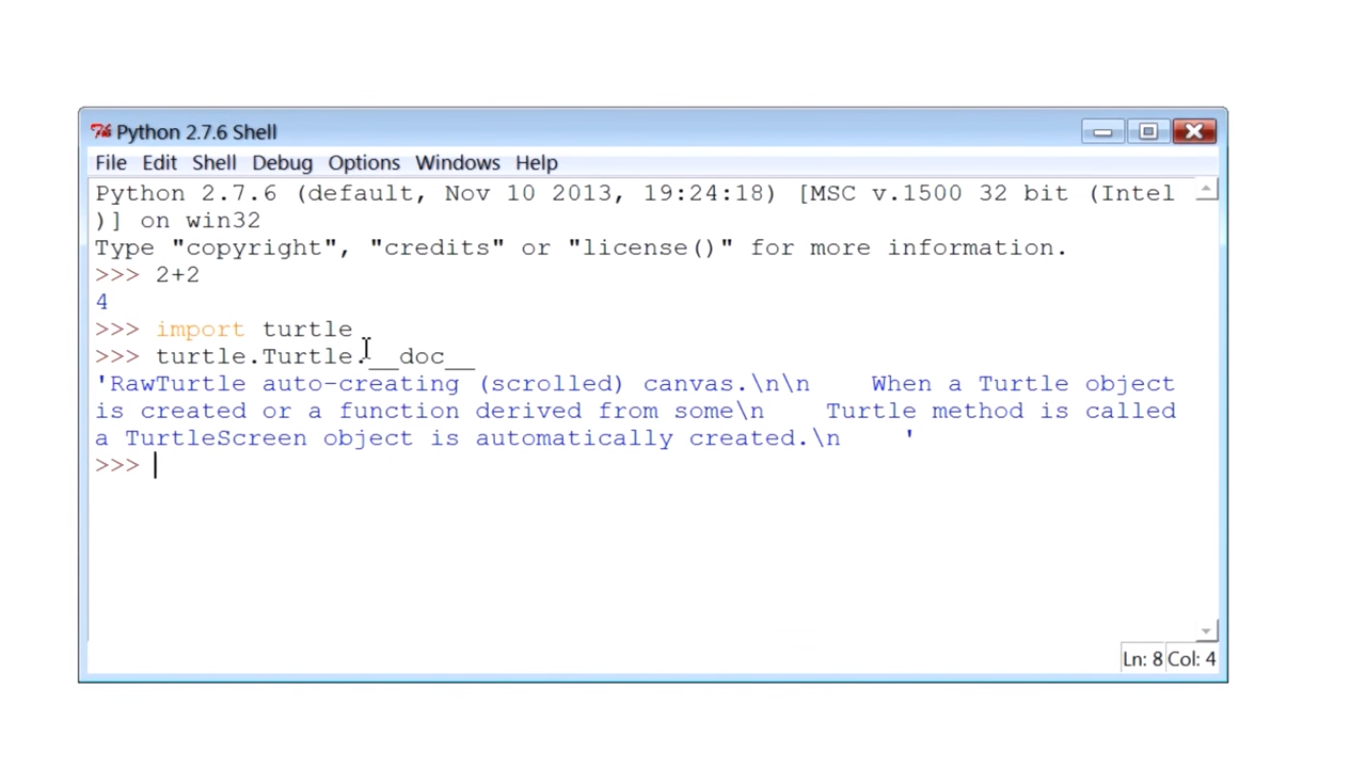
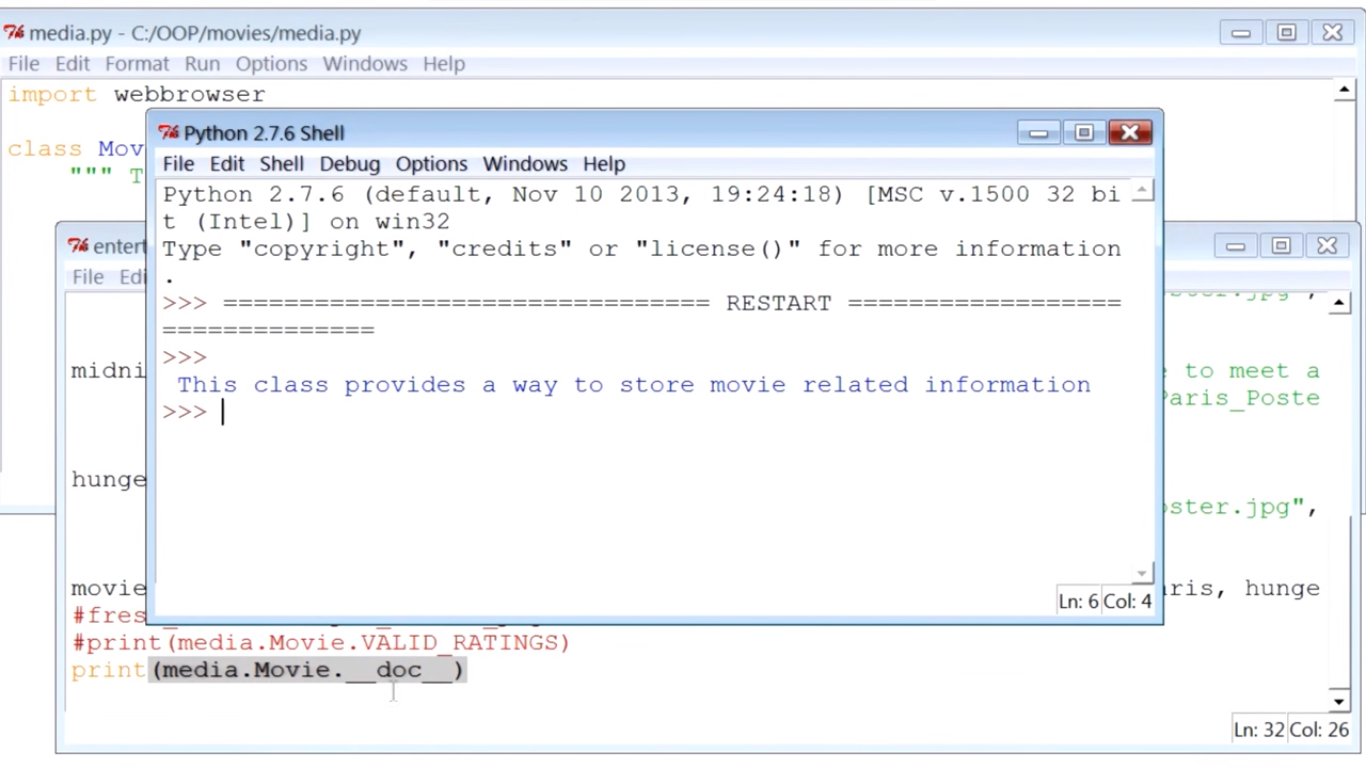
class中有很多有underscore的Attributes. 比如__doc__就是。只要在文档里用"""xxxxxxx"""包住的注释部分,都能用module_name.class_name.__doc__调用。
 pf94.png-247.4kB
在media.py中添加了""" xxxxxx """注释的部分,在entertainment_center.py文件中最后用media.Movie.__doc__来调用
 pf95.png-558.9kB
执行后效果
 pf96.png-363.1kB
3.2.3 Using Predefined Class Variables
除了__doc__之外,class中一般还有其他的Predefined variables。
Predefined Class Attributes,具体可见这个网站
 pf97.png-46kB
测试效果图。__name__是class name, __module__是存放这个class的module name, 即media.py中的media。
 pf98.png-45.7kB
3.2.4 Inheritance
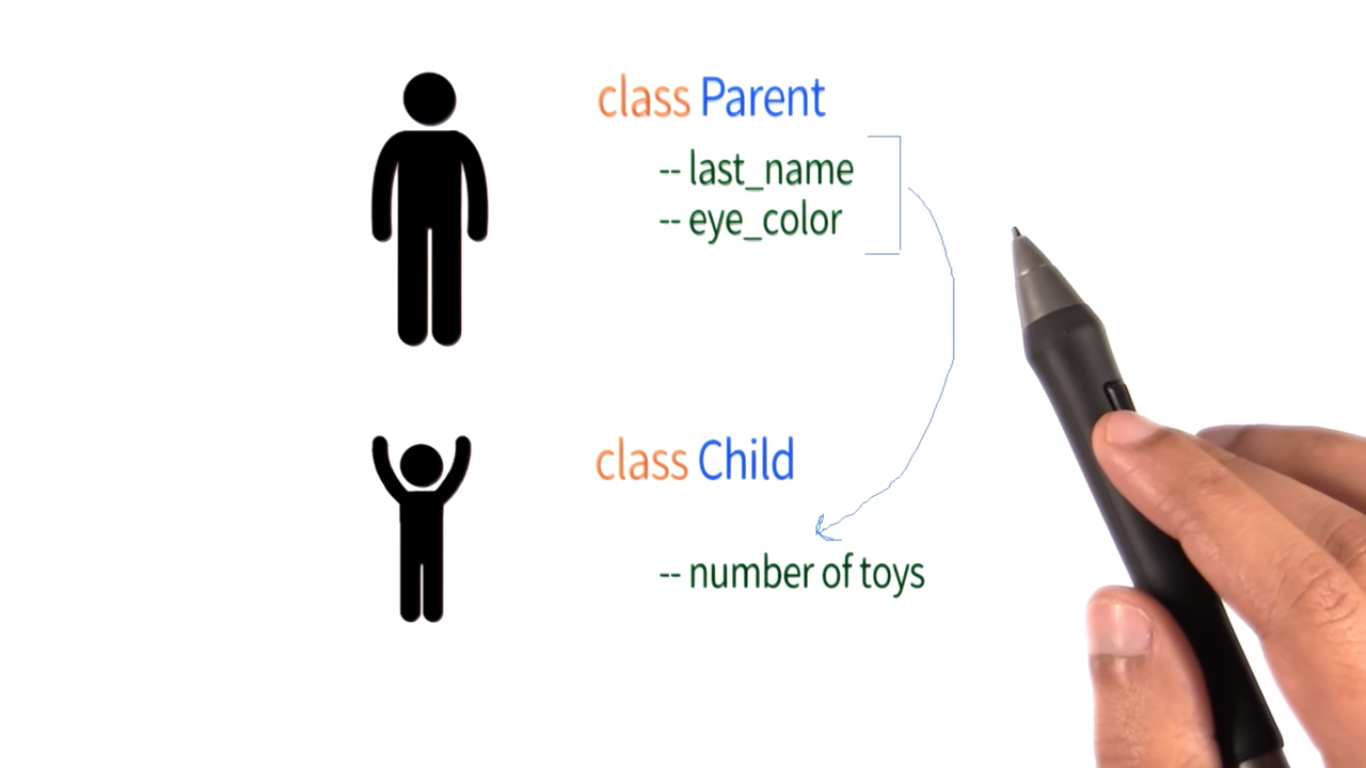
这个inheritance的概念在OOP中很重要。如其字面的意思child可以从parent那里继承很多共性。
 pf99.png-228.1kB
3.2.5 Class Parent
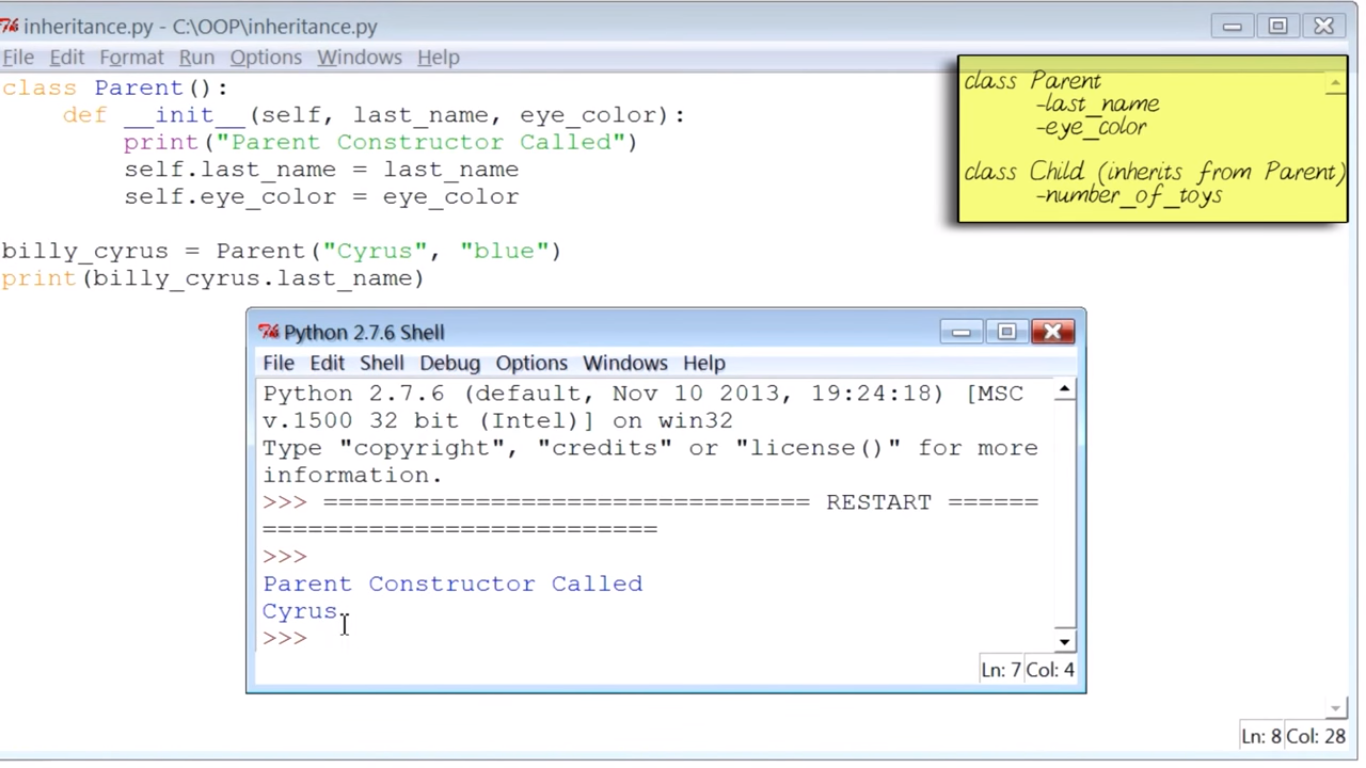
在inheritance.py中定义class parent
 pf100.png-375.5kB
3.2.6 Class Child
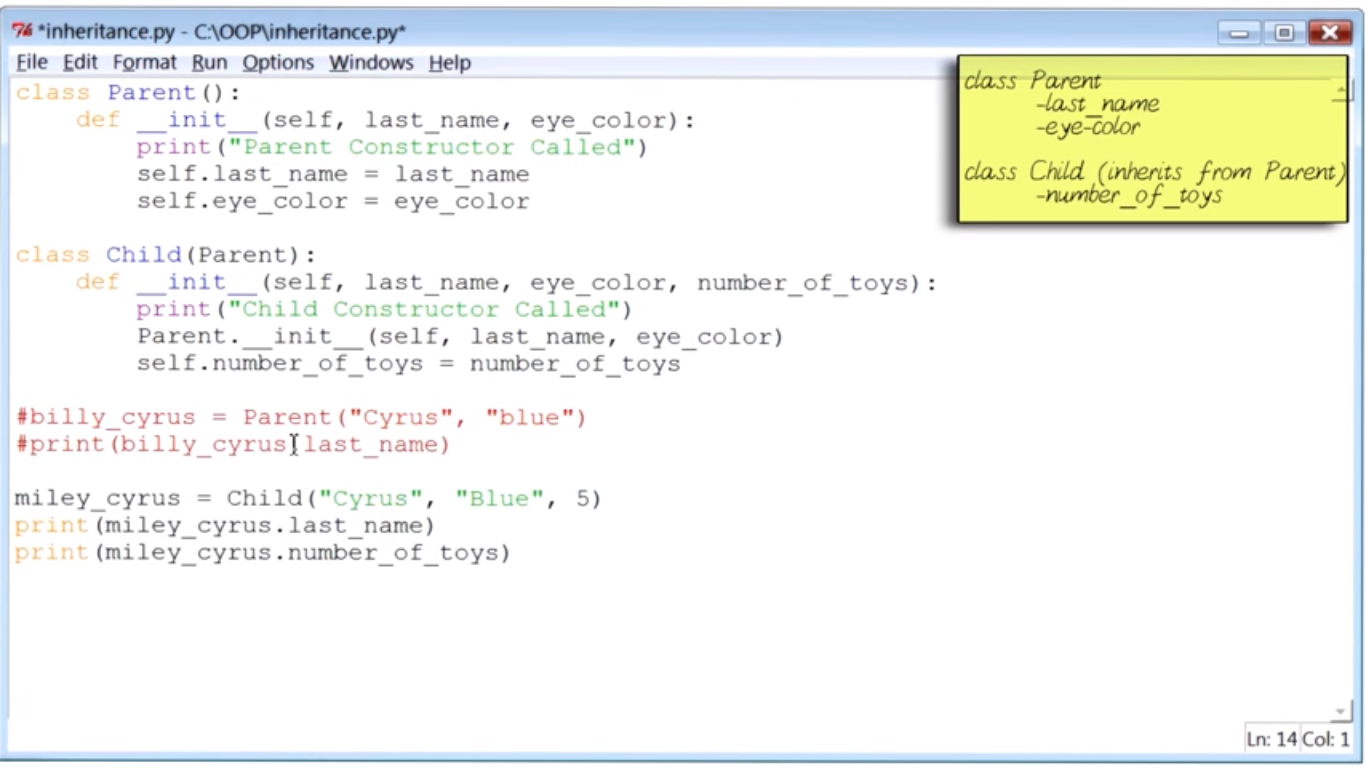
注意代码中升级到inheritance的部分
class Child(Parent)把继承的class放入括号中.
Parent.__init__(self, last_name, eye_color)在__init__内部,initialize the parent.
 pf101.png-361.2kB
那么,quiz!执行后输出的结果顺序是怎样的?
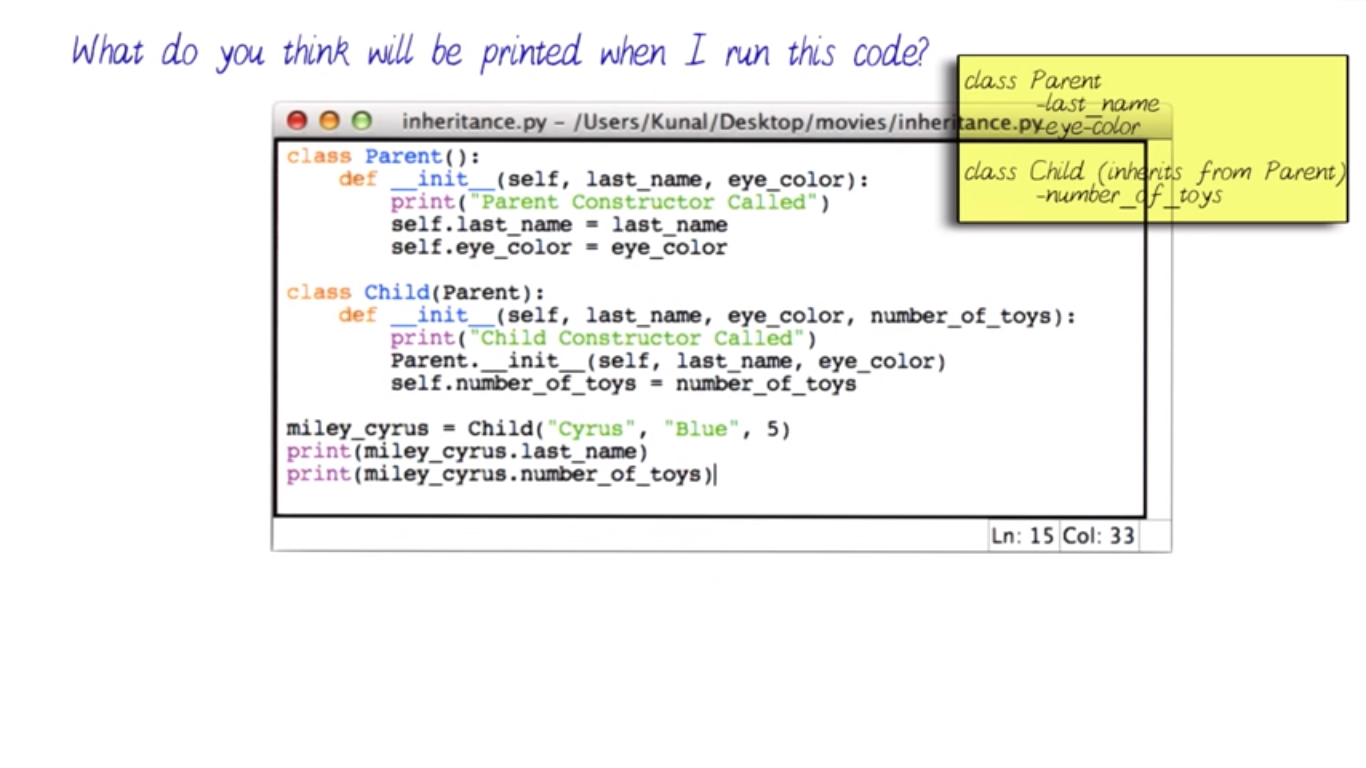 pf102.png-360.1kB
两个class内都有print语句用来判断输出的顺序,由此可知程序执行的顺序。
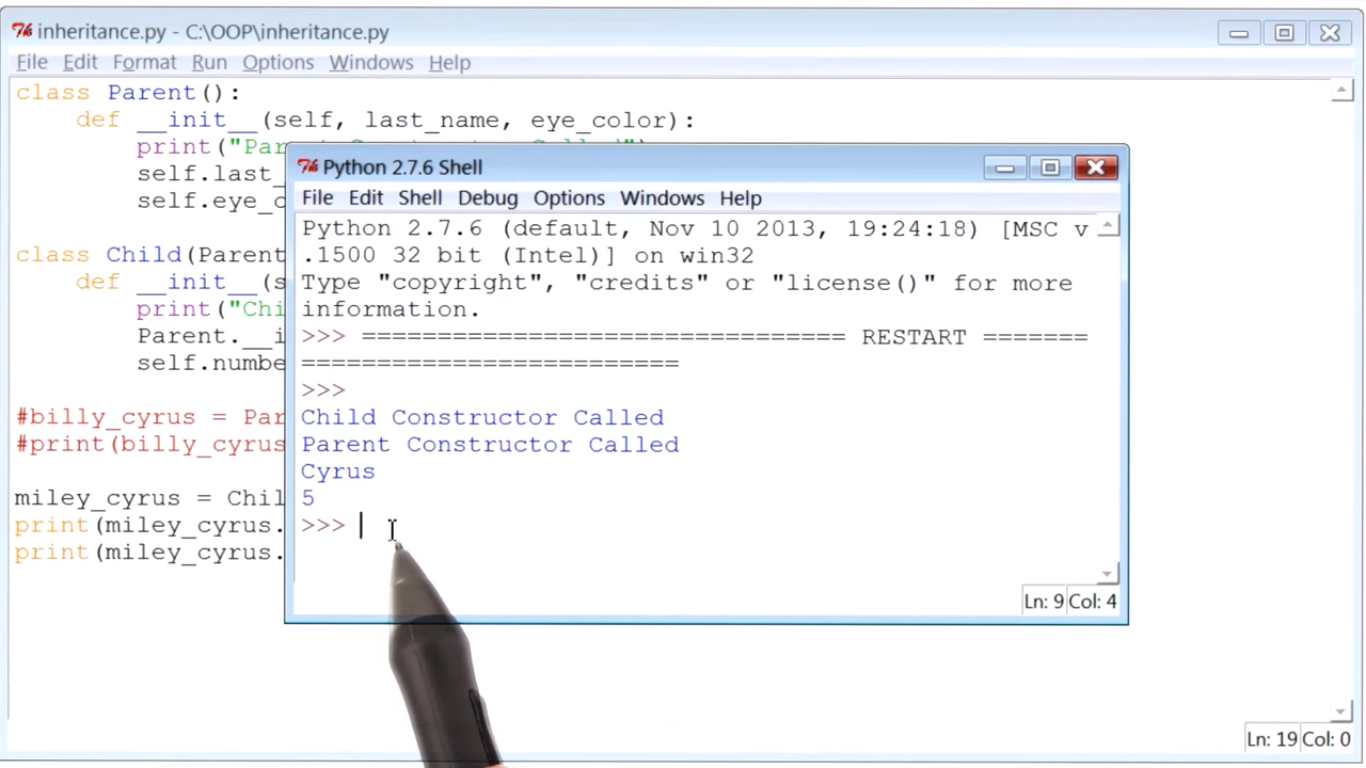 pf103.png-379.5kB
那么,如何利用inheritance来update class movie?
3.2.7 Updating the Design for Class Movie
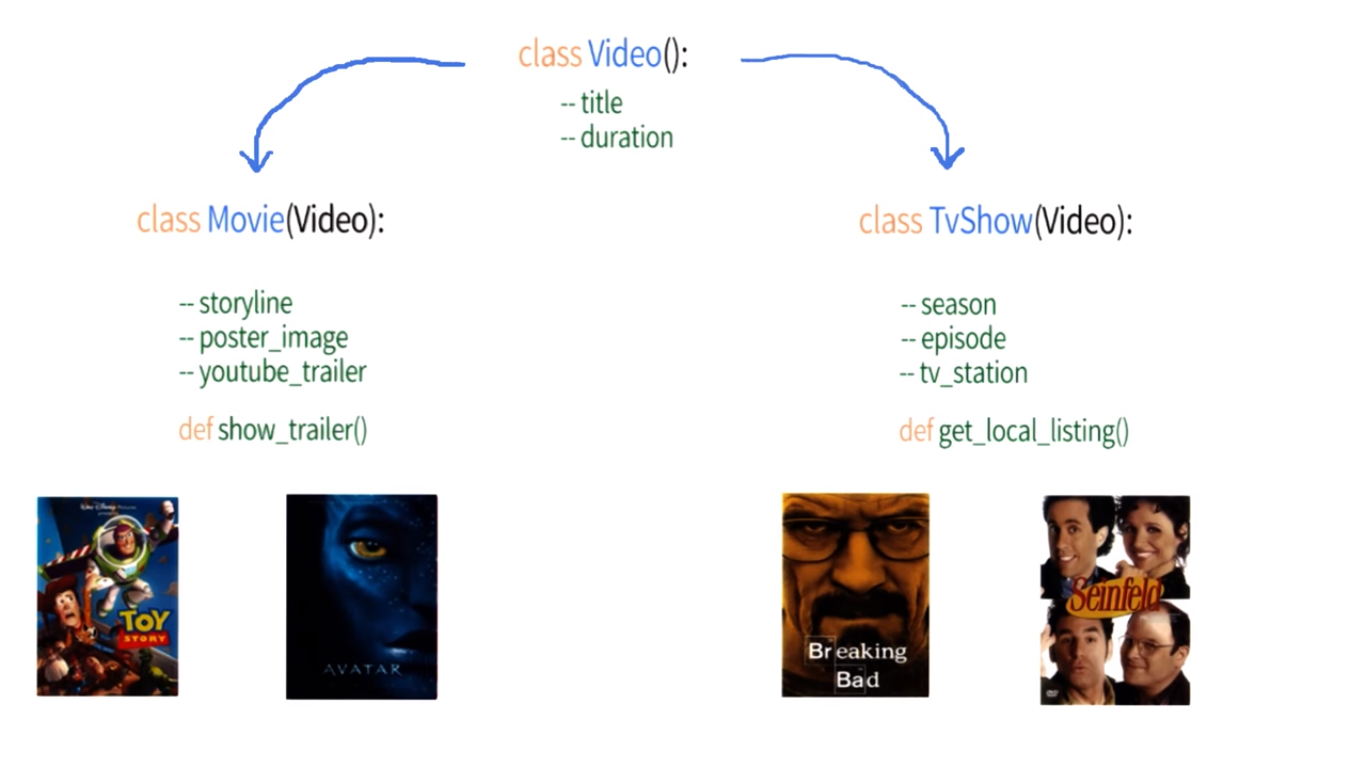 pf104.png-309.5kB
3.2.8 Reusing Methods
怎么通过inheritance利用methods?
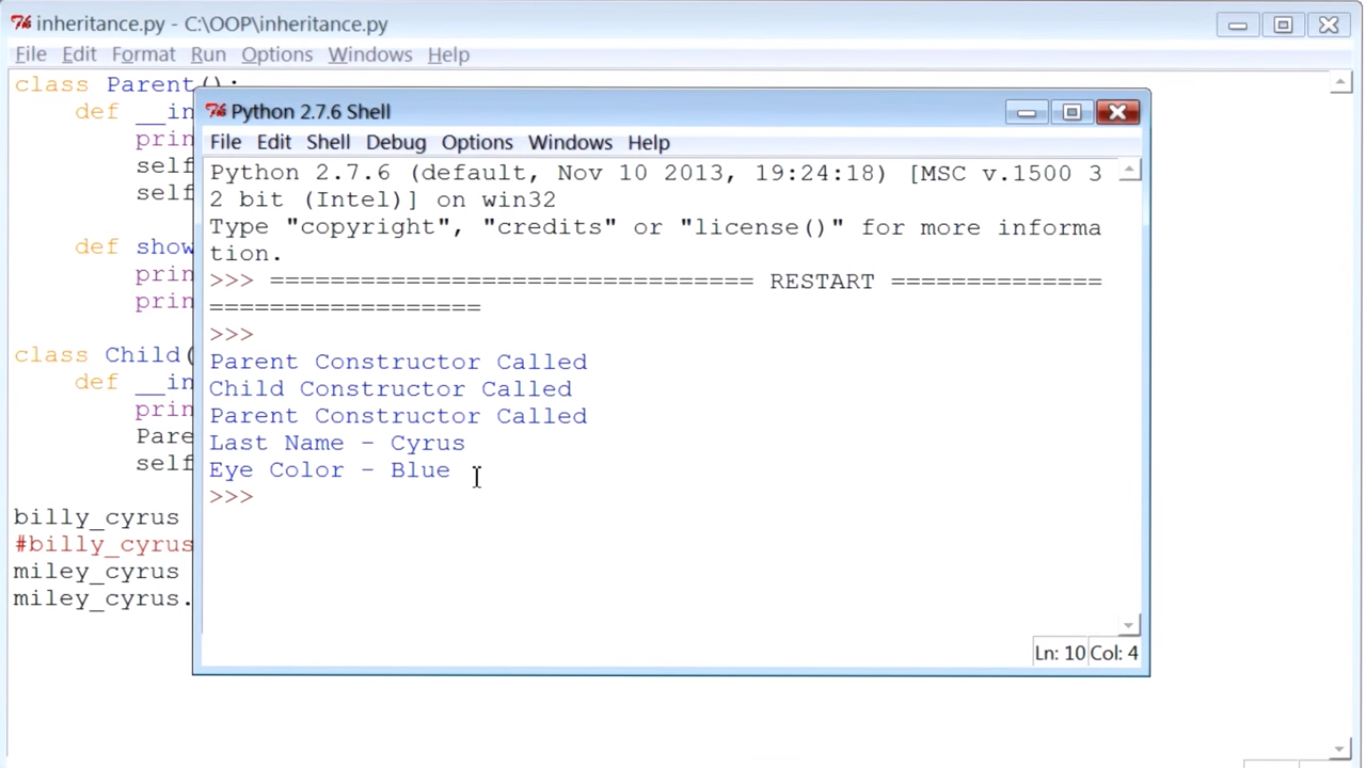
在class parent中定义了show_info(),那么只要class child继承了parent,即使在class child中不定义show_info()也能直接使用。
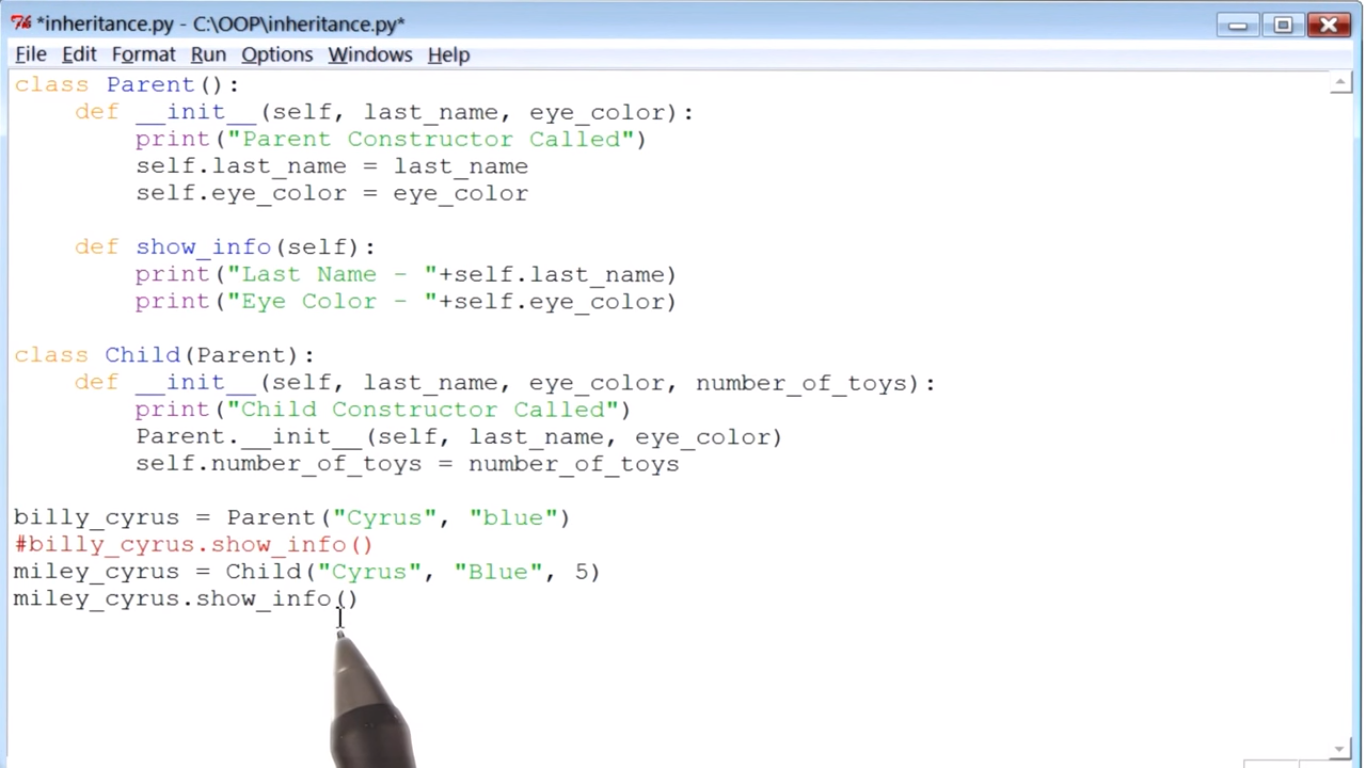 pf105.png-352.4kB
运行效果
 pf106.png-352.7kB
3.2.9 Method Overriding
紧跟上一小节,如果在class child中再重新命名一个show_info()的function,那么这个新的function就会把从parent那里继承来的show_info() overriding掉。调用的时候只会使用class child中定义的show_info() function,而不是class parent中的function.
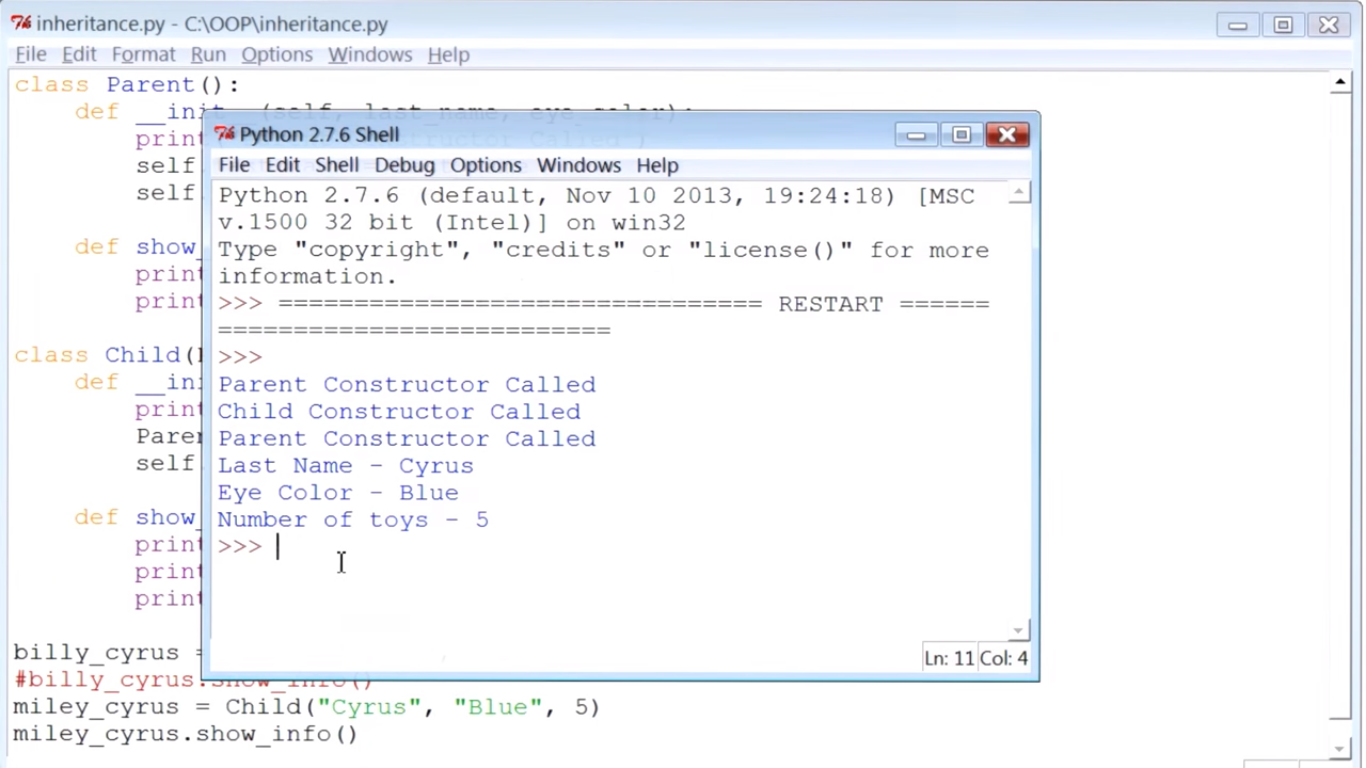 pf108.png-401.8kB
4 Final Project
对整个project介绍的很详细


网友评论