简单的webpack入门
1.新建一个node项目,内容为
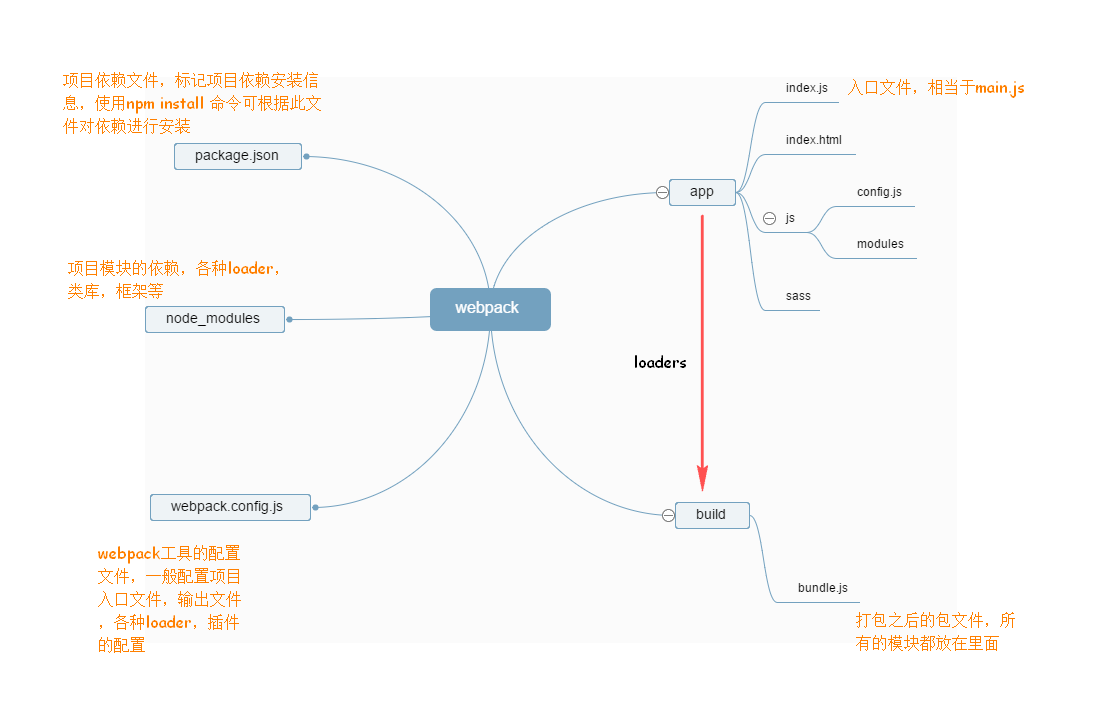
- /app
- index.html
- entry.js
- package.json
- bundle.js
- webpack.config.js
cd app && npm init
在index.html中引入bundle.js,作为打包之后的集成文件
在entry.js中写一个简单的语句
document.write('hello world');
然后使用webpack打包到bundle.js中
webpack entry.js bundle.js
使用浏览器打开index.html即可看到效果
具有模块引用的文件打包
新建一个module.js,并写入一些语句
module.exprots = 'It was work form module'
再在entry.js中引入这个模块
var text = require('./module.js');
document.write(text);
重新打包,即可看到效果
hello wrold It was work form module
使用css-loader引入css模块
在webpack的世界里,所有都是模块,所以css也不例外,我们可以通过css-loader读取它,然后再使用style-loader把它插入到html页面中
先安装css-loader和style-loader这两个包
npm install css-loader style-loader
在entry.js中引入style.css
    require('!style!css!./style.css')       //载入style.css
    var text = require('./module.js');
    document.write('hello world');
    document.write(text);
如果每次都写成!style!css!./style.css则会非常繁琐,webpack可以根据模块的扩展名去自动绑定需要的loader
修改entry.js中的写法
    require('./style.css')       //载入style.css
    var text = require('./module.js');
    document.write('hello world');
    document.write(text);
然后打包必须这样进行
webpack entry.js bundle.js --module-bind "css=style!css"
强大的配置
上面的操作都是手动运行,实在是太麻烦了,因此我们需要用到webpack的配置文件,根据配置去打包对应的模块。
先在根目录新建webpack配置文件
vim webpack.config.js
然后写好对应的配置
    var webpack = require('webpack');
    module.exports = {
        entry:'entry.js',  //配置入口文件
        output:{
            path:__dirname, //配置输出文件绝对路径,一般使用__dirname获取当前模块路径
            filename:'bundle.js' //输出文件名
        },
        //配置nodejs模块
        module:{
            //配置加载器
            loaders:[
                //使用正则匹配目标文件,使用使用css-load和style-load把css插入到页面中去
                {test:/\.css$/,loaders:['style-loader','css-loader']}
                //webpack已经不允许使用style,css这种loader的名称了,要使用style-loader
            ]
        }
    }
最后在项目根目录使用 webpack 即可根据配置文件来打包项目
npm命令的一些常识
- 如果需要新建一个项目,必须要使用
npm init命令,在package.json中配置好项目所需要的依赖
npm install webpack --save-dev后面--save-dev的意思是将包信息添加到devDependencies,表示开发时依赖的包,--save是指将包信息添加到dependencies,表示你发布时依赖的包
使用nodejs插件快速生成html文件
有时候我们不想自己手动创建html文件,可以使用nodejs插件创建
npm install html-webpack-plugin --save-dev
有了这个插件之后,可以在webpack配置进行配置了
var path =require('path');
var HTMLwebpackPlugin = require('html-webpack-plugin');
//定义一些文件夹,项目文件就放这里
var ROOT_PATH = path.resolve(__dirname);  //获取当前模块绝对路径
var APP_PATH = path.resolve(ROOT_PATH,'app');  //指定项目源码目录
var BUILD_PATH = path.resolve(ROOT_PATH,'build'); //指定构建输出目录

module.exports = {
   //项目入口,如果指定到文件夹则会寻找index.js作为入口js,如果指定到某个js,则会以其为入口文件
    entry:APP_PATH;
    output:{
        path:BUILD_PATH,
        filename:'bundle.js'
    }
},
//添加我们的插件,会自动生成一个html文件
plugins:[
    new HTMLwebpackPlugin({
        title:'hello webpack'
    })
]
使用webpack本地服务器
npm install webpack-dev-
然后需要在webpack.config.js里面对这个服务器进行配置
    module.exports = {
        ...
        devServer:{
            historyApiFallback: true,
            hot: true,
            inline: true,
            progress: true,
        }
        ...
    }
然后在package.json里面配置一下运行的命令,npm支持自定义一些命令短语
"script":{
"start":"webpack-dev-server --hot --inline"
//key是要运行的命令的短语,value是需要运行的命令
}
然后在项目根目录运行 npm start 命令,打开浏览器输入 localhost:8080即可
总结
webpack将所有的资源都视作模块,使用Common.js的语法进行模块的引入,挂载
 webpack入门总结


网友评论