ctorrent安装开发对接手册
- 1. 前言
- 2. p2p文件分发原理和过程
- 3. 安装
- 4. 测试环境使用
- 5. 原始使用与接口
- 6. 自动安装脚本内容
- 7. ctorrent 发送时网络问题监控情况排查
1. 前言
1.1. 简介
在一个大型的业务系统中,有传递文件的需求,传统的方式是ftp,http下载等,为了提升网络利用率 ,降低文件分发端的计算资源,采用p2p的传输模式比较有效率,成本最低。
ctorrent是一个比较适合传输的基于命令行界面的bittorrent工具,也便于集成, 为了方便在ctorrent的基础上进行p2p传输到业务系统的集成,需要让业务端的发送方,接收方软件的开发工程师了解其基本原理,以及简明扼要地说明他们所关心的功能与接口。
如果是为了和程序做对接,比较方便的方法是再提供一个API, 目前的ctcs是web的控制端,API则需要另外再开发,可以参考我后继的文章。
1.2. 面向读者
1.2.1. 接收端开发工程师
对于接收端业务系统的软件工程师,他关心的是如何创建任务,如何取消任务,知道当前的下载进度。
阅读第2章,第4章,第5章
1.2.2. 发送端开发工程师
对于发送端业务系统的软件工程师,则关心如何创建任务,如何给特定的接收端发送任务,任务的进度。
阅读:
阅读第2章,第4章,第5章
1.2.3. 运维/测试工程师
对于运维工程师,则关心服务器发送端和 接收端如何安装ctorrent软件。同时,软件工程师也关心有一个测试环境可以进行测试。
阅读:
阅读第2章,第3章,第4章,第5章
1.3. 集成的业务系统需求
具备的调用界面:
- 命令行
- web界面
具备相应的接口或调用方法:
- 创建任务
- 取消任务
- 知道当前进度
- 是否完成
- 动态带宽调整
2. p2p文件分发原理和过程
2.1. 概览
最为流行的P2P协议是BitTorrent协议, 可用于减少分发大型文件的服务器和网络影响。BitTorrent协议不是从单一源服务器下载文件,而是允许用户同时加入一组“主机”以相互上载/下载。
每一个ctorrent都是一个bittorrent的客户端,称为Peer, Peer和Peer之间互相发送和接收文件。
BitTorrent 的Tracker 提供可用于传输的文件列表,并允许客户端找到可以传输文件的被称为种子的对等用户.
Tracker用来记录和通知各个Peer的状态,分发一个文件时,首先创建一个种子文件并写入Tracker的地址,在使用DHT分发Peer之前,Tracker是找到Peer的唯一方法。如果是公开地进行文件分发,不考虑ISP对Tracker封禁的问题,采用tracker则用于提高Peer发现的速度,是相对更高效和易于维护的架构。
 image_1c5ic6jjhb7b30s1q33dicn4n4u.png-11.7kB
2.2. 整体文件下载动画演示分发过程
2.3. BitTorrent 算法介绍,名词定义
一般的下载服务器为每一个发出下载请求的用户提供下载服务,而BitTorrent的工作方式与之不同。分配器或文件的持有者将文件发送给其中一名用户,再由这名用户转发给其他用户,用户之间相互转发自己所拥有的文件部分,直到每个用户的下载都全部完成。这种方法可以使下载服务器同时处理多个大体积文件的下载请求,
以下是BitTorrent协议中重要的名词定义和算法介绍。
-
种子文件(Torrent文件) 。
BitTorrent是通过一个扩展名为.torrent的种子文件进行下载部署的,它由文件最初发布者创建,发布到互联网上,供感兴趣的用户下载。种子文件记录了负责管理该文件所在分发网络的Tracker服务器的地址、文件名、文件长度以及每个文件分块的SHA-1校验值。 -
种子节点(Seed节点) 。
Seed节点是指在一个P2P共享下载网络中,拥有完整文件拷贝的节点。这类节点只提供上传服务,而没有下载请求。 -
下载节点(Leecher节点)。
共享网络中相对于Seed节点的是Leecher节点,它只拥有部分的文件拷贝,在提供这部分拷贝的同时,还会向其他节点请求自己缺少的那部分文件。 -
跟踪服务器(Tracker服务器) 。
Tracker是一个中心服务器,负责跟踪系统中所有的参与节点,收集和统计节点状态,帮助参与节点互相发现,维护共享网络中文件的下载。一个Tracker服务器可以同时维护和管理多个文件共享网络。 -
共享网络(Swarm网络)。
一个Swarm共享网络是拥有和传输同一个文件资源的所有节点所构成的一个覆盖网络,包括共享该文件的Seed节点、Leecher节点和Tracker服务器。 -
分片机制。
BitTorrent像其他文件共享软件一样对文件进行了分片(Piece),Piece是最小的文件共享单位,每个Leecher在下载完一个完整的分片后才会进行完整性校验, 完整性校验成功后通知其他节点自己拥有这部分数据。为了加快文件传输的并行性,每个分片还会分成更小的分块(Block), Block是最小的文件传输单位,数据请求者每次向数据提供者请求一个Block的数据。 -
片选择机制。
为了保证共享网络的健壮性,延长一个共享网络的生命周期, BitTorrent通过局部最少块优先(Rarest-First)策略在节点间交换数据。下载节点根据自己周围的邻居节点拥有的数据块信息,选择拥有节点最少的分块优先下载,从而维护局部的数据块相对平衡。 -
节点选择机制。
BT系统采用了基于"Tit-for-Tat"的激励机制来抵御“Free-riding”行为,其中Choking/Unchoking算法最为关键。每个BT节点通过Internet/Uninterest消息来维护与多个节点的并发连接,但是只能为少数节点提供上传。服务提供节点在收到上传请求后会通过Choking/Unchoking机制决定是否对文件请求节点提供上传服务,可以拒绝服务(Choking)或者允许服务(Unchoking),该机制决定了两个相连的节点是否共享彼此的资源。为了防止部分节点只下载不上传的自私行为,Choking/Unchoking算法优先选择曾经为自己提供过上传数据并拥有高下载速率的节点,前者可以鼓励节点上传以获取下载,后者有助于最大化系统资源利用率。此外, Choking/Unchoking算法每隔30s将不考虑过去的贡献随机选择一个节点进行上传,一方面有利于发现可能存在更高下载速率的节点,另一方面可以避免新节点因从未进行过上传而无法获得有效的下载连接。
3. 安装
3.1. 环境准备
3.1.1. 系统环境准备
接收端的要求:
- 能上网
- 网关上可以作端口映射(port mapping)
- 防火墙打开相关端口
发送端的要求:
- 具有公网IP,能上网也能被访问
- 防火墙打开相应端口
- 带宽足够,至少100M带宽
3.1.1.1. Ubuntu 16.04
服务器或者客户端都可以设置为 ubuntu 16.04 ,方便快速安装。
sudo apt install cvs git -y

apt install openssh-client -y

sudo apt install sshpass -y

sudo apt-get install zlib1g-dev -y

sudo apt-get install nethogs -y
3.1.1.2. CentOS
CentOS则相应安装上面所列的 git, sshpass等软件
3.1.2. 防火墙与网络设置
防火墙添加对外提供服务的端口:
| service | port |
|---|---|
| tracker: | 80, 6969 |
| ctorrent: | 2706 -- 2106 |
| ctorrent control server: | 2780 |
| ssh: | 22 |
需要确保运行相应程序的服务器上的端口没有被占用,或者不冲突。ctorrent 如果不能设置很多端口,至少设置2696-2706的10个端口。
为了排查问题可以清理防火墙策略
iptables -F
3.1.2.1. Tracker服务器的说明
Tracker服务器位于公网上:
无需做防火墙或者路由器上的映射,直接运行即可。若有防火墙,只开放对外服务的端口即可。
Tracker服务器位于内网:
如果Tracker服务器是在内网,那么需要在路由器或者防火墙上提供公网ip到内网ip的映射,并且需要做NAT映射,将对外公布的外部ip和端口,作为各个接收端的tracker 地址
阿里云默认做了映射,会提供除了一对IP,公共IP,私有IP。
3.2. 客户端
3.2.1. 安装ctcs(ctorrent web端)及设置初始带宽限制
mkdir -p ~/soft

cd ~/soft

wget http://www.rahul.net/dholmes/ctorrent/ctcs-1.4.1.tar.gz

tar -zxvf ctcs-1.4.1.tar.gz

chmod 755 ctcs-1.4.1
每次启动后自动运行,可以编辑 /etc/rc.local
加入
3.2.1.1. root 用户
#download & upload limit 100Mbps

nohup /root/soft/ctcs-1.4.1/ctcs -d 12500 -u 12500 >/dev/null 2>&1 &
3.2.1.2. 非root用户
#download & upload limit 100Mbps

nohup /home/ubuntu/soft/ctcs-1.4.1/ctcs -d 12500 -u 12500 >/dev/null 2>&1 &
路径要根据实际的进行修改。
注意:ctcs默认是几百k, 所以一定要设置。 如果有 exit 0 要加到这行之前。
echo "#download & upload limit 100Mbps

nohup /root/soft/ctcs-1.4.1/ctcs -d 12500 -u 12500 >/dev/null 2>&1 &" >> /etc/rc.local
访问 localhost:2780 验证
3.2.2. 安装 ctorrent
3.2.2.1. 通过源码编译安装
wget http://39.106.122.67/ctorrent/ctorrent-1.3.4.dnh3.3.2.ubuntu.largefile.src.tgz

tar -zxvf ctorrent-1.3.4.dnh3.3.2.ubuntu.largefile.src.tgz

cd

cd ctorrent-1.3.4.dnh3.3.2/

./configure ; make; make install
make install 安装到“ /usr/bin/install -c 'ctorrent' '/usr/local/bin/ctorrent'”
将安装路径可执行文件ctorrent建加入 PATH
3.2.2.2. 通过安装包deb安装
ctorrent 源码(ubuntu最新源码修改过,支持200G单个文件传输):
wget http://39.106.122.67/ctorrent/ctorrent-1.3.4.dnh3.3.2.ubuntu.largefile.src.tgz
重新编译后的ubuntu安装包:
3.2.2.2.1. amd64 64bit系统:
wget http://39.106.122.67/ctorrent/ctorrent_1.3.4.dnh3.3.2-4_amd64.deb

sudo dpkg -i ctorrent_1.3.4.dnh3.3.2-4_amd64.deb
3.2.2.2.2. i386 32bit系统:
wget http://39.106.122.67/ctorrent/ctorrent_1.3.4.dnh3.3.2-4_i386.deb

sudo dpkg -i ctorrent_1.3.4.dnh3.3.2-4_i386.deb
3.2.3. 自动安装 ctorrent 脚本
wget http://39.106.122.67/ctorrent/install-ctorrent-ubuntu-16.04.sh
chmod a+x install-ctorrent-ubuntu-16.04.sh
sudo ./install-ctorrent-ubuntu-16.04.sh
3.3. 服务器端
服务器端也是个客户端,所以按照流程同样安装客户端的软件。
然后再搭建tracker,即完成。tracker服务器和 客户端不必是同一台。
注意:不建议tracker与发送的客户端都位于同一个NAT的内网,最好都具备公网地址,或者分开在不同的网络,否则对于客户端需要添加额外的参数配置。
3.3.1. 搭建Tracker服务器
下载OpenTracker依赖库及源码,编译。
cvs -d :pserver:cvs@cvs.fefe.de:/cvs -z9 co libowfat

cd libowfat

make

cd ..

# LEGACY: cvs -d:pserver:anoncvs@cvs.erdgeist.org:/home/cvsroot co opentracker

git clone git://erdgeist.org/opentracker

cd opentracker

make
3.3.1.1. 加入服务启动项
每次启动后自动运行,可以编辑 /etc/rc.local
加入
# only tracker need this line

nohup /root/soft/opentracker/opentracker -p 6969 -P 6969 >/dev/null &


#download & upload limit 100Mbps

nohup /root/soft/ctcs-1.4.1/ctcs -d 12500 -u 12500 >/dev/null 2>&1 &


date >> /root/soft/ctcs-1.4.1/start.log


exit 0
注意:ctcs默认是几百k, 所以一定要设置。
3.3.2. DNS指向变更
为了方便使用,可以将域名指向此IP,这里域名是
bttracker.top, 指向 39.106.122.67
4. 测试环境使用
4.1. 安装完成后使用说明
4.1.1. Tracker服务器
4.1.1.1. Tracker的URL(用于制作种子)
对于客户端,每次添加tracker地址时,使用的tracker url是:
http://bttracker.top:6969/announce
4.1.1.2. 验证
验证是否正常
telnet bttracker.top 6969
或者web访问
http://bttracker.top:6969/stats
进行验证
4.1.2. 文件分发管理端
4.1.2.1. 终端ssh shell访问ctorrent
需要以lijun登录,然后root身份运行。
密码找管理员要。
ssh lijun@106.120.83.20

sudo su -

cd ~/test
通过命令行控制文件的分发, 具体方法参考下一章使用。
4.1.2.2. ctorrent web 界面访问
对于ctorrent要进行web界面的控制时,需要访问本机2780端口
http://localhost:2780/ or http://ip:2780/
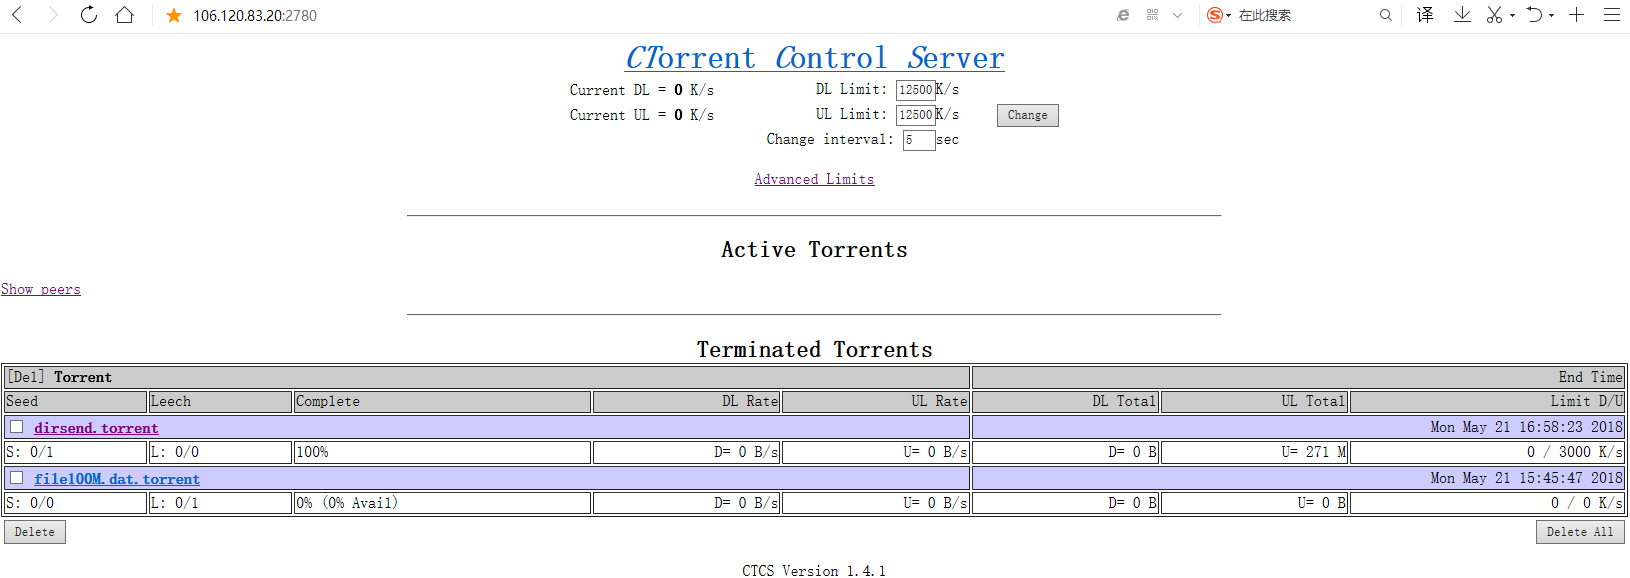 image_1ce12be3hgo8rkajdscsv1fdk9.png-72kB
这里就是
http://106.120.83.20:2780/
4.1.2.3. 生成测试用大文件
4.1.2.3.1. 制作发送用的文件的脚本 makefile.sh
sudo cp /home/lijun/soft/makefile.sh /usr/bin/
cat /usr/bin/makefile.sh
#!/bin/bash


# This script create a x+1M or xG+1M file by parameter

# which added a 1M random head


if [ ! $# == 1 ]; then

echo "Usage: $0 filesize "

echo " filesize >1M, example: 100M, 10G "

exit 1

fi


size=$1

fn=file${size}.dat

## add random 1M head

dd if=/dev/urandom of=$fn count=1M bs=1

truncate -s +$size $fn
usage examples:
makefile.sh 100M
makefile.sh 150G
4.1.2.3.2. 随机版 rmakefile.sh
另外,为了确保文件的随机性,全部采用随机数生成,与上面脚本一致,命令改为: rmakefile.sh 生成速度较慢。
路径:
/usr/bin/rmakefile.sh
4.1.2.4. 自动调用接收端执行p2p传输
客户端需要事先添加好。见 运维批量维护客户端一节. 或者如下seedp2p.sh一样,将接收端的用户名密码明文填写好。
cat seedp2p.sh
if [ ! $# == 1 ]; then
  echo "Usage: $0 filename/dirname "
  exit 1
fi

fn=$1
md5sum ${fn} > ${fn}.md5

# 生成种子
rm -f ${fn}.torrent
ctorrent -t -u "http://bttracker.top:6969/announce"  -s ${fn}.torrent ${fn}

# 开始传输给所有客户端。

# 客户端配置模板

### tencent1 --start

server=140.143.197.160
sshport=22
user=ubuntu
passwd=lijun123~~
storedir=/home/ubuntu/test
cport=2706

#通过scp将种子和md5传给远程客户端
sshpass -p $passwd  scp -P $sshport ${fn}.torrent $user@$server:$storedir
sshpass -p $passwd  scp -P $sshport ${fn}.md5 $user@$server:$storedir


# 通过ssh调用远程客户端ctorrent开始p2p传输

sshpass -p $passwd ssh -o StrictHostKeyChecking=no -o ConnectTimeout=3  -p $sshport $user@$server "cd $storedir ;rm -rf ${fn}; rm -f ${fn}.finished; ctorrent -d -S localhost:2780  ${fn}.torrent -X \"touch ${fn}.finished \" "

### tencent1 --end


# 文件分发端开始后台模式p2p传输,上传带宽限速 KB/s

# close by kill process
pid=`ps -ef |grep ctorrent |grep ${fn} | awk '{ print $2 }'`

if [ -n "$pid" ]; then
    echo exist same name process: $pid ;
    kill $pid;
fi

# close by web api
# peer_id=`curl http://localhost:2780/ |grep $fn | sed -r 's/^.*\/torrent\///g' | sed -r 's/".*//g'`
# curl http://localhost:2780/tracker/${peer_id}?tracker=quit

ctorrent -d -U 50000  -S localhost:2780  ${fn}.torrent
使用举例:
#filename
./seedp2p.sh file150G.dat

# dirname
cp /home/test .
./seedp2p.sh test
为了简化接收端的配置,可以先通过 4.2 配置ssh, 避免密码登录之后,再配置接收端,样例可以参考seedp2pv2.sh 中的 第2个接收端的模板 vultr4
查看上传和下载进度
发送端:
http://106.120.83.20:2780/
客户端:
http://140.143.197.160:2780/
4.2. 运维批量维护客户端
4.2.1. 在文件分发管理端:
为了简化客户端的维护任务,利用公私钥存储所有的客户端登录信息。
4.2.1.1. 事先一次性生成本机的ssh公私钥
ssh-keygen

# or

ssh-keygen -t ecdsa
生成本机的公私钥,一次性
4.2.1.2. 配置新增客户端
ssh client有两个配置文件,/etc/ssh/ssh_config和~/.ssh/config,前者是对所有用户,后者是针对某个用户,两个文件的格式是一样的。
在本地配置config文件,位于~/.ssh/config,在该文件加入如下几行配置:
sudo su -

vi ~/.ssh/config
host tencent1
  Hostname 140.143.197.160
  User ubuntu
  Port 22

host vultr4
    Hostname 149.28.75.117
    User root
    Port 22
添加客户端
sshpass -p $PASSWORD ssh-copy-id -o StrictHostKeyChecking=no -o ConnectTimeout=3 vultr4
添加完ssh的自动登录配置之后,就可以在 seedp2pv2.sh 中添加比较简单的客户端接收的模板(省去了端口用户等配置),如下:
server=vultr4
storedir=/root/test

scp ${fn}.torrent $server:$storedir
scp ${fn}.md5 $server:$storedir

ssh -o StrictHostKeyChecking=no -o ConnectTimeout=3  $server "cd $storedir ;rm -rf ${fn}; rm -f ${fn}.finished; ctorrent -d -S localhost:2780  ${fn}.torrent -X \"touch ${f
n}.finished \" "
5. 原始使用与接口
使用Ctorrent 除了命令行上的操作,也可以通过2780的web端进行页面查看管理。
按照每个任务来分,分成如下的任务。
在此基础上可以进行程序的接口,另外见 ctorrent API server提供的接口说明。
5.1. 创建任务
完整的服务器端创建种子,创建任务,复制种子到客户端,调用客户端开始接收任务,可以参考发送端的
seedp2p.sh
基于开发的需求,需要查看单独的任务,或者分开来执行,可以看下面说明
5.1.1. 先判断是否存在同名文件任务
5.1.1.1. 基于进程
根据文件名${fn} 到对应客户端上获取进程id
如果存在同文件发送/接收任务,先kill 相应的进程,脚本:
5.1.1.1.1. 示例
ps -ef |grep ctorrent |grep file100M.dat | awk '{ print $2 }'
23746

kill 23746
5.1.1.1.2. 脚本
# close by kill process
pid=`ps -ef |grep ctorrent |grep ${fn} | awk '{ print $2 }'`

if [ -n "$pid" ]; then
    echo exist same name process: $pid ;
    kill $pid;
fi
5.1.1.2. 基于2780接口
可以在进程级别查找, 也可以通过2780的接口查找peerid,然后停掉。
通过 http://localhost:2780/ 根据种子文件名找到 peerid.
5.1.1.2.1. 示例
查看网页源代码示例:
curl http://localhost:2780/ |grep file99M.dat

<TR bgcolor="#ccccff"><TD colspan=5><A HREF="/torrent/-CD0303-0x9226FE87C077863459CF14F5"><B>file99M.dat.torrent</B></A>
停掉任务的方法示例:
curl http://localhost:2780/tracker/-CD0303-0x9226FE87C077863459CF14F5?tracker=quit
5.1.1.2.2. 接口脚本
通过脚本获取peer_id,根据peerid构造url, 停止这个种子任务
# close by web api
peer_id=`curl http://localhost:2780/ |grep $fn | sed -r 's/^.*\/torrent\///g' | sed -r 's/".*//g'`

curl http://localhost:2780/tracker/${peer_id}?tracker=quit
5.1.2. 正式开始传输
通过scp将种子和md5传给远程客户端,或者提供一个http server, 在客户端通过wget下载。
sshpass -p $passwd scp -P $sshport ${fn}.torrent $user@$server:$storedir

sshpass -p $passwd scp -P $sshport ${fn}.md5 $user@$server:$storedir
调用远程客户端ctorrent开始p2p传输
cd $storedir ;
rm -rf ${fn};
ctorrent -d -S localhost:2780 ${fn}.torrent

# or after finished seeding 2 hours.

cd $storedir ;
rm -rf ${fn};
ctorrent -d -e2 -S localhost:2780 ${fn}.torrent
(e2表完成后做种2小时,e0表示不做种)
-d 表示后台运行
-S 表示指定 web的管理端地址
如果没有种子,则需要先创建种子:
ctorrent -t -u "http://bttracker.top:6969/announce" -s ${fn}.torrent ${fn}
有了种子,则可以如上所示直接发送即可。
ctorrent -d -U 50000 -S localhost:2780 ${fn}.torrent
这种情况默认是在当前目录下,要发送的内容和内容对应的种子同时存在,那么就执行发送。 同样的命令,如果当前目录下没有对应的内容文件或目录,那么就开始接收,接受完后开始作种发送。
为了方便,也可以指定全路径,然后在当前路径下存储种子来进行发送。(用于存储的文件与种子文件不在同一目录下的情况,但是这样容易混淆,不建议使用。)
ctorrent -s /home/lijun/test/file3M.dat file3M.dat.torrent
"-s"参数在制作种子时表示种子文件名, 在发送下载文件时表示原文件的路径。
为了方便, 我把所有的过程包括直接通过ssh调用远程的接收端进行接收都写到了seedp2p.sh里面,无论是单个文件还是一个目录,都只需要
./seedp2p.sh dir/filename
目录时无法生成md5文件进行校验. 需要自己逐个去md5sum验证。或者通过ctorrent -c 验证。
5.2. 取消任务
5.2.1. 取消ctorrent一个发送/接收文件的进程
杀掉进程
# close by kill process
pid=`ps -ef |grep ctorrent |grep ${fn} | awk '{ print $2 }'`

if [ -n "$pid" ]; then
    echo exist same name process: $pid ;
    kill $pid;
fi
或者
通过脚本获取peer_id,根据peerid构造url, 停止这个种子任务
# close by web api
peer_id=`curl http://localhost:2780/ |grep $fn | sed -r 's/^.*\/torrent\///g' | sed -r 's/".*//g'`

curl http://localhost:2780/tracker/${peer_id}?tracker=quit
5.2.2. 取消所有的进程
killall ctorrent
5.3. 获取进度
5.3.1. Web访问
访问 : http://ip:2780/ 获取相应的进度,百分比
具体含义查看:
http://www.rahul.net/dholmes/ctorrent/ctcs-protocol.html
如果要随时主动控制带宽的大小,同样可以通过2780的web界面进行提交和更改。
5.3.2. 二次开发,本地文件交换信息
进一步的详细状态信息待再开发,可以通过本地文件的形式进行交换。
5.3.3. Curl脚本获取
或者借助curl 然后提取出网页上的进度:
5.3.3.1. 网页源码示例:
curl http://localhost:2780/ |grep file54M.dat.torrent -A 2
<TR bgcolor="#ccccff"><TD colspan=5><A HREF="/torrent/-CD0303-0x147E3EE8C5DAC36448630CBE"><B>file99M.dat.torrent</B></A>

<TD colspan=3 align=right>Thu May 17 12:21:09 2018</TR>

<TR><TD>S: 0/0<TD>L: 0/0<TD>100%
取最后一个百分比即可。
5.3.3.2. 脚本:
curl http://localhost:2780/ |grep file54M.dat.torrent -A 2 | awk '{ FS=">"; print $NF }'
如果想获取更多信息,例如上传下载的速率等,可以 “ -A 5" 将上传和下载的相关信息都解析出来。
5.4. 是否完成
可以根据进度, 也可以在客户端完成下载后执行一个 命令,生成一个指示文件。
例如:
ctorrent -d -S localhost:2780 ${fn}.torrent -X “touch ${fn}.finished”
完整脚本如下:
sshpass -p $passwd ssh $user@$server "cd ${storedir}; rm -rf ${fn}; rm -rf ${fn}.finished; ctorrent -d -e2 ${fn}.torrent -X \"touch ${fn}.finished \""
5.5. 获取种子对应的文件信息
ctorrent -x file99M.dat.torrent
META INFO

Announce: http://bttracker.top:6969/announce

Created On: Thu May 17 12:21:08 2018

Piece length: 4128768

Created with: Enhanced-CTorrent/dnh3.3.2

FILES INFO

<1> file99M.dat [104857600]

Total: 100 MB
5.6. 总带宽占用设置
5.6.1. 带宽换算
http://www.conversioncenter.net/bandwidth-conversion/from-megabit/sec-(Mbps)-to-kilobyte/sec-(kB/s)
常见的100Mbps带宽,则其大小为 100 / 8 * 1000 = 12500 K/s
5.6.2. 带宽设置
界面访问 : http://ip:2780/ 设置总带宽占用, 根据每个种子任务设置其带宽占用。
如果是通过程序自动设置,可以使用curl, 如果程序是从本机发起请求,则可以把ip改为
可以一次设置一个参数,也可以设置多个,多个时要用双引号括起来。
带宽的单位大小为 kilobytes per second (KB/s).
设置100Mbps, 12500K/s的下载带宽限制:
curl "http://localhost:2780/?dlimit=12500"
5.6.2.1. 发送端设置
同时设置上传和下载带宽限制
curl "http://106.120.83.20:2780/?dlimit=1000&ulimit=3000"
5.6.2.2. 接收端设置
curl "http://140.143.197.160:2780/?dlimit=1000&ulimit=3000"
5.7. 每个种子任务的设置(暂停,重启与终止)
5.7.1. 先找 peerid
首先通过 http://localhost:2780/ 根据种子文件名找到 peerid.
curl http://localhost:2780/ |grep file99M.dat.torrent

<TR bgcolor="#ccccff"><TD colspan=5><A HREF="/torrent/-CD0303-0x9226FE87C077863459CF14F5"><B>file99M.dat.torrent</B></A>
例如是“-CD0303-0x9226FE87C077863459CF14F5”
然后:
5.7.2. 根据peerid构造curl执行命令
暂停上传和下载 (待测试)
curl --data "pause=1" http://localhost:2780/torrent/-CD0303-0x9226FE87C077863459CF14F5
重启这个种子任务
curl http://localhost:2780/tracker/-CD0303-0x9226FE87C077863459CF14F5?tracker=restart
停止这个种子任务(已验证)
curl http://localhost:2780/tracker/-CD0303-0x9226FE87C077863459CF14F5?tracker=quit
6. 自动安装脚本内容
6.1. 仅安装ctorrent& ctcs的 v1 版
cat install-ctorrent-ubuntu-16.04.sh
echo " start to setup ctorrent server "

sudo apt install -y cvs git openssh-client sshpass zlib1g-dev nethogs


# setup ctcs
mkdir -p ~/soft

cd ~/soft
softpwd=`pwd`

if [ ! -f "${softpwd}/ctcs-1.4.1.tar.gz" ]; then
  wget http://www.rahul.net/dholmes/ctorrent/ctcs-1.4.1.tar.gz
  tar -zxvf ctcs-1.4.1.tar.gz
  chmod 755 ctcs-1.4.1
fi


sudo grep "soft/ctcs-1.4.1/ctcs" /etc/rc.local
if [ $? -eq 0 ]; then
  echo "found"
else
  sudo echo " first time add script to rc.local"
  sudo sed -i "s/exit 0//" /etc/rc.local
  echo "#download & upload limit 100Mbps" | sudo tee -a /etc/rc.local
  echo "nohup ${softpwd}/ctcs-1.4.1/ctcs -d 12500 -u 12500 >/dev/null 2>&1 & " | sudo tee -a /etc/rc.local
  echo "exit 0 " | sudo tee -a /etc/rc.local
  nohup ${softpwd}/ctcs-1.4.1/ctcs -d 12500 -u 12500 >/dev/null 2>&1 &
fi

# 32 or 64 bit
if [ `getconf LONG_BIT` -eq "32" ]; then
  echo " 32 bit system"
  if [ ! -f "${softpwd}/ctorrent_1.3.4.dnh3.3.2-4_i386.deb" ]; then
    wget http://39.106.122.67/ctorrent/ctorrent_1.3.4.dnh3.3.2-4_i386.deb
    sudo dpkg -i ctorrent_1.3.4.dnh3.3.2-4_i386.deb
  fi
else
  echo " 64 bit system"
  if [ ! -f "${softpwd}/ctorrent_1.3.4.dnh3.3.2-4_amd64.deb" ]; then
    wget http://39.106.122.67/ctorrent/ctorrent_1.3.4.dnh3.3.2-4_amd64.deb
    sudo dpkg -i ctorrent_1.3.4.dnh3.3.2-4_amd64.deb
  fi
fi


mkdir -p ~/test
chown 755 ~/test
cd ~/test

sudo wget http://39.106.122.67/ctorrent/makefile.sh
sudo wget http://39.106.122.67/ctorrent/seedp2p.sh
sudo chmod 755 makefile.sh
sudo chmod 755 seedp2p.sh
6.2. 补充ctorrent API server的安装的版本
可以直接从 http://39.106.122.67/ctorrent/install-ctorrent-ubuntu-16.04.sh 下载
7. ctorrent 发送时网络问题监控情况排查
因为有些网络服务商可能因为自己网络的问题,会造成ctorrent无法正常运行,就需要提供相应情况供他们排查。
另外如果运行不正常,也可能是因为网管封了p2p的传输。需要根据具体情况
7.1. 第一次测试
nethogs
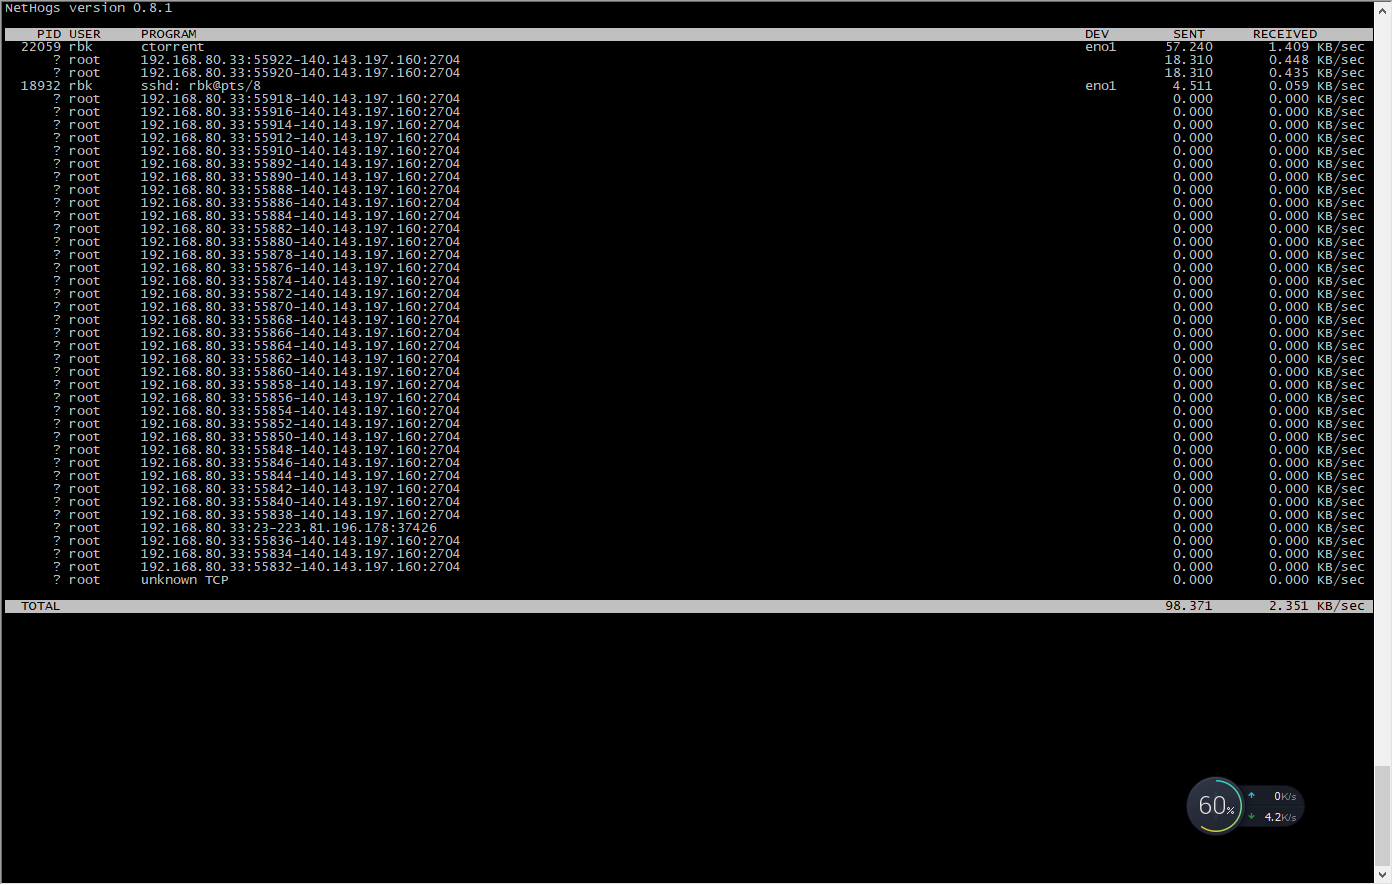 image_1cge5aubi54jfa01lp81ejm1p2ip.png-151.5kB
可以看到不断地产生新的ctorrent 连接到 另外一个服务器的 2704端口(ctorrent的服务端口)
 image_1cge5ecvd1qq617q11eol14q44lg23.png-36.2kB
另一台服务器的2704处于监听状态
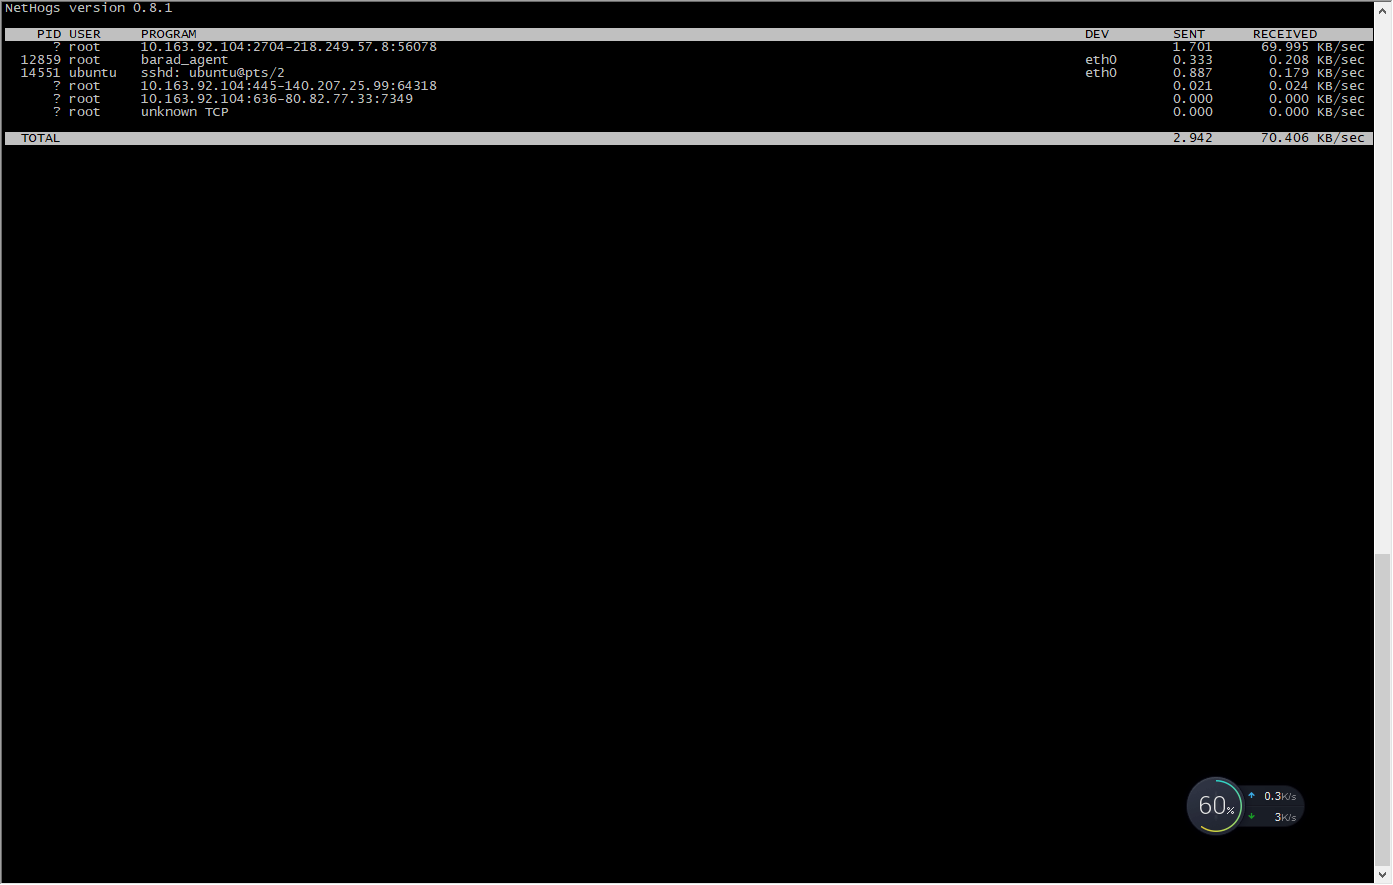 image_1cge5d9j9pbt1n4916pn1u2dc1n16.png-53.3kB
用nethogs看有一些流量产生,
再去看
实际接收的文件百分比:
 image_1cge62upo16b7rd8e331c921fkc2g.png-31.3kB
ctorrent -c file13M.dat.torrent
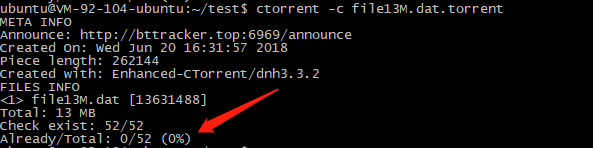 image_1cge66qbmkhg1qc2fn6aohvoa4t.png-17.4kB
其路由情况:
rbk@rbk-OptiPlex-7010:~$ traceroute 140.143.197.160
traceroute to 140.143.197.160 (140.143.197.160), 30 hops max, 60 byte packets
 1  192.168.80.1 (192.168.80.1)  0.799 ms  0.785 ms  0.770 ms
 2  218.249.57.1 (218.249.57.1)  54.155 ms  54.754 ms  55.753 ms
 3  10.255.37.133 (10.255.37.133)  23.469 ms  22.871 ms  23.155 ms
 4  218.241.253.85 (218.241.253.85)  22.849 ms  23.116 ms  23.088 ms
 5  * 14.197.178.49 (14.197.178.49)  23.072 ms  23.053 ms
 6  14.197.252.49 (14.197.252.49)  23.043 ms 14.197.219.201 (14.197.219.201)  24.327 ms *
 7  * 14.197.213.62 (14.197.213.62)  17.790 ms  17.754 ms
 8  14.197.215.154 (14.197.215.154)  17.752 ms 14.197.149.246 (14.197.149.246)  20.502 ms 14.197.215.150 (14.197.215.150)  20.484 ms
 9  10.200.5.73 (10.200.5.73)  20.465 ms  19.114 ms  20.427 ms
10  10.200.150.190 (10.200.150.190)  35.698 ms 10.200.150.222 (10.200.150.222)  38.072 ms 10.200.150.190 (10.200.150.190)  34.952 ms
11  10.200.150.222 (10.200.150.222)  37.013 ms  38.321 ms 10.200.150.190 (10.200.150.190)  22.003 ms
12  100.120.215.229 (100.120.215.229)  23.786 ms  23.760 ms 100.120.219.229 (100.120.219.229)  29.385 ms
13  140.143.197.160 (140.143.197.160)  26.324 ms  24.136 ms  25.620 ms
到另外一台服务器的路由
rbk@rbk-OptiPlex-7010:~$ traceroute 124.193.192.168
traceroute to 124.193.192.168 (124.193.192.168), 30 hops max, 60 byte packets
 1  192.168.80.1 (192.168.80.1)  0.895 ms  0.883 ms  0.868 ms
 2  218.249.57.1 (218.249.57.1)  8.759 ms  10.092 ms  10.625 ms
 3  124.193.192.168 (124.193.192.168)  21.170 ms  21.167 ms  21.153 ms
都同时经过了
218.249.57.1 这台网关或路由器
可能是这台机器的对特定的tcp包做了过滤策略处理,无意中中断了 ctorrent的链接,导致无法传输数据。
解决方案:A. 联系网络运营商, B. 修改tcp包的特征,例如修改包头特征。
7.2. 第二次测试
2018.6.28
拓扑图
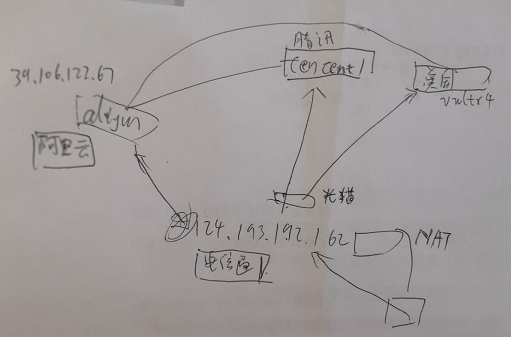 image_1ch2qsdvn1eif1v4l1ftl8q31bc816.png-120.4kB
将 ctserver 从机房的防火墙下面搬出来到光猫的下面,配置了一个公网ip
124.193.192.162
然后尝试发送文件到 tencent1, vultr4 仍然是失败,有数据发出,但是接收端收不到。
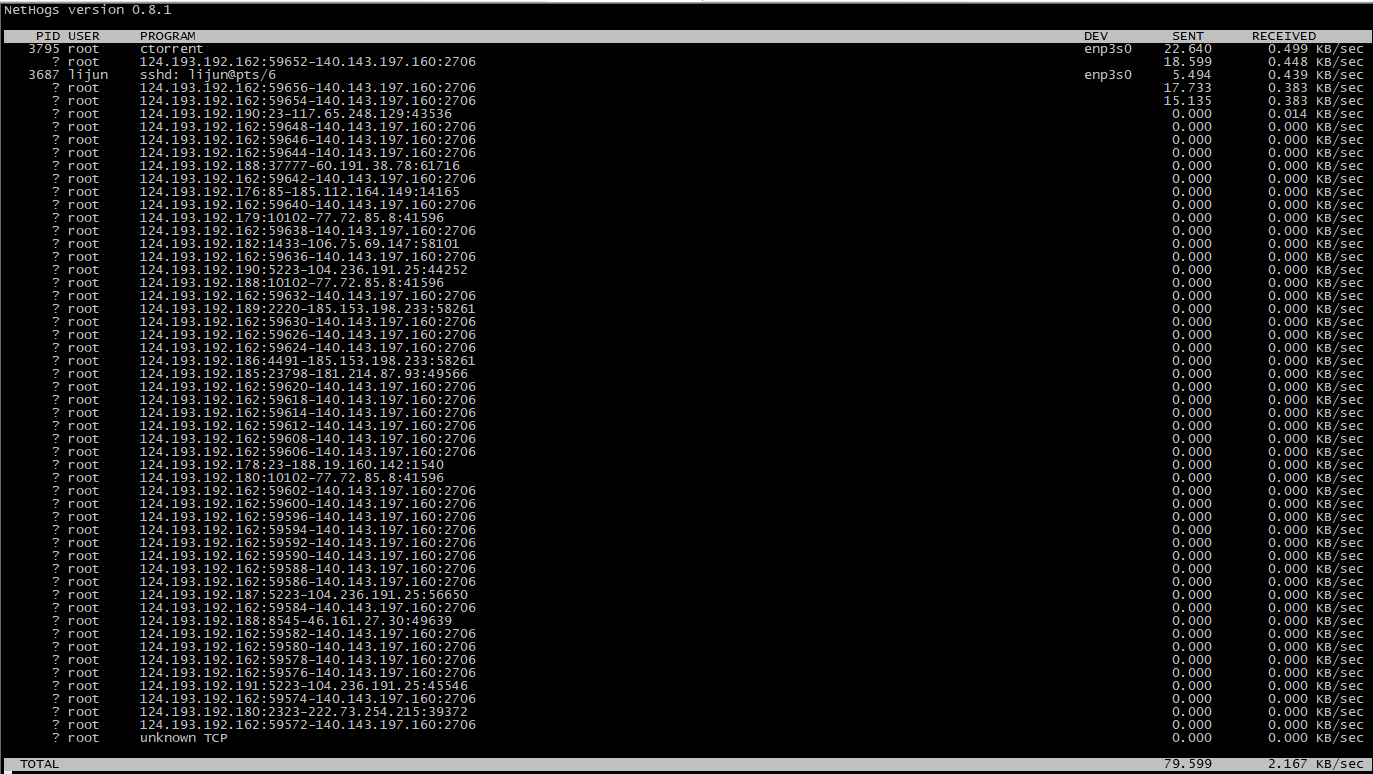 image_1ch2m7praiek1cmdf6j1ertml9.png-163.5kB
但是过了几分钟,接收端开始都收到了。
再尝试发送88M的文件
tencent1 收到了,但是vultr4没收到。
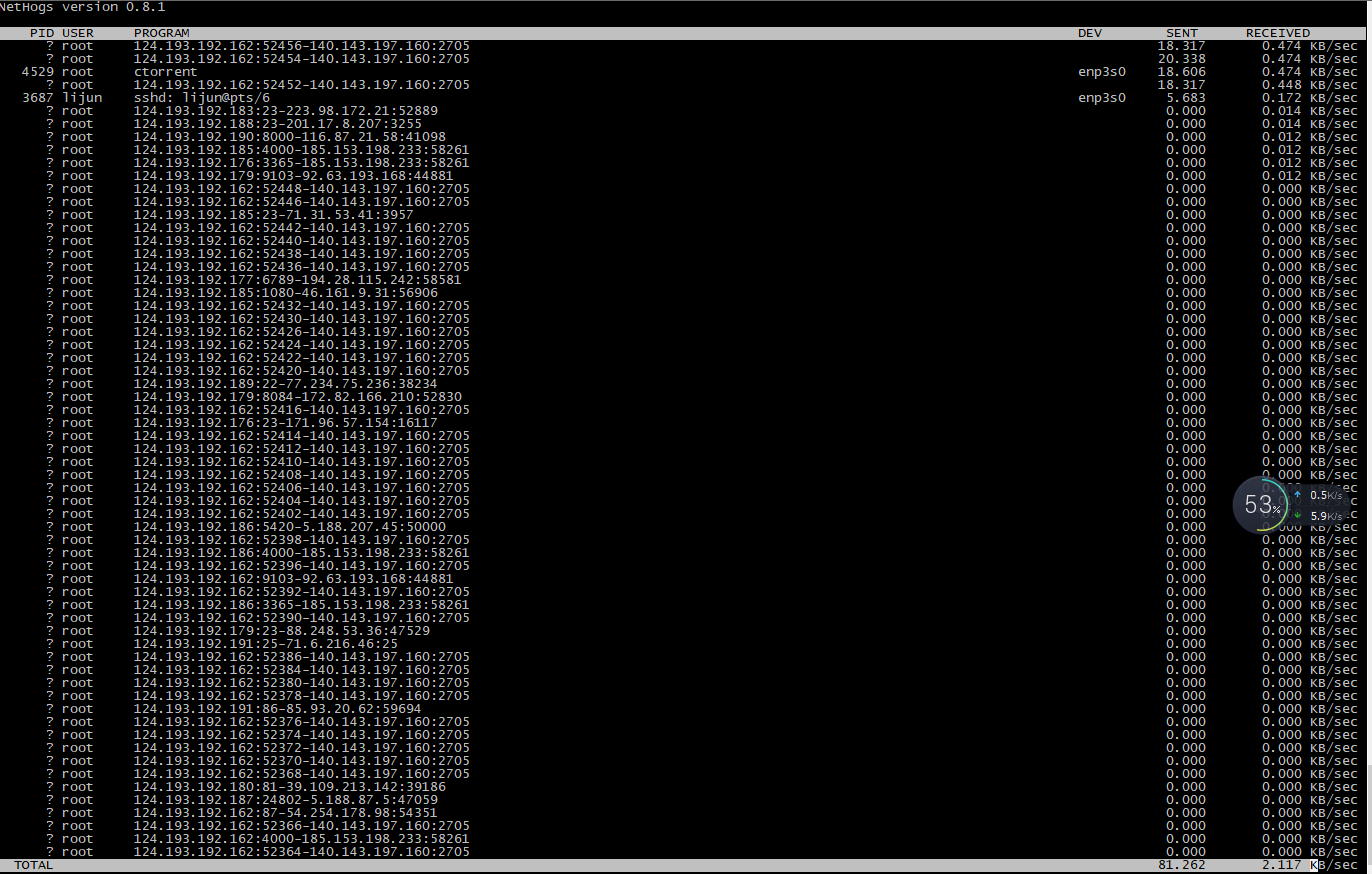 image_1ch2nrv6jd5kpqtb741fj8j89m.png-203.6kB
root@ctserver:~/test# traceroute 140.143.197.160
traceroute to 140.143.197.160 (140.143.197.160), 30 hops max, 60 byte packets
 1  gateway (124.193.192.161)  7.382 ms  8.337 ms  9.236 ms
 2  10.255.37.133 (10.255.37.133)  3.020 ms  3.366 ms  3.110 ms
 3  218.241.253.85 (218.241.253.85)  2.228 ms  2.230 ms  2.221 ms
 4  14.197.210.209 (14.197.210.209)  1.207 ms  1.279 ms *
 5  14.197.252.53 (14.197.252.53)  2.548 ms 14.197.219.201 (14.197.219.201)  3.445 ms 14.197.219.205 (14.197.219.205)  2.924 ms
 6  14.197.213.86 (14.197.213.86)  2.278 ms 14.197.196.26 (14.197.196.26)  3.855 ms 14.197.196.22 (14.197.196.22)  4.036 ms
 7  14.197.245.2 (14.197.245.2)  2.846 ms 14.197.215.142 (14.197.215.142)  3.157 ms 14.197.215.154 (14.197.215.154)  3.814 ms
 8  10.200.5.69 (10.200.5.69)  3.578 ms  4.912 ms  5.165 ms
 9  10.200.150.174 (10.200.150.174)  18.322 ms  18.810 ms 10.200.150.206 (10.200.150.206)  18.984 ms
10  10.200.150.206 (10.200.150.206)  18.313 ms  16.860 ms *
11  100.120.215.229 (100.120.215.229)  11.573 ms 100.120.219.229 (100.120.219.229)  13.147 ms 100.120.215.229 (100.120.215.229)  10.980 ms
12  140.143.197.160 (140.143.197.160)  3.914 ms  3.335 ms  3.263 ms
root@ctserver:~/test# traceroute 149.28.75.117
traceroute to 149.28.75.117 (149.28.75.117), 30 hops max, 60 byte packets
 1  gateway (124.193.192.161)  5.645 ms  6.665 ms  7.543 ms
 2  10.255.37.133 (10.255.37.133)  3.143 ms  7.572 ms  7.742 ms
 3  124.205.98.201 (124.205.98.201)  3.203 ms  3.177 ms  3.158 ms
 4  124.205.98.253 (124.205.98.253)  3.907 ms  3.559 ms *
 5  218.241.244.9 (218.241.244.9)  3.023 ms 218.241.244.17 (218.241.244.17)  3.013 ms 218.241.244.21 (218.241.244.21)  4.256 ms
 6  218.241.244.69 (218.241.244.69)  4.198 ms  3.676 ms  3.666 ms
 7  * 106.120.192.5 (106.120.192.5)  6.945 ms  6.982 ms
 8  106.120.234.141 (106.120.234.141)  3.286 ms  2.925 ms  2.962 ms
 9  * * *
10  202.97.48.218 (202.97.48.218)  6.304 ms 202.97.94.206 (202.97.94.206)  8.053 ms 202.97.53.114 (202.97.53.114)  7.463 ms
11  202.97.53.62 (202.97.53.62)  9.411 ms  9.374 ms 202.97.81.170 (202.97.81.170)  8.075 ms
12  202.97.52.86 (202.97.52.86)  167.216 ms  167.219 ms 202.97.52.190 (202.97.52.190)  228.261 ms
13  202.97.90.118 (202.97.90.118)  179.838 ms * 202.97.86.177 (202.97.86.177)  164.823 ms
14  218.30.53.70 (218.30.53.70)  193.710 ms te-0-3-0-8-pe03.11greatoaks.ca.ibone.comcast.net (66.208.216.41)  155.565 ms 218.30.53.70 (218.30.53.70)  193.100 ms
15  hu-0-3-0-7-cr01.9greatoaks.ca.ibone.comcast.net (68.86.83.137)  156.501 ms hu-0-3-0-5-cr01.9greatoaks.ca.ibone.comcast.net (68.86.83.129)  156.280 ms hu-0-4-0-4-cr01.9greatoaks.ca.ibone.comcast.net (68.86.88.189)  146.537 ms
16  be-11025-cr02.sunnyvale.ca.ibone.comcast.net (68.86.87.157)  150.045 ms * *
17  * * be-11015-cr02.losangeles.ca.ibone.comcast.net (68.86.86.98)  278.433 ms
18  149.28.75.117.vultr.com (149.28.75.117)  184.056 ms be-11599-pe01.losangeles.ca.ibone.comcast.net (68.86.84.194)  172.469 ms  172.483 ms
7.2.1. 对比正常的阿里云发送
从 阿里云 发送
区别1: nethogs查看的网络连接很稳定,没有无效链接不断出现。
区别2: 接收端tencent1, vultr4 马上开始接收数据。
 image_1ch2ptarum1g3eag8f4ht15gr2j.png-40.5kB
7.3. 6.29第三次测试
经客服反映,说做过调整了,让我再测试一遍。
结果还是刚开始时接收端收不到,发送端不断地出现连接客户端端口的情形
正常是一开始就能收到,没有创建这么多的TCP链接。
 image_1ch58kcgj1nmnric758m12779.png-134.6kB
如图,本机不断连接 腾讯tencent1的 2703端口,(正常应该不会出现这么多连接,只一次就够了)
过了一会,接收端都开始接收了,这是之前所没有的。所以问题只解决了一半。
7.4. 7.5 第四次测试
从218.249.57.8 ( 内网ip: 192.168.80.33 ) 往外发送文件。仍然一样的现象。一开始发送,通过网络监控工具nethogs看到有不断的出现断开的网络连接,然后ctorrent就不断尝试再建立新连接。
接收端 149.28.75.117 接收很慢; 140.143.197.160 接收很慢。
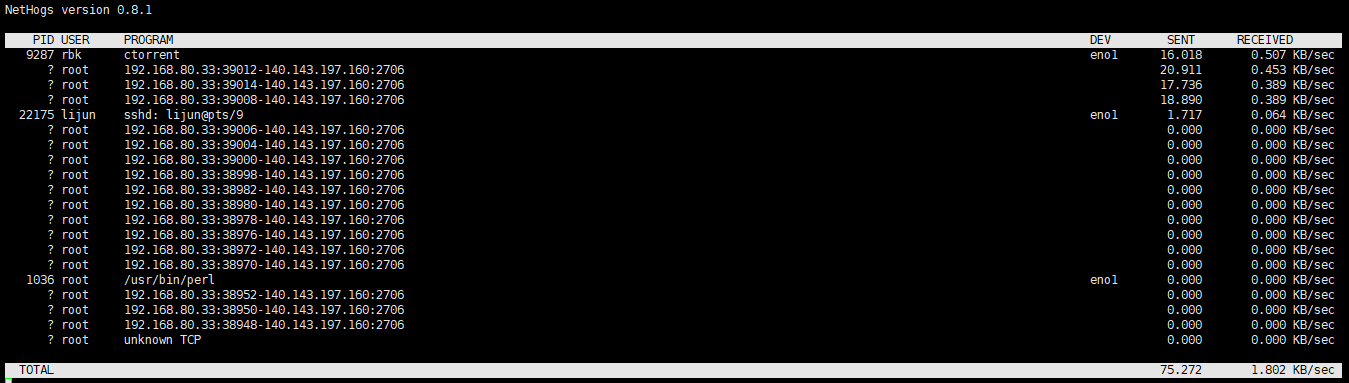 image_1chkt6dfk141l1iul1uph1ksehkd9.png-61.1kB


网友评论