用SyncThing进行文件同步和存储分发
1. 前言
当我们有文件同步或者存储的需求时,又不想采用云盘,那么p2p的文件同步工具就是个不错的选择,比上传到云盘再下载的过程更加有效率,直接点对点地同步内容。 做的不错的有商业化的Resilio Sync。而Syncthing是 Resilio Sync / BT Sync 的开源替代品。
Syncthing 最大的特色是采用了与 Resilio Sync (BitTorrent Sync) 类似的 P2P 分布式技术,无需中心服务器,即可让多台设备互相实时同步文件。
2. 安装
2.1. ubuntu版本安装
Debian/Ubuntu版本参考自:
https://apt.syncthing.net/
其他linux或windows版本可以参考:
https://docs.syncthing.net/users/contrib.html#contributions
执行下列命令
# Add the release PGP keys:
curl -s https://syncthing.net/release-key.txt | sudo apt-key add -

# Add the "stable" channel to your APT sources:
echo "deb https://apt.syncthing.net/ syncthing stable" | sudo tee /etc/apt/sources.list.d/syncthing.list

# Update and install syncthing:
sudo apt-get update
sudo apt-get install syncthing
如果遇到"The method driver /usr/lib/apt/methods/https could not be found."的提示,则
安装apt-transport-https
sudo apt-get install apt-transport-https
2.2. 设置系统自启动
https://docs.syncthing.net/users/autostart.html
对于采用 systemd 的操作系统可以创建两种类型的服务:
user service:用户级服务,只有在用户登录系统后 syncthing 才会启动。
system service:系统级服务,syncthing 随系统启动而启动,而不论用户是否已经登录系统。
下面步骤是加入系统级服务中。
2.2.1. 创建运行syncthing的用户,例如myuser.
useradd myuser -d /home/myuser -m
2.2.2. 找到 service文件并复制到system目录
find / -name syncthing@.service
/lib/systemd/system/syncthing@.service
cp /lib/systemd/system/syncthing@.service /etc/systemd/system/
2.2.3. systemctl 执行启动
修改为自己期望运行syncthing的用户。
Enable and start the service. Replace “myuser” with the actual Syncthing user after the @:
systemctl enable syncthing@myuser.service
systemctl start syncthing@myuser.service
检查:
systemctl status syncthing@myuser.service
也可以直接使用root
● syncthing@root.service - Syncthing - Open Source Continuous File Synchronization for root
   Loaded: loaded (/etc/systemd/system/syncthing@.service; enabled; vendor preset: enabled)
   Active: active (running) since Thu 2018-02-08 17:24:42 CST; 5min ago
     Docs: man:syncthing(1)
 Main PID: 7941 (syncthing)
   CGroup: /system.slice/system-syncthing.slice/syncthing@root.service
           └─7941 /usr/bin/syncthing -no-browser -no-restart -logflags=0

Feb 08 17:24:44 iZ2ze55t9zj53mddhdt8c9Z syncthing[7941]: [KV4LG] INFO: Device KV4LG6S-YRZDVBA-RIPDLE7-6VF2W6X-TSVS4WP-4F2MBSD-QB6YKHW-N3UUSQK is "iZ2ze55t9zj53mddhdt8c9Z" at [dynamic]
Feb 08 17:24:44 iZ2ze55t9zj53mddhdt8c9Z syncthing[7941]: [KV4LG] INFO: Loading HTTPS certificate: open /root/.config/syncthing/https-cert.pem: no such file or directory
Feb 08 17:24:44 iZ2ze55t9zj53mddhdt8c9Z syncthing[7941]: [KV4LG] INFO: Creating new HTTPS certificate
Feb 08 17:24:44 iZ2ze55t9zj53mddhdt8c9Z syncthing[7941]: [KV4LG] WARNING: Syncthing should not run as a privileged or system user. Please consider using a normal user account.
Feb 08 17:24:44 iZ2ze55t9zj53mddhdt8c9Z syncthing[7941]: [KV4LG] INFO: GUI and API listening on 127.0.0.1:8384
Feb 08 17:24:44 iZ2ze55t9zj53mddhdt8c9Z syncthing[7941]: [KV4LG] INFO: Access the GUI via the following URL: http://127.0.0.1:8384/
Feb 08 17:24:46 iZ2ze55t9zj53mddhdt8c9Z syncthing[7941]: [KV4LG] INFO: kcp://0.0.0.0:22020 detected NAT type: Full cone NAT
Feb 08 17:24:46 iZ2ze55t9zj53mddhdt8c9Z syncthing[7941]: [KV4LG] INFO: kcp://0.0.0.0:22020 resolved external address kcp://39.106.199.67:22020 (via stun.voipbuster.com:3478)
Feb 08 17:24:54 iZ2ze55t9zj53mddhdt8c9Z syncthing[7941]: [KV4LG] INFO: Detected 0 NAT devices
Feb 08 17:25:28 iZ2ze55t9zj53mddhdt8c9Z syncthing[7941]: [KV4LG] INFO: Joined relay relay://106.185.55.60:22067
2.3. 修改Syncthing配置文件以便外网可以访问
vim ~/.config/syncthing/config.xml
找到如下一行
<address>127.0.0.1:8384</address>
然后把IP127.0.0.1修改成0.0.0.0即可保存退出:
systemctl restart syncthing@root.service
3. 防火墙相关设置
参考和翻译自官方文档:
https://docs.syncthing.net/users/firewall.html#firewall-setup
3.1. 端口转发设置
在计算机网络中,端口转发(Port Forwards)或端口映射(Port Mapping)是网络地址转换(NAT)的一种应用,在数据包穿越网络网关(如路由器或防火墙)时将通信请求从一个地址和端口号组合重定向到另一个地址。此技术最常用于通过将通信的目标IP地址和端口号重新映射到网关对端(外部网络)上的主机,使位于受保护的内部主机网络上的主机上的服务可用。
如果你有一个支持UPnP的NAT路由器,一个让端口转发工作的最简单方法是确保在Syncthing和路由器上都启用了UPnP设置,Syncthing将尝试处理剩下的事情。如果成功,您将在控制台中看到一条消息:
Created UPnP port mapping for external port XXXXX on UPnP device YYYYY.
如果这不可能或不可行,则应该为端口 22000 / TCP设置端口转发,或者在“ Sync Protocol Listen Address ”设置中设置自己定义的端口。外部转发端口和内部目标端口必须相同(即22000 / TCP)。
Syncthing中的交流是双向的。因此,如果您为一个设备设置端口转发,即使它们位于NAT网络或防火墙之后,其他设备也可以连接到该设备。
在没有端口转发的情况下,中继(Relay)可能工作得很好,以使设备连接和同步,但与直接连接相比性能不佳。
3.2. 防火墙设置
如果PC机本身有一个防火墙,则需要打开以下用于传入和传出通信的端口:
Port 22000/TCP (or the actual listening port if you have changed the Sync Protocol Listen Address setting.)
Port 21027/UDP (for discovery broadcasts on IPv4 and multicasts on IPv6)
如果在linux上使用ufw, 则可以使用如下命令来打开:
打开syncthing服务:
sudo ufw allow syncthing
打开 Syncthing web GUI
sudo ufw allow syncthing-gui
3.3. 设置远端Web GUI
除了前面提到的可以修改Syncthing配置文件以便外网可以访问,也需要同时设置防火墙。
通过SSH隧道
如果您可以通过SSH访问运行Syncthing的计算机,但不想将Web GUI端口对外部打开,则可以通过SSH隧道访问它。您可以使用以下命令启动隧道:
ssh -L 9999:localhost:8384 machine
这将绑定到您的本地端口9999,并将所有连接从那里转发到目标机器上的端口8384。即使Syncthing只能在本地主机127.0.0.1上侦听,这仍然有效。
4. 使用
图形或者web界面操作,本质上就是添加远端设备ID,选择需要同步或者共享的文件夹的过程,网上有现成的文档说明,也有一些国外的视频介绍其整个过程。 这里不再重复。
打开浏览器访问本机,若是远程云主机可以直接敲IP:
https://localhost:8384/
使用过程,共享文件和文件夹的过程可以看下面的视频:
https://www.youtube.com/watch?v=BXSYKsYI1Zo
5. 架构与机制
然后补充一下软件架构,如下图所示:
 捕获.PNG-109.4kB
架构和团队开发的情况可以参考下面的调研报告:
调研报告:Syncthing: Open Source Continuous File Synchronisation
https://delftswa.gitbooks.io/desosa-2017/content/syncthing/chapter.html
另外需要说明的是,这个大学的学生对很多流行的软件架构进行了调研,可以参考如下网址:
Delft Students on Software Architecture 的调研报告,对很多流行的开源软件进行了软件架构的调研:
https://www.gitbook.com/book/delftswa/desosa-2017/details
https://www.gitbook.com/book/delftswa/desosa2016/details
6. 文件大小与客户端数量限制
查了一下官网的论坛, 找到一些相关限制,而且随着开发的进行,限制也逐渐变大。
6.1. Syncing large files, “Scanning”, then nothing?
https://forum.syncthing.net/t/syncing-large-files-scanning-then-nothing/5617/10
128GB
time: Sep 2015
6.2. Syncthing lims & caps
https://forum.syncthing.net/t/syncthing-lims-caps/10011
Syncthing currently can’t handle files larger than about 1.25 TiB.
time: June 2017
6.3. Maximum amount of peer
https://github.com/syncthing/syncthing/issues/879
When I exceed 63 peer, for each connection I got the following error
version: 0.10.2 Linux x64
time: 19 Oct 2014
fixed version: 0.10.3
time: 14 Apr 2015
6.4. Maximum number of devices
https://forum.syncthing.net/t/maximum-number-of-devices/5749
data: The largest reported cluster has 457 devices, and the largest reported number of folders on a single device is 458
time: Sep 2015
6.5. 结论
看了论坛里的问答,文件和能同步的设备的最大限制一直在提升。
再看 统计:https://data.syncthing.net/, 最大的设备数达到了2200个。
对于日常应用是足够的,就目前的版本,支持的最大的文件也超过1T,连接的客户端也超过了500到2000个。
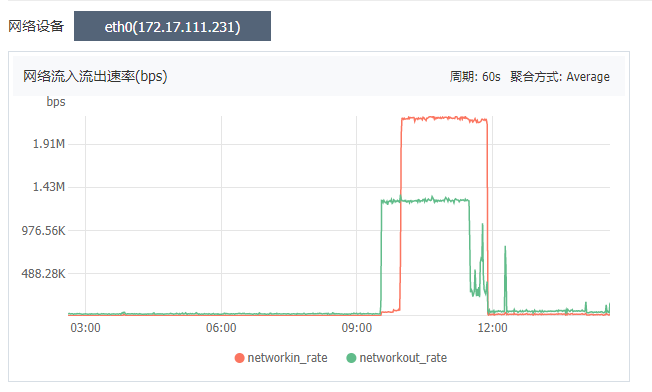
7. 测试的网络占用图示结果
在阿里云主机的1M带宽下1.8G 文件同步情况:
显然,文件同步期间完全占满了整个带宽,而且可能阿里云的1M带宽可能有冗余,所以超出了1Mbps。
同步端:
 syncthing1.png-21.2kB
被同步端:
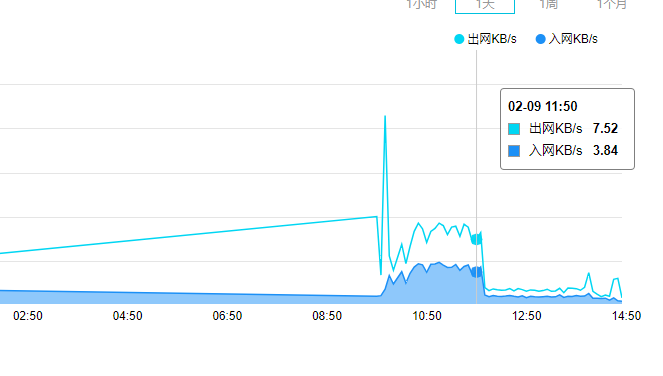 image_1c5sm75oq1b4k1ij16941rd21m1a1r.png-28kB
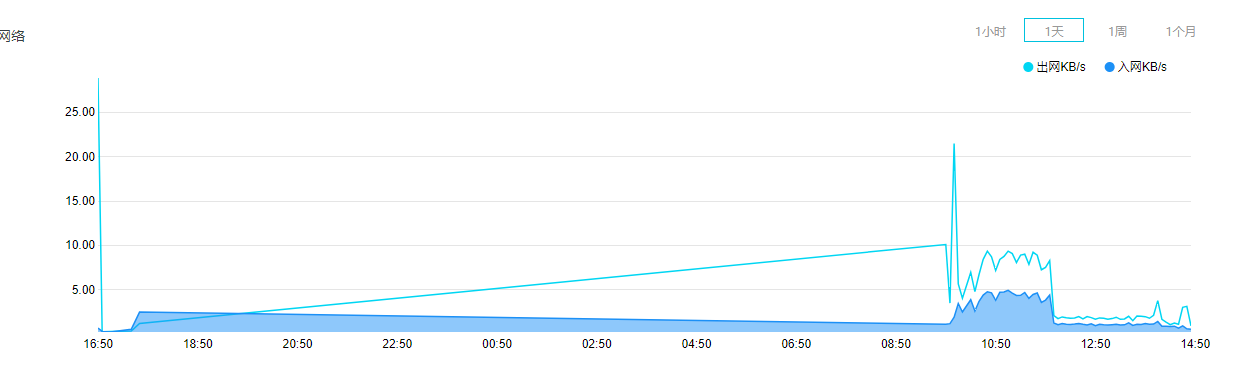 image_1c5sm5be51pbmhl3apbof91kvt1e.png-36.9kB
8. Reference
syncthing官网:
https://syncthing.net/
syncthing官网文档:
https://docs.syncthing.net/intro/getting-started.html
Gen2安装Syncthing
http://www.nasyun.com/thread-30460-1-1.html
Syncthing的安装与使用
https://www.jianshu.com/p/4235cc85c32d
syncthing统计:
https://data.syncthing.net/


网友评论