本文章是 Vert.x 蓝图系列 的第二篇教程。全系列:
- Vert.x Blueprint 系列教程(一) | 待办事项服务开发教程
- Vert.x Blueprint 系列教程(二) | 开发基于消息的应用 - Vert.x Kue 教程
- Vert.x Blueprint 系列教程(三) | Vert.x B2B微服务应用实践
- Vert.x Blueprint 系列教程(四) | Vert.x 高性能应用实践
前言
欢迎回到Vert.x 蓝图系列~在本教程中,我们将利用Vert.x开发一个基于消息的应用 - Vert.x Kue,它是一个使用Vert.x开发的优先级工作队列,数据存储使用的是 Redis 。Vert.x Kue是Automattic/kue的Vert.x实现版本。我们可以使用Vert.x Kue来处理各种各样的任务,比如文件转换、订单处理等等。
通过本教程,你将会学习到以下内容:
- 消息、消息系统以及事件驱动的运用
- Vert.x Event Bus 的几种事件机制(发布/订阅、点对点模式)
- 设计 分布式 的Vert.x应用
- 工作队列的设计
- Vert.x Service Proxy(服务代理)的运用
- 更深层次的Redis运用
本教程是Vert.x 蓝图系列的第二篇教程,对应的Vert.x版本为3.3.2。本教程中的完整代码已托管至GitHub。
Vert.x的消息系统
既然我们要用Vert.x开发一个基于消息的应用,那么我们先来瞅一瞅Vert.x的消息系统吧~在Vert.x中,我们可以通过 Event Bus 来发送和接收各种各样的消息,这些消息可以来自不同的Vertx实例。怎么样,很酷吧?我们都将消息发送至Event Bus上的某个地址上,这个地址可以是任意的字符串。
Event Bus支持三种消息机制:发布/订阅(Publish/Subscribe)、点对点(Point to point)以及请求/回应(Request-Response)模式。下面我们就来看一看这几种机制。
发布/订阅模式
在发布/订阅模式中,消息被发布到Event Bus的某一个地址上,所有订阅此地址的Handler都会接收到该消息并且调用相应的处理逻辑。我们来看一看示例代码:
EventBus eventBus = vertx.eventBus();

eventBus.consumer("foo.bar.baz", r -> { // subscribe to `foo.bar.baz` address
  System.out.println("1: " + r.body());
});
eventBus.consumer("foo.bar.baz", r -> { // subscribe to `foo.bar.baz` address
  System.out.println("2: " + r.body());
});

eventBus.publish("foo.bar.baz", "+1s"); // 向此地址发送消息
我们可以通过vertx.eventBus()方法获取EventBus的引用,然后我们就可以通过consume方法订阅某个地址的消息并且绑定一个Handler。接着我们通过publish向此地址发送消息。如果运行上面的例子,我们会得到一下结果:
2: +1s
1: +1s
点对点模式
如果我们把上面的示例中的publish方法替代成send方法,上面的实例就变成点对点模式了。在点对点模式中,消息被发布到Event Bus的某一个地址上。Vert.x会将此消息传递给其中监听此地址的Handler之一。如果有多个Handler绑定到此地址,那么就使用轮询算法随机挑一个Handler传递消息。比如在此示例中,程序只会打印2: +1s或者1: +1s之中的一个。
请求/回应模式
当我们绑定的Handler接收到消息的时候,我们可不可以给消息的发送者回复呢?当然了!当我们通过send方法发送消息的时候,我们可以同时指定一个回复处理函数(reply handler)。然后当某个消息的订阅者接收到消息的时候,它就可以给发送者回复消息;如果发送者接收到了回复,发送者绑定的回复处理函数就会被调用。这就是请求/回应模式。
好啦,现在我们已经粗略了解了Vert.x中的消息系统 - Event Bus的基本使用,下面我们就看看Vert.x Kue的基本设计。有关更多关于Event Bus的信息请参考Vert.x Core Manual - Event Bus。
Vert.x Kue 架构设计
Vert.x Kue 组件划分
在我们的项目中,我们将Vert.x Kue划分为两个模块:
-
kue-core: 核心组件,提供优先级队列的功能 -
kue-http: Web组件,提供Web UI以及REST API
另外我们还提供一个示例模块kue-example用于演示以及阐述如何使用Vert.x Kue。
既然我们的项目有两个模块,那么你一定会好奇:两个模块之间是如何进行通信的?并且如果我们写自己的Kue应用的话,我们该怎样去调用Kue Core中的服务呢?不要着急,谜底将在后边的章节中揭晓:-)
Vert.x Kue 核心模块
回顾一下Vert.x Kue的作用 - 优先级工作队列,所以在Vert.x Kue的核心模块中我们设计了以下的类:
-
Job- 任务(作业)数据实体 -
JobService- 异步服务接口,提供操作任务以及获取数据的相关逻辑 -
KueWorker- 用于处理任务的Verticle -
Kue- 工作队列
前边我们提到过,我们的两个组件之间需要一种通信机制可以互相通信 - 这里我们使用Vert.x的集群模式,即以clustered的模式来部署Verticle。这样的环境下的Event Bus同样也是集群模式的,因此各个组件可以通过集群模式下的Event Bus进行通信。很不错吧?在Vert.x的集群模式下,我们需要指定一个集群管理器ClusterManager。这里我们使用默认的HazelcastClusterManager,使用 Hazelcast 作为集群管理。
在Vert.x Kue中,我们将JobService服务发布至分布式的Event Bus上,这样其它的组件就可以通过Event Bus调用该服务了。我们设计了一个KueVerticle用于注册服务。Vert.x提供了Vert.x Service Proxy(服务代理组件),可以很方便地将服务注册至Event Bus上,然后在其它地方获取此服务的代理并调用。我们将在下面的章节中详细介绍Vert.x Service Proxy。
基于Future的异步模式
在我们的Vert.x Kue中,大多数的异步方法都是基于Future的。如果您看过蓝图系列的第一篇文章的话,您一定不会对这种模式很陌生。在Vert.x 3.3中,我们的Future支持基本的响应式的操作,比如map和compose。它们用起来非常方便,因为我们可以将多个Future以响应式的方式组合起来而不用担心陷入回调地狱中。
Vert.x Kue中的事件
正如我们在Vert.x Kue 特性介绍中提到的那样,Vert.x Kue支持两种级别的事件:任务事件(job events) 以及 队列事件(queue events)。在Vert.x Kue中,我们设计了三种事件地址:
-
vertx.kue.handler.job.{handlerType}.{addressId}.{jobType}: 某个特定任务的任务事件地址 -
vertx.kue.handler.workers.{eventType}: (全局)队列事件地址 -
vertx.kue.handler.workers.{eventType}.{addressId}: 某个特定任务的内部事件地址
在特性介绍文档中,我们提到了以下几种任务事件:
-
start开始处理一个任务 (onStart) -
promotion一个延期的任务时间已到,提升至工作队列中 (onPromotion) -
progress任务的进度变化 (onProgress) -
failed_attempt任务处理失败,但是还可以重试 (onFailureAttempt) -
failed任务处理失败并且不能重试 (onFailure) -
complete任务完成 (onComplete) -
remove任务从后端存储中移除 (onRemove)
队列事件也相似,只不过需要加前缀job_。这些事件都会通过send方法发送至Event Bus上。每一个任务都有对应的任务事件地址,因此它们能够正确地接收到对应的事件并进行相应的处理逻辑。
特别地,我们还有两个内部事件:done和done_fail。done事件对应一个任务在底层的处理已经完成,而done_fail事件对应一个任务在底层的处理失败。这两个事件使用第三种地址进行传递。
任务状态
在Vert.x Kue中,任务共有五种状态:
-
INACTIVE: 任务还未开始处理,在工作队列中等待处理 -
ACTIVE: 任务正在处理中 -
COMPLETE: 任务处理完成 -
FAILED: 任务处理失败 -
DELAYED: 任务延时处理,正在等待计时器时间到并提升至工作队列中
我们使用状态图来描述任务状态的变化:
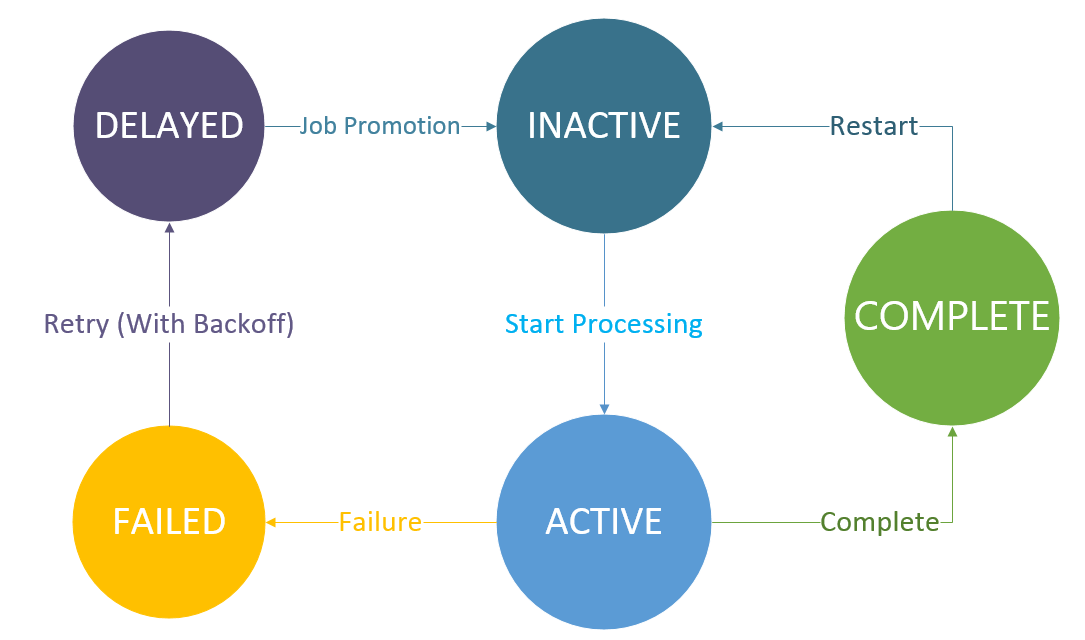 Job State Machine
以及任务状态的变化伴随的事件:
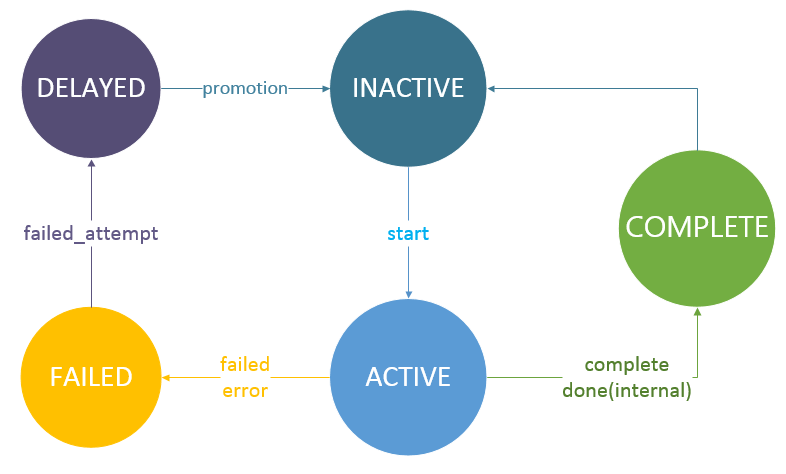 Events with state change
整体设计
为了让大家对Vert.x Kue的架构有大致的了解,我用一幅图来简略描述整个Vert.x Kue的设计:
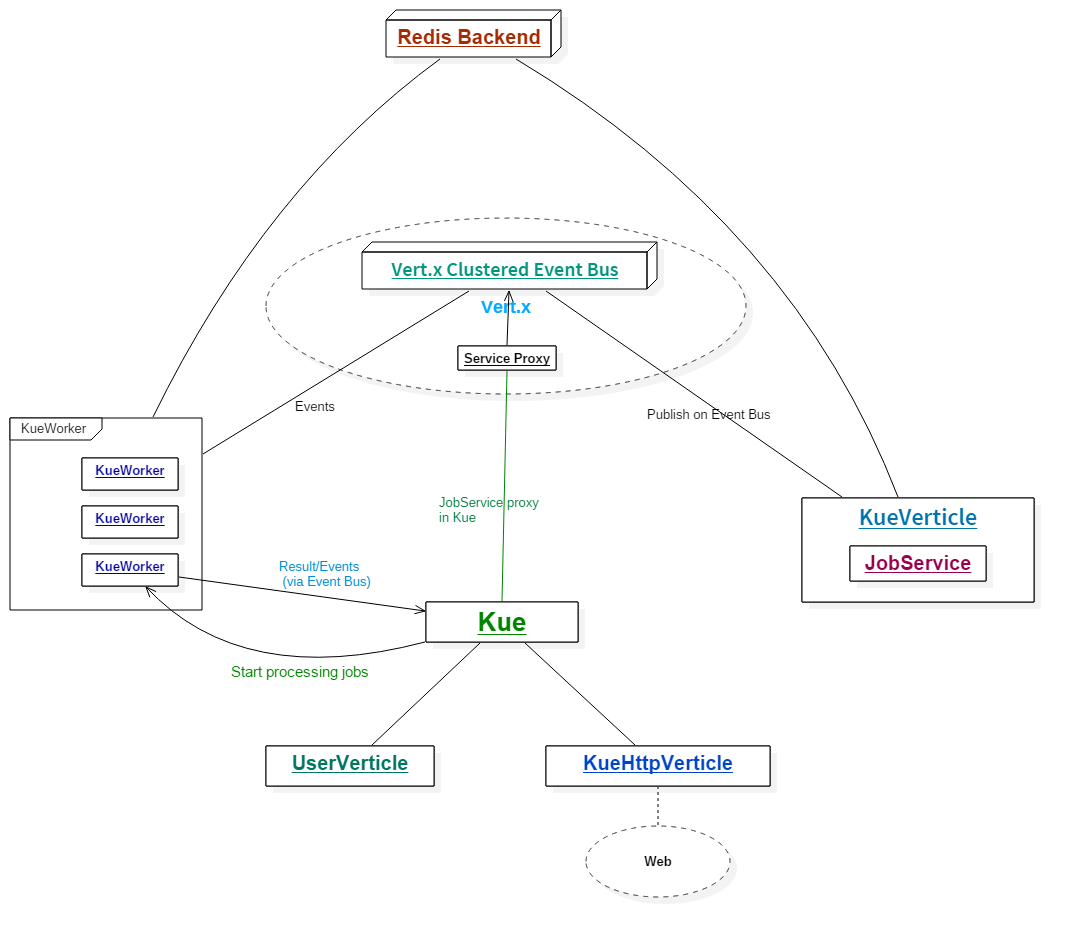 Diagram - How Vert.x Kue works
现在我们对Vert.x Kue的设计有了大致的了解了,下面我们就来看一看Vert.x Kue的代码实现了~
项目结构
我们来开始探索Vert.x Kue的旅程吧!首先我们先从GitHub上clone源代码:
git clone https://github.com/sczyh30/vertx-blueprint-job-queue.git
然后你可以把项目作为Gradle项目导入你的IDE中。(如何导入请参考相关IDE帮助文档)
正如我们之前所提到的,我们的Vert.x Kue中有两个功能模块和一个实例模块,因此我们需要在Gradle工程文件中定义三个子工程。我们来看一下本项目中的build.gradle文件:
configure(allprojects) { project ->

  ext {
    vertxVersion = "3.3.2"
  }

  apply plugin: 'java'

  repositories {
    jcenter()
  }

  dependencies {
    compile("io.vertx:vertx-core:${vertxVersion}")
    compile("io.vertx:vertx-codegen:${vertxVersion}")
    compile("io.vertx:vertx-rx-java:${vertxVersion}")
    compile("io.vertx:vertx-hazelcast:${vertxVersion}")
    compile("io.vertx:vertx-lang-ruby:${vertxVersion}")

    testCompile("io.vertx:vertx-unit:${vertxVersion}")
    testCompile group: 'junit', name: 'junit', version: '4.12'
  }

  sourceSets {
    main {
      java {
        srcDirs += 'src/main/generated'
      }
    }
  }

  compileJava {
    targetCompatibility = 1.8
    sourceCompatibility = 1.8
  }
}

project("kue-core") {

  dependencies {
    compile("io.vertx:vertx-redis-client:${vertxVersion}")
    compile("io.vertx:vertx-service-proxy:${vertxVersion}")
  }

  jar {
    archiveName = 'vertx-blueprint-kue-core.jar'
    from { configurations.compile.collect { it.isDirectory() ? it : zipTree(it) } }
    manifest {
      attributes 'Main-Class': 'io.vertx.core.Launcher'
      attributes 'Main-Verticle': 'io.vertx.blueprint.kue.queue.KueVerticle'
    }
  }

  task annotationProcessing(type: JavaCompile, group: 'build') { // codegen
    source = sourceSets.main.java
    classpath = configurations.compile
    destinationDir = project.file('src/main/generated')
    options.compilerArgs = [
      "-proc:only",
      "-processor", "io.vertx.codegen.CodeGenProcessor",
      "-AoutputDirectory=${project.projectDir}/src/main"
    ]
  }

  compileJava {
    targetCompatibility = 1.8
    sourceCompatibility = 1.8

    dependsOn annotationProcessing
  }
}

project("kue-http") {

  dependencies {
    compile(project(":kue-core"))
    compile("io.vertx:vertx-web:${vertxVersion}")
    compile("io.vertx:vertx-web-templ-jade:${vertxVersion}")
  }

  jar {
    archiveName = 'vertx-blueprint-kue-http.jar'
    from { configurations.compile.collect { it.isDirectory() ? it : zipTree(it) } }
    manifest {
      attributes 'Main-Class': 'io.vertx.core.Launcher'
      attributes 'Main-Verticle': 'io.vertx.blueprint.kue.http.KueHttpVerticle'
    }
  }
}

project("kue-example") {

  dependencies {
    compile(project(":kue-core"))
  }

  jar {
    archiveName = 'vertx-blueprint-kue-example.jar'
    from { configurations.compile.collect { it.isDirectory() ? it : zipTree(it) } }
    manifest {
      attributes 'Main-Class': 'io.vertx.core.Launcher'
      attributes 'Main-Verticle': 'io.vertx.blueprint.kue.example.LearningVertxVerticle'
    }
  }
}

task wrapper(type: Wrapper) {
  gradleVersion = '2.12'
}
(⊙o⊙)…比之前的待办事项服务项目中的长不少诶。。。我们来解释一下:
- 在
configure(allprojects)作用域中,我们配置了一些全局信息(对所有子工程都适用)。 - 我们定义了三个子工程:
kue-core、kue-http以及kue-example。这里我们来解释一下里面用到的依赖。在kue-core中,vertx-redis-client用于Redis通信,vertx-service-proxy用于Event Bus上的服务代理。在kue-http中,我们将kue-core子工程作为它的一个依赖。vertx-web和vertx-web-templ-jade用于Kue Web端的开发。 - 任务
annotationProcessing用于注解处理(Vert.x Codegen)。我们已经在上一篇教程中介绍过了,这里就不展开讲了。
我们还需要在 settings.gradle 中配置工程:
rootProject.name = 'vertx-blueprint-job-queue'

include "kue-core"
include "kue-http"
include "kue-example"
看完了配置文件以后,我们再来浏览一下我们的项目目录结构:
.
├── build.gradle
├── kue-core
│   └── src
│       ├── main
│       │   ├── java
│       │   └── resources
│       └── test
│           ├── java
│           └── resources
├── kue-example
│   └── src
│       ├── main
│       │   ├── java
│       │   └── resources
│       └── test
│           ├── java
│           └── resources
├── kue-http
│   └── src
│       ├── main
│       │   ├── java
│       │   └── resources
│       └── test
│           ├── java
│           └── resources
└── settings.gradle
在Gradle中,项目的源码都位于{projectName}/src/main/java目录内。这篇教程是围绕Vert.x Kue Core的,所以我们的代码都在kue-core目录中。
好啦!现在我们已经对Vert.x Kue项目的整体结构有了大致的了解了,下面我们开始源码探索之旅!
任务实体 - 不仅仅是一个数据对象
Vert.x Kue是用来处理任务的,因此我们先来看一下代表任务实体的Job类。Job类位于io.vertx.blueprint.kue.queue包下。代码可能有点长,不要担心,我们把它分成几部分,分别来解析。
任务成员属性
我们先来看一下Job类中的成员属性:
@DataObject(generateConverter = true)
public class Job {
    // job properties

    private final String address_id;
    private long id = -1;
    private String zid;
    private String type;
    private JsonObject data;
    private Priority priority = Priority.NORMAL;
    private JobState state = JobState.INACTIVE;
    private long delay = 0;
    private int max_attempts = 1;
    private boolean removeOnComplete = false;
    private int ttl = 0;
    private JsonObject backoff;

    private int attempts = 0;
    private int progress = 0;
    private JsonObject result;

    // job metrics
    private long created_at;
    private long promote_at;
    private long updated_at;
    private long failed_at;
    private long started_at;
    private long duration;


    // ...
}
我去。。。好多属性!我们一个一个地解释:
-
address_id: 一个UUID序列,作为Event Bus的地址 -
id: 任务的编号(id) -
type: 任务的类型 -
data: 任务携带的数据,以JsonObject类型表示 -
priority: 任务优先级,以Priority枚举类型表示。默认优先级为正常(NORMAL) -
delay: 任务的延迟时间,默认是 0 -
state: 任务状态,以JobState枚举类型表示。默认状态为等待(INACTIVE) -
attempts: 任务已经尝试执行的次数 -
max_attempts: 任务尝试执行次数的最大阈值 -
removeOnComplete: 代表任务完成时是否自动从后台移除 -
zid:zset操作对应的编号(zid),保持先进先出顺序 -
ttl: TTL(Time to live) -
backoff: 任务重试配置,以JsonObject类型表示 -
progress: 任务执行的进度 -
result: 任务执行的结果,以JsonObject类型表示
还有这些统计数据:
-
created_at: 代表此任务创建的时间 -
promote_at: 代表此任务从延时状态被提升至等待状态时的时间 -
updated_at: 代表任务更新的时间 -
failed_at: 代表任务失败的时间 -
started_at: 代表任务开始的时间 -
duration: 代表处理任务花费的时间,单位为毫秒(ms)
你可能注意到在 Job 类中还存在着几个静态成员变量:
private static Logger logger = LoggerFactory.getLogger(Job.class);

private static Vertx vertx;
private static RedisClient client;
private static EventBus eventBus;

public static void setVertx(Vertx v, RedisClient redisClient) {
  vertx = v;
  client = redisClient;
  eventBus = vertx.eventBus();
}
对于 logger 对象,我想大家应该都很熟悉,它代表一个Vert.x Logger实例用于日志记录。但是你一定想问为什么 Job 类中存在着一个Vertx类型的静态成员。Job类不应该是一个数据对象吗?当然咯!Job类代表一个数据对象,但不仅仅是一个数据对象。这里我模仿了一些Automattic/kue的风格,把一些任务相关逻辑方法放到了Job类里,它们大多都是基于Future的异步方法,因此可以很方便地去调用以及进行组合变换。比如:
job.save()
    .compose(Job::updateNow)
    .compose(j -> j.log("good!"));
由于我们不能在Job类被JVM加载的时候就获取Vertx实例,我们必须手动给Job类中的静态Vertx成员赋值。这里我们是在Kue类中对其进行赋值的。当我们创建一个工作队列的时候,Job类中的静态成员变量会被初始化。同时为了保证程序的正确性,我们需要一个方法来检测静态成员变量是否初始化。当我们在创建一个任务的时候,如果静态成员此时未被初始化,那么日志会给出警告:
private void _checkStatic() {
  if (vertx == null) {
    logger.warn("static Vertx instance in Job class is not initialized!");
  }
}
我们还注意到 Job 类也是由@DataObject注解修饰的。Vert.x Codegen可以处理含有@DataObject注解的类并生成对应的JSON转换器,并且Vert.x Service Proxy也需要数据对象。
在Job类中我们有四个构造函数。其中address_id成员必须在一个任务被创建时就被赋值,默认情况下此地址用一个唯一的UUID字符串表示。每一个构造函数中我们都要调用_checkStatic函数来检测静态成员变量是否被初始化。
任务事件辅助函数
正如我们之前所提到的那样,我们通过一个特定的地址vertx.kue.handler.job.{handlerType}.{addressId}.{jobType}在分布式的Event Bus上发送和接收任务事件(job events)。所以我们提供了两个用于发送和接收事件的辅助函数emit和on(类似于Node.js中的EventEmitter):
@Fluent
public <T> Job on(String event, Handler<Message<T>> handler) {
  logger.debug("[LOG] On: " + Kue.getCertainJobAddress(event, this));
  eventBus.consumer(Kue.getCertainJobAddress(event, this), handler);
  return this;
}

@Fluent
public Job emit(String event, Object msg) {
  logger.debug("[LOG] Emit: " + Kue.getCertainJobAddress(event, this));
  eventBus.send(Kue.getCertainJobAddress(event, this), msg);
  return this;
}
在后面的代码中,我们将频繁使用这两个辅助函数。
Redis中的存储形式
在我们探索相关的逻辑函数之前,我们先来描述一下Vert.x Kue的数据在Redis中是以什么样的形式存储的:
- 所有的key都在
vertx_kue命名空间下(以vertx_kue:作为前缀) -
vertx:kue:job:{id}: 存储任务实体的map -
vertx:kue:ids: 计数器,指示当前最大的任务ID -
vertx:kue:job:types: 存储所有任务类型的列表 -
vertx:kue:{type}:jobs: 指示所有等待状态下的某种类型任务的列表 -
vertx_kue:jobs: 存储所有任务zid的有序集合 -
vertx_kue:job:{state}: 存储所有指定状态的任务zid的有序集合 -
vertx_kue:jobs:{type}:{state}: 存储所有指定状态和类型的任务zid的有序集合 -
vertx:kue:job:{id}:log: 存储指定id的任务对应日志的列表
OK,下面我们就来看看Job类中重要的逻辑函数。
改变任务状态
我们之前提到过,Vert.x Kue中的任务一共有五种状态。所有的任务相关的操作都伴随着任务状态的变换,因此我们先来看一下state方法的实现,它用于改变任务的状态:
public Future<Job> state(JobState newState) {
  Future<Job> future = Future.future();
  RedisClient client = RedisHelper.client(vertx, new JsonObject()); // use a new client to keep transaction
  JobState oldState = this.state;
  client.transaction().multi(r0 -> { // (1)
    if (r0.succeeded()) {
      if (oldState != null && !oldState.equals(newState)) { // (2)
        client.transaction().zrem(RedisHelper.getStateKey(oldState), this.zid, _failure())
          .zrem(RedisHelper.getKey("jobs:" + this.type + ":" + oldState.name()), this.zid, _failure());
      }
      client.transaction().hset(RedisHelper.getKey("job:" + this.id), "state", newState.name(), _failure()) // (3)
        .zadd(RedisHelper.getKey("jobs:" + newState.name()), this.priority.getValue(), this.zid, _failure())
        .zadd(RedisHelper.getKey("jobs:" + this.type + ":" + newState.name()), this.priority.getValue(), this.zid, _failure());

      switch (newState) { // dispatch different state
        case ACTIVE: // (4)
          client.transaction().zadd(RedisHelper.getKey("jobs:" + newState.name()),
            this.priority.getValue() < 0 ? this.priority.getValue() : -this.priority.getValue(),
            this.zid, _failure());
          break;
        case DELAYED: // (5)
          client.transaction().zadd(RedisHelper.getKey("jobs:" + newState.name()),
            this.promote_at, this.zid, _failure());
          break;
        case INACTIVE: // (6)
          client.transaction().lpush(RedisHelper.getKey(this.type + ":jobs"), "1", _failure());
          break;
        default:
      }

      this.state = newState;

      client.transaction().exec(r -> { // (7)
        if (r.succeeded()) {
          future.complete(this);
        } else {
          future.fail(r.cause());
        }
      });
    } else {
      future.fail(r0.cause());
    }
  });

  return future.compose(Job::updateNow);
}
首先我们先创建了一个Future对象。然后我们调用了 client.transaction().multi(handler) 函数开始一次Redis事务 (1)。在Vert.x 3.3.2中,所有的Redis事务操作都移至RedisTransaction类中,所以我们需要先调用client.transaction()方法去获取一个事务实例,然后调用multi代表事务块的开始。
在multi函数传入的Handler中,我们先判定当前的任务状态。如果当前任务状态不为空并且不等于新的任务状态,我们就将Redis中存储的旧的状态信息移除 (2)。为了方便起见,我们提供了一个RedisHelper辅助类,里面提供了一些生成特定地址以及编码解码zid的方法:
package io.vertx.blueprint.kue.util;

import io.vertx.blueprint.kue.queue.JobState;
import io.vertx.core.Vertx;
import io.vertx.core.json.JsonObject;
import io.vertx.redis.RedisClient;
import io.vertx.redis.RedisOptions;


public final class RedisHelper {

  private static final String VERTX_KUE_REDIS_PREFIX = "vertx_kue";

  private RedisHelper() {
  }

  public static RedisClient client(Vertx vertx, JsonObject config) {
    return RedisClient.create(vertx, options(config));
  }

  public static RedisOptions options(JsonObject config) {
    return new RedisOptions()
      .setHost(config.getString("redis.host", "127.0.0.1"))
      .setPort(config.getInteger("redis.port", 6379));
  }

  public static String getKey(String key) {
    return VERTX_KUE_REDIS_PREFIX + ":" + key;
  }

  public static String getStateKey(JobState state) {
    return VERTX_KUE_REDIS_PREFIX + ":jobs:" + state.name();
  }

  public static String createFIFO(long id) {
    String idLen = "" + ("" + id).length();
    int len = 2 - idLen.length();
    while (len-- > 0)
      idLen = "0" + idLen;
    return idLen + "|" + id;
  }

  public static String stripFIFO(String zid) {
    return zid.substring(zid.indexOf('|') + 1);
  }

  public static long numStripFIFO(String zid) {
    return Long.parseLong(zid.substring(zid.indexOf('|') + 1));
  }
}
所有的key都必须在vertx_kue命名空间下,因此我们封装了一个getKey方法。我们还实现了createFIFO和stripFIFO方法用于生成zid以及解码zid。zid的格式使用了Automattic/Kue中的格式。
回到state方法来。我们使用zrem(String key, String member, Handler<AsyncResult<String>> handler)方法将特定的数据从有序集合中移除。两个key分别是vertx_kue:job:{state} 以及 vertx_kue:jobs:{type}:{state};member对应着任务的zid。
接下来我们使用hset方法来变更新的状态 (3),然后用zadd方法往vertx_kue:job:{state} 和 vertx_kue:jobs:{type}:{state}两个有序集合中添加此任务的zid,同时传递一个权重(score)。这个非常重要,我们就是通过这个实现优先级队列的。我们直接使用priority对应的值作为score。这样,当我们需要从Redis中获取任务的时候,我们就可以通过zpop方法获取优先级最高的任务。我们会在后面详细讲述。
不同的新状态需要不同的操作。对于ACTIVE状态,我们通过zadd命令将zid添加至vertx_kue:jobs:ACTIVE有序集合中并赋予优先级权值 (4)。对于DELAYED状态,我们通过zadd命令将zid添加至vertx_kue:jobs:DELAYED有序集合中并赋予提升时间(promote_at)权值 (5)。对于INACTIVE状态,我们向vertx:kue:{type}:jobs列表中添加一个元素 (6)。这些操作都是在Redis事务块内完成的。最后我们通过exec方法一并执行这些事务操作 (7)。如果执行成功,我们给future赋值(当前任务)。最后我们返回future并且与updateNow方法相组合。
updateNow方法非常简单,就是把updated_at的值设为当前时间,然后存到Redis中:
Future<Job> updateNow() {
  this.updated_at = System.currentTimeMillis();
  return this.set("updated_at", String.valueOf(updated_at));
}
保存任务
这里我们来看一下整个Job类中最重要的方法之一 - save方法,它的作用是保存任务至Redis中。
public Future<Job> save() {
  // check
  Objects.requireNonNull(this.type, "Job type cannot be null"); // (1)

  if (this.id > 0)
    return update(); // (2)

  Future<Job> future = Future.future();

  // 生成id
  client.incr(RedisHelper.getKey("ids"), res -> { // (3)
    if (res.succeeded()) {
      this.id = res.result();
      this.zid = RedisHelper.createFIFO(id); // (4)
      String key = RedisHelper.getKey("job:" + this.id);

      if (this.delay > 0) {
        this.state = JobState.DELAYED;
      }

      client.sadd(RedisHelper.getKey("job:types"), this.type, _failure()); // (5)
       this.created_at = System.currentTimeMillis();
       this.promote_at = this.created_at + this.delay;
       // 保存任务
       client.hmset(key, this.toJson(), _completer(future, this)); // (6)
    } else {
      future.fail(res.cause());
    }
  });

  return future.compose(Job::update); // (7)
}
首先,任务类型不能为空所以我们要检查type是否为空 (1)。接着,如果当前任务的id大于0,则代表此任务已经存储过(因为id是存储时分配),此时只需执行更新操作(update)即可 (2)。然后我们创建一个Future对象,然后使用incr方法从vertx_kue:ids字段获取一个新的id (3)。同时我们使用RedisHelper.createFIFO(id)方法来生成新的zid (4)。接着我们来判断任务延时是否大于0,若大于0则将当前任务状态设置为DELAYED。然后我们通过sadd方法将当前任务类型添加至vertx:kue:job:types列表中 (5) 并且保存任务创建时间(created_at)以及任务提升时间(promote_at)。经过这一系列的操作后,所有的属性都已准备好,所以我们可以利用hmset方法将此任务实体存储至vertx:kue:job:{id}哈希表中 (6)。如果存储操作成功,那么将当前任务实体赋给future,否则记录错误。最后我们返回此future并且将其与update方法进行组合。
update方法进行一些更新操作,它的逻辑比较简单:
Future<Job> update() {
  Future<Job> future = Future.future();
  this.updated_at = System.currentTimeMillis();

  client.transaction().multi(_failure())
    .hset(RedisHelper.getKey("job:" + this.id), "updated_at", String.valueOf(this.updated_at), _failure())
    .zadd(RedisHelper.getKey("jobs"), this.priority.getValue(), this.zid, _failure())
    .exec(_completer(future, this));

  return future.compose(r ->
    this.state(this.state));
}
可以看到update方法只做了三件微小的工作:存储任务更新时间、存储zid以及更改当前任务状态(组合state方法)。
最后总结一下将一个任务存储到Redis中经过的步骤:save -> update -> state :-)
移除任务
移除任务非常简单,借助zrem和del方法即可。我们来看一下其实现:
public Future<Void> remove() {
  Future<Void> future = Future.future();
  client.transaction().multi(_failure())
    .zrem(RedisHelper.getKey("jobs:" + this.stateName()), this.zid, _failure())
    .zrem(RedisHelper.getKey("jobs:" + this.type + ":" + this.stateName()), this.zid, _failure())
    .zrem(RedisHelper.getKey("jobs"), this.zid, _failure())
    .del(RedisHelper.getKey("job:" + this.id + ":log"), _failure())
    .del(RedisHelper.getKey("job:" + this.id), _failure())
    .exec(r -> {
      if (r.succeeded()) {
        this.emit("remove", new JsonObject().put("id", this.id));
        future.complete();
      } else {
        future.fail(r.cause());
      }
    });
  return future;
}
注意到成功移除任务时,我们会向Event Bus上的特定地址发送remove任务事件。此事件包含着被移除任务的id。
监听任务事件
我们可以通过几种 onXXX 方法来监听任务事件:
@Fluent
public Job onComplete(Handler<Job> completeHandler) {
  this.on("complete", message -> {
    completeHandler.handle(new Job((JsonObject) message.body()));
  });
  return this;
}

@Fluent
public Job onFailure(Handler<JsonObject> failureHandler) {
  this.on("failed", message -> {
    failureHandler.handle((JsonObject) message.body());
  });
  return this;
}

@Fluent
public Job onFailureAttempt(Handler<JsonObject> failureHandler) {
  this.on("failed_attempt", message -> {
    failureHandler.handle((JsonObject) message.body());
  });
  return this;
}

@Fluent
public Job onPromotion(Handler<Job> handler) {
  this.on("promotion", message -> {
    handler.handle(new Job((JsonObject) message.body()));
  });
  return this;
}

@Fluent
public Job onStart(Handler<Job> handler) {
  this.on("start", message -> {
    handler.handle(new Job((JsonObject) message.body()));
  });
  return this;
}

@Fluent
public Job onRemove(Handler<JsonObject> removeHandler) {
  this.on("start", message -> {
    removeHandler.handle((JsonObject) message.body());
  });
  return this;
}

@Fluent
public Job onProgress(Handler<Integer> progressHandler) {
  this.on("progress", message -> {
    progressHandler.handle((Integer) message.body());
  });
  return this;
}
注意到不同的事件,对应接收的数据类型也有差异。我们来说明一下:
-
onComplete、onPromotion以及onStart: 发送的数据是对应的Job对象 -
onFailureandonFailureAttempt: 发送的数据是JsonObject类型的,其格式类似于:
{
    "job": {},
    "extra": {
        "message": "some_error"
    }
}
-
onProgress: 发送的数据是当前任务进度 -
onRemove: 发送的数据是JsonObject类型的,其中id代表被移除任务的编号
更新任务进度
我们可以通过progress方法来更新任务进度。看一下其实现:
public Future<Job> progress(int complete, int total) {
  int n = Math.min(100, complete * 100 / total); // (1)
  this.emit("progress", n); // (2)
  return this.setProgress(n) // (3)
    .set("progress", String.valueOf(n))
    .compose(Job::updateNow);
}
progress方法接受两个参数:第一个是当前完成的进度值,第二个是完成状态需要的进度值。我们首先计算出当前的进度 (1),然后向特定地址发送progress事件 (2)。最后我们将进度存储至Redis中并更新时间,返回Future (3)。
任务失败以及重试机制
当一个任务处理失败时,如果它有剩余的重试次数,Vert.x Kue会自动调用failAttempt方法进行重试。我们来看一下failAttempt方法的实现:
Future<Job> failedAttempt(Throwable err) {
  return this.error(err)
    .compose(Job::failed)
    .compose(Job::attemptInternal);
}
(⊙o⊙)非常简短吧~实际上,failAttempt方法是三个异步方法的组合:error、failed以及attemptInternal。当一个任务需要进行重试的时候,我们首先向Event Bus发布 error 队列事件并且在Redis中记录日志,然后将当前的任务状态置为FAILED,最后重新处理此任务。
我们先来看一下error方法:
public Future<Job> error(Throwable ex) {
  return this.emitError(ex)
    .set("error", ex.getMessage())
    .compose(j -> j.log("error | " + ex.getMessage()));
}
它的逻辑很简单:首先我们向Event Bus发布 错误 事件,然后记录错误日志即可。这里我们封装了一个发布错误的函数emitError:
@Fluent
public Job emitError(Throwable ex) {
  JsonObject errorMessage = new JsonObject().put("id", this.id)
    .put("message", ex.getMessage());
  eventBus.publish(Kue.workerAddress("error"), errorMessage);
  eventBus.send(Kue.getCertainJobAddress("error", this), errorMessage);
  return this;
}
其中发送的错误信息格式类似于下面的样子:
{
    "id": 2052,
    "message": "some error"
}
接下来我们再来看一下failed方法的实现:
public Future<Job> failed() {
  this.failed_at = System.currentTimeMillis();
  return this.updateNow()
    .compose(j -> j.set("failed_at", String.valueOf(j.failed_at)))
    .compose(j -> j.state(JobState.FAILED));
}
非常简单,首先我们更新任务的更新时间和失败时间,然后通过state方法将当前任务状态置为FAILED即可。
任务重试的核心逻辑在attemptInternal方法中:
private Future<Job> attemptInternal() {
  int remaining = this.max_attempts - this.attempts; // (1)
  if (remaining > 0) { // 还有重试次数
    return this.attemptAdd() // (2)
      .compose(Job::reattempt) // (3)
      .setHandler(r -> {
        if (r.failed()) {
          this.emitError(r.cause()); // (4)
        }
      });
  } else if (remaining == 0) { // (5)
    return Future.failedFuture("No more attempts");
  } else { // (6)
    return Future.failedFuture(new IllegalStateException("Attempts Exceeded"));
  }
}
在我们的Job数据对象中,我们存储了最大重试次数max_attempts以及已经重试的次数attempts,所以我们首先根据这两个数据计算剩余的重试次数remaining (1)。如果还有剩余次数的话,我们就先调用attemptAdd方法增加一次已重试次数并 (2),然后我们调用reattempt方法执行真正的任务重试逻辑 (3)。最后返回这两个异步方法组合的Future。如果其中一个过程出现错误,我们就发布error事件 (4)。如果没有剩余次数了或者超出剩余次数了,我们直接返回错误。
在我们解析reattempt方法之前,我们先来回顾一下Vert.x Kue中的任务失败恢复机制。Vert.x Kue支持延时重试机制(retry backoff),并且支持不同的策略(如 fixed 以及 exponential)。之前我们提到Job类中有一个backoff成员变量,它用于配置延时重试的策略。它的格式类似于这样:
{
    "type": "fixed",
    "delay": 5000
}
延时重试机制的实现在getBackoffImpl方法中,它返回一个Function<Integer, Long>对象,代表一个接受Integer类型(即attempts),返回Long类型(代表计算出的延时值)的函数:
private Function<Integer, Long> getBackoffImpl() {
  String type = this.backoff.getString("type", "fixed"); // (1)
  long _delay = this.backoff.getLong("delay", this.delay); // (2)
  switch (type) {
    case "exponential": // (3)
      return attempts -> Math.round(_delay * 0.5 * (Math.pow(2, attempts) - 1));
    case "fixed":
    default: // (4)
      return attempts -> _delay;
  }
}
首先我们从backoff配置中获取延迟重试策略。目前Vert.x Kue支持两种策略:fixed 和 exponential。前者采用固定延迟时间,而后者采用指数增长型延迟时间。默认情况下Vert.x Kue会采用fixed策略 (1)。接下来我们从backoff配置中获取延迟时间,如果配置中没有指定,那么就使用任务对象中的延迟时间delay (2)。接下来就是根据具体的策略进行计算了。对于指数型延迟,我们计算[delay * 0.5 * 2^attempts]作为延迟时间 (3);对于固定型延迟策略,我们直接使用获取到的延迟时间 (4)。
好啦,现在回到“真正的重试”方法 —— reattempt方法来:
private Future<Job> reattempt() {
  if (this.backoff != null) {
    long delay = this.getBackoffImpl().apply(attempts); // (1)
    return this.setDelay(delay)
      .setPromote_at(System.currentTimeMillis() + delay)
      .update() // (2)
      .compose(Job::delayed); // (3)
  } else {
    return this.inactive(); // (4)
  }
}
首先我们先检查backoff配置是否存在,若存在则计算出对应的延时时间 (1) 并且设定delay和promote_at属性的值然后保存至Redis中 (2)。接着我们通过delayed方法将任务的状态设为延时(DELAYED) (3)。如果延时重试配置不存在,我们就通过inactive方法直接将此任务置入工作队列中 (4)。
这就是整个任务重试功能的实现,也不是很复杂蛤?观察上面的代码,我们可以发现Future组合无处不在。这种响应式的组合非常方便。想一想如果我们用回调的异步方式来写代码的话,我们很容易陷入回调地狱中(⊙o⊙)。。。几个回调嵌套起来总显得不是那么优美和简洁,而用响应式的、可组合的Future就可以有效地避免这个问题。
不错!到现在为止我们已经探索完Job类的源码了~下面我们来看一下JobService类。
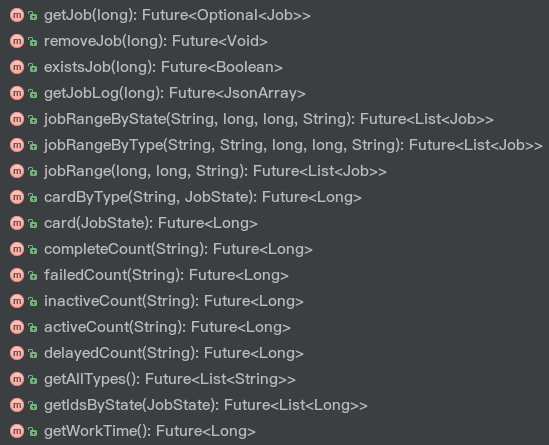
Event Bus 服务 - JobService
在本章节中我们来探索一下JobService接口及其实现 —— 它包含着各种普通的操作和统计Job的逻辑。
异步RPC
我们的JobService是一个通用逻辑接口,因此我们希望应用中的每一个组件都能访问此服务,即进行RPC。在Vert.x中,我们可以将服务注册至Event Bus上,然后其它组件就可以通过Event Bus来远程调用注册的服务了。
传统的RPC有一个缺点:消费者需要阻塞等待生产者的回应。你可能想说:这是一种阻塞模型,和Vert.x推崇的异步开发模式不相符。没错!而且,传统的RPC不是真正面向失败设计的。
还好,Vert.x提供了一种高效的、响应式的RPC —— 异步RPC。我们不需要等待生产者的回应,而只需要传递一个Handler<AsyncResult<R>>参数给异步方法。这样当收到生产者结果时,对应的Handler就会被调用,非常方便,这与Vert.x的异步开发模式相符。并且,AsyncResult也是面向失败设计的。
所以讲到这里,你可能想问:到底怎么在Event Bus上注册服务呢?我们是不是需要写一大堆的逻辑去包装和发送信息,然后在另一端解码信息并进行调用呢?不,这太麻烦了!有了Vert.x 服务代理,我们不需要这么做!Vert.x提供了一个组件 Vert.x Service Proxy 来自动生成服务代理。有了它的帮助,我们就只需要按照规范设计我们的异步服务接口,然后用@ProxyGen注解修饰即可。
@ProxyGen注解的限制
@ProxyGen注解的使用有诸多限制。比如,所有的异步方法都必须是基于回调的,也就是说每个方法都要接受一个Handler<AsyncResult<R>>类型的参数。并且,类型R也是有限制的 —— 只允许基本类型以及数据对象类型。详情请参考官方文档。
异步服务接口
我们来看一下JobService的源码:
@ProxyGen
@VertxGen
public interface JobService {

  static JobService create(Vertx vertx, JsonObject config) {
    return new JobServiceImpl(vertx, config);
  }

  static JobService createProxy(Vertx vertx, String address) {
    return ProxyHelper.createProxy(JobService.class, vertx, address);
  }

  /**
   * 获取任务,按照优先级顺序
   *
   * @param id      job id
   * @param handler async result handler
   */
  @Fluent
  JobService getJob(long id, Handler<AsyncResult<Job>> handler);

  /**
   * 删除任务
   *
   * @param id      job id
   * @param handler async result handler
   */
  @Fluent
  JobService removeJob(long id, Handler<AsyncResult<Void>> handler);

  /**
   * 判断任务是否存在
   *
   * @param id      job id
   * @param handler async result handler
   */
  @Fluent
  JobService existsJob(long id, Handler<AsyncResult<Boolean>> handler);

  /**
   * 获取任务日志
   *
   * @param id      job id
   * @param handler async result handler
   */
  @Fluent
  JobService getJobLog(long id, Handler<AsyncResult<JsonArray>> handler);

  /**
   * 获取某一范围内某个指定状态下的任务列表
   *
   * @param state   expected job state
   * @param from    from
   * @param to      to
   * @param order   range order
   * @param handler async result handler
   */
  @Fluent
  JobService jobRangeByState(String state, long from, long to, String order, Handler<AsyncResult<List<Job>>> handler);

  /**
   * 获取某一范围内某个指定状态和类型下的任务列表
   *
   * @param type    expected job type
   * @param state   expected job state
   * @param from    from
   * @param to      to
   * @param order   range order
   * @param handler async result handler
   */
  @Fluent
  JobService jobRangeByType(String type, String state, long from, long to, String order, Handler<AsyncResult<List<Job>>> handler);

  /**
   * 获取某一范围内的任务列表(按照顺序或倒序)
   *
   * @param from    from
   * @param to      to
   * @param order   range order
   * @param handler async result handler
   */
  @Fluent
  JobService jobRange(long from, long to, String order, Handler<AsyncResult<List<Job>>> handler);

  // 统计函数

  /**
   * 获取指定状态和类型下的任务的数量
   *
   * @param type    job type
   * @param state   job state
   * @param handler async result handler
   */
  @Fluent
  JobService cardByType(String type, JobState state, Handler<AsyncResult<Long>> handler);

  /**
   * 获取某个状态下的任务的数量
   *
   * @param state   job state
   * @param handler async result handler
   */
  @Fluent
  JobService card(JobState state, Handler<AsyncResult<Long>> handler);

  /**
   * 获取COMPLETE状态任务的数量
   *
   * @param type    job type; if null, then return global metrics
   * @param handler async result handler
   */
  @Fluent
  JobService completeCount(String type, Handler<AsyncResult<Long>> handler);

  /**
   * 获取FAILED状态任务的数量
   *
   * @param type job type; if null, then return global metrics
   */
  @Fluent
  JobService failedCount(String type, Handler<AsyncResult<Long>> handler);

  /**
   * 获取INACTIVE状态任务的数量
   *
   * @param type job type; if null, then return global metrics
   */
  @Fluent
  JobService inactiveCount(String type, Handler<AsyncResult<Long>> handler);

  /**
   * 获取ACTIVE状态任务的数量
   *
   * @param type job type; if null, then return global metrics
   */
  @Fluent
  JobService activeCount(String type, Handler<AsyncResult<Long>> handler);

  /**
   * 获取DELAYED状态任务的数量
   *
   * @param type job type; if null, then return global metrics
   */
  @Fluent
  JobService delayedCount(String type, Handler<AsyncResult<Long>> handler);

  /**
   * 获取当前存在的所有任务类型
   *
   * @param handler async result handler
   */
  @Fluent
  JobService getAllTypes(Handler<AsyncResult<List<String>>> handler);

  /**
   * 获取指定状态下的所有任务的ID
   *
   * @param state   job state
   * @param handler async result handler
   */
  @Fluent
  JobService getIdsByState(JobState state, Handler<AsyncResult<List<Long>>> handler);

  /**
   * 工作队列运行时间(ms)
   *
   * @param handler async result handler
   */
  @Fluent
  JobService getWorkTime(Handler<AsyncResult<Long>> handler);
}
可以看到我们还为JobService接口添加了@VertxGen注解,Vert.x Codegen可以处理此注解生成多种语言版本的服务。
在JobService接口中我们还定义了两个静态方法:create用于创建一个任务服务实例,createProxy用于创建一个服务代理。
JobService接口中包含一些任务操作和统计的相关逻辑,每个方法的功能都已经在注释中阐述了,因此我们就直接来看它的实现吧~
任务服务的实现
JobService接口的实现位于JobServiceImpl类中,代码非常长,因此这里就不贴代码了。。。大家可以对照GitHub中的代码读下面的内容。
-
getJob: 获取任务的方法非常简单。直接利用hgetall命令从Redis中取出对应的任务即可。 -
removeJob: 我们可以将此方法看作是getJob和Job#remove两个方法的组合。 -
existsJob: 使用exists命令判断对应id的任务是否存在。 -
getJobLog: 使用lrange命令从vertx_kue:job:{id}:log列表中取出日志。 -
rangeGeneral: 使用zrange命令获取一定范围内的任务,这是一个通用方法。
zrange操作
zrange返回某一有序集合中某个特定范围内的元素。详情请见ZRANGE - Redis。
以下三个方法复用了rangeGeneral方法:
-
jobRangeByState: 指定状态,对应的key为vertx_kue:jobs:{state}。 -
jobRangeByType: 指定状态和类型,对应的key为vertx_kue:jobs:{type}:{state}。 -
jobRange: 对应的key为vertx_kue:jobs。
这两个通用方法用于任务数量的统计:
-
cardByType: 利用zcard命令获取某一指定状态和类型下任务的数量。 -
card: 利用zcard命令获取某一指定状态下任务的数量。
下面五个辅助统计方法复用了上面两个通用方法:
completeCountfailedCountdelayedCountinactiveCountactiveCount
接着看:
-
getAllTypes: 利用smembers命令获取vertx_kue:job:types集合中存储的所有的任务类型。 -
getIdsByState: 使用zrange获取某一指定状态下所有任务的ID。 -
getWorkTime: 使用get命令从vertx_kue:stats:work-time中获取Vert.x Kue的工作时间。
注册任务服务
既然完成了JobService的实现,接下来我们来看一下如何利用Service Proxy将服务注册至Event Bus上。这里我们还需要一个KueVerticle来创建要注册的服务实例,并且将其注册至Event Bus上。
打开io.vertx.blueprint.kue.queue.KueVerticle类的源码:
package io.vertx.blueprint.kue.queue;

import io.vertx.blueprint.kue.service.JobService;
import io.vertx.blueprint.kue.util.RedisHelper;
import io.vertx.core.AbstractVerticle;
import io.vertx.core.Future;
import io.vertx.core.json.JsonObject;
import io.vertx.core.logging.Logger;
import io.vertx.core.logging.LoggerFactory;
import io.vertx.redis.RedisClient;
import io.vertx.serviceproxy.ProxyHelper;


public class KueVerticle extends AbstractVerticle {

  private static Logger logger = LoggerFactory.getLogger(Job.class);

  public static final String EB_JOB_SERVICE_ADDRESS = "vertx.kue.service.job.internal"; // (1)

  private JsonObject config;
  private JobService jobService;

  @Override
  public void start(Future<Void> future) throws Exception {
    this.config = config();
    this.jobService = JobService.create(vertx, config); // (2)
    // create redis client
    RedisClient redisClient = RedisHelper.client(vertx, config);
    redisClient.ping(pr -> { // (3) test connection
      if (pr.succeeded()) {
        logger.info("Kue Verticle is running...");

        // (4) register job service
        ProxyHelper.registerService(JobService.class, vertx, jobService, EB_JOB_SERVICE_ADDRESS);

        future.complete();
      } else {
        logger.error("oops!", pr.cause());
        future.fail(pr.cause());
      }
    });
  }

}
首先我们需要定义一个地址用于服务注册 (1)。在start方法中,我们创建了一个任务服务实例 (2),然后通过ping命令测试Redis连接 (3)。如果连接正常,那么我们就可以通过ProxyHelper类中的registerService辅助方法来将服务实例注册至Event Bus上 (4)。
这样,一旦我们在集群模式下部署KueVerticle,服务就会被发布至Event Bus上,然后我们就可以在其他组件中去远程调用此服务了。很奇妙吧!
Kue - 工作队列
Kue类代表着工作队列。我们来看一下Kue类的实现。首先先看一下其构造函数:
public Kue(Vertx vertx, JsonObject config) {
  this.vertx = vertx;
  this.config = config;
  this.jobService = JobService.createProxy(vertx, EB_JOB_SERVICE_ADDRESS);
  this.client = RedisHelper.client(vertx, config);
  Job.setVertx(vertx, RedisHelper.client(vertx, config)); // init static vertx instance inner job
}
这里我们需要注意两点:第一点,我们通过createProxy方法来创建一个JobService的服务代理;第二点,之前提到过,我们需要在这里初始化Job类中的静态成员变量。
基于Future的封装
我们的JobService是基于回调的,这是服务代理组件所要求的。为了让Vert.x Kue更加响应式,使用起来更加方便,我们在Kue类中以基于Future的异步模式封装了JobService中的所有异步方法。这很简单,比如这个方法:
@Fluent
JobService getJob(long id, Handler<AsyncResult<Job>> handler);
可以这么封装:
public Future<Optional<Job>> getJob(long id) {
  Future<Optional<Job>> future = Future.future();
  jobService.getJob(id, r -> {
    if (r.succeeded()) {
      future.complete(Optional.ofNullable(r.result()));
    } else {
      future.fail(r.cause());
    }
  });
  return future;
}
其实就是加一层Future。其它的封装过程也类似所以我们就不细说了。
process和processBlocking方法
process和processBlocking方法用于处理任务:
public Kue process(String type, int n, Handler<Job> handler) {
  if (n <= 0) {
    throw new IllegalStateException("The process times must be positive");
  }
  while (n-- > 0) {
    processInternal(type, handler, false);
  }f
  setupTimers();
  return this;
}

public Kue process(String type, Handler<Job> handler) {
  processInternal(type, handler, false);
  setupTimers();
  return this;
}

public Kue processBlocking(String type, int n, Handler<Job> handler) {
  if (n <= 0) {
    throw new IllegalStateException("The process times must be positive");
  }
  while (n-- > 0) {
    processInternal(type, handler, true);
  }
  setupTimers();
  return this;
}
两个process方法都类似 —— 它们都是使用Event Loop线程处理任务的,其中第一个方法还可以指定同时处理任务数量的阈值。我们来回顾一下使用Event Loop线程的注意事项 —— 我们不能阻塞Event Loop线程。因此如果我们需要在处理任务时做一些耗时的操作,我们可以使用processBlocking方法。这几个方法的代码看起来都差不多,那么区别在哪呢?之前我们提到过,我们设计了一种Verticle - KueWorker,用于处理任务。因此对于process方法来说,KueWorker就是一种普通的Verticle;而对于processBlocking方法来说,KueWorker是一种Worker Verticle。这两种Verticle有什么不同呢?区别在于,Worker Verticle会使用Worker线程,因此即使我们执行一些耗时的操作,Event Loop线程也不会被阻塞。
创建及部署KueWorker的逻辑在processInternal方法中,这三个方法都使用了processInternal方法:
private void processInternal(String type, Handler<Job> handler, boolean isWorker) {
  KueWorker worker = new KueWorker(type, handler, this); // (1)
  vertx.deployVerticle(worker, new DeploymentOptions().setWorker(isWorker), r0 -> { // (2)
    if (r0.succeeded()) {
      this.on("job_complete", msg -> {
        long dur = new Job(((JsonObject) msg.body()).getJsonObject("job")).getDuration();
        client.incrby(RedisHelper.getKey("stats:work-time"), dur, r1 -> { // (3)
          if (r1.failed())
            r1.cause().printStackTrace();
        });
      });
    }
  });
}
首先我们创建一个KueWorker实例 (1)。我们将在稍后详细介绍KueWorker的实现。然后我们根据提供的配置来部署此KueWorker (2)。processInternal方法的第三个参数代表此KueWorker是否为worker verticle。如果部署成功,我们就监听complete事件。每当接收到complete事件的时候,我们获取收到的信息(处理任务消耗的时间),然后用incrby增加对应的工作时间 (3)。
再回到前面三个处理方法中。除了部署KueWorker以外,我们还调用了setupTimers方法,用于设定定时器以监测延时任务以及监测活动任务TTL。
监测延时任务
Vert.x Kue支持延时任务,因此我们需要在任务延时时间到达时将任务“提升”至工作队列中等待处理。这个工作是在checkJobPromotion方法中实现的:
private void checkJobPromotion() {
  int timeout = config.getInteger("job.promotion.interval", 1000); // (1)
  int limit = config.getInteger("job.promotion.limit", 1000); // (2)
  vertx.setPeriodic(timeout, l -> { // (3)
    client.zrangebyscore(RedisHelper.getKey("jobs:DELAYED"), String.valueOf(0), String.valueOf(System.currentTimeMillis()),
      new RangeLimitOptions(new JsonObject().put("offset", 0).put("count", limit)), r -> {  // (4)
        if (r.succeeded()) {
          r.result().forEach(r1 -> {
            long id = Long.parseLong(RedisHelper.stripFIFO((String) r1));
            this.getJob(id).compose(jr -> jr.get().inactive())  // (5)
              .setHandler(jr -> {
                if (jr.succeeded()) {
                  jr.result().emit("promotion", jr.result().getId()); // (6)
                } else {
                  jr.cause().printStackTrace();
                }
              });
          });
        } else {
          r.cause().printStackTrace();
        }
      });
  });
}
首先我们从配置中获取监测延时任务的间隔(job.promotion.interval,默认1000ms)以及提升数量阈值(job.promotion.limit,默认1000)。然后我们使用vertx.setPeriodic方法设一个周期性的定时器 (3),每隔一段时间就从Redis中获取需要被提升的任务 (4)。这里我们通过zrangebyscore获取每个需要被提升任务的id。我们来看一下zrangebyscore方法的定义:
RedisClient zrangebyscore(String key, String min, String max, RangeLimitOptions options, Handler<AsyncResult<JsonArray>> handler);
-
key: 某个有序集合的key,即vertx_kue:jobs:DELAYED -
minandmax: 最小值以及最大值(按照某种模式)。这里min是0,而max是当前时间戳
我们来回顾一下Job类中的state方法。当我们要把任务状态设为DELAYED的时候,我们将score设为promote_at时间:
case DELAYED:
  client.transaction().zadd(RedisHelper.getKey("jobs:" + newState.name()),
    this.promote_at, this.zid, _failure());
因此我们将max设为当前时间(System.currentTimeMillis()),只要当前时间超过需要提升的时间,这就说明此任务可以被提升了。
-
options: range和limit配置。这里我们需要指定LIMIT值所以我们用new RangeLimitOptions(new JsonObject().put("offset", 0).put("count", limit)创建了一个配置
zrangebyscore的结果是一个JsonArray,里面包含着所有等待提升任务的zid。获得结果后我们就将每个zid转换为id,然后分别获取对应的任务实体,最后对每个任务调用inactive方法来将任务状态设为INACTIVE (5)。如果任务成功提升至工作队列,我们就发送promotion事件 (6)。
CallbackKue - 提供多语言支持
我们知道,Vert.x支持多种语言(如JS,Ruby),因此如果能让我们的Vert.x Kue支持多种语言那当然是极好的!这没有问题~Vert.x Codegen可以处理含@VertxGen注解的异步接口,生成多语言版本。@VertxGen注解同样限制异步方法 —— 需要基于回调,因此我们设计了一个CallbackKue接口用于提供多语言支持。CallbackKue的设计非常简单,其实现复用了Kue和jobService的代码。大家可以直接看源码,一目了然,这里就不细说了。
注意要生成多语言版本的代码,需要添加相应的依赖。比如要生成Ruby版本的代码就要向build.gradle中添加compile("io.vertx:vertx-lang-ruby:${vertxVersion}")。
KueWorker - 任务在此处理
好啦,我们已经对Vert.x Kue Core的几个核心部分有了大致的了解了,现在是时候探索一下任务处理的本源 - KueWorker了~
每一个worker都对应一个特定的任务类型,并且绑定着特定的处理函数(Handler),所以我们需要在创建的时候指定它们。
prepareAndStart方法
在KueWorker中,我们使用prepareAndStart方法来准备要处理的任务并且开始处理任务的过程:
private void prepareAndStart() {
  this.getJobFromBackend().setHandler(jr -> { // (1)
    if (jr.succeeded()) {
      if (jr.result().isPresent()) {
        this.job = jr.result().get(); // (2)
        process(); // (3)
      } else {
        this.emitJobEvent("error", null, new JsonObject().put("message", "job_not_exist"));
        throw new IllegalStateException("job not exist");
      }
    } else {
        this.emitJobEvent("error", null, new JsonObject().put("message", jr.cause().getMessage()));
        jr.cause().printStackTrace();
    }
  });
}
代码比较直观。首先我们通过getJobFromBackend方法从Redis中按照优先级顺序获取任务 (1)。如果成功获取任务,我们就把获取到的任务保存起来 (2) 然后通过process方法处理任务 (3)。如果中间出现错误,我们需要发送error错误事件,其中携带错误信息。
使用zpop按照优先级顺序获取任务
我们来看一下我们是如何从Redis中按照优先级顺序获取任务实体的:
private Future<Optional<Job>> getJobFromBackend() {
  Future<Optional<Job>> future = Future.future();
  client.blpop(RedisHelper.getKey(this.type + ":jobs"), 0, r1 -> { // (1)
    if (r1.failed()) {
      client.lpush(RedisHelper.getKey(this.type + ":jobs"), "1", r2 -> {
        if (r2.failed())
          future.fail(r2.cause());
      });
    } else {
      this.zpop(RedisHelper.getKey("jobs:" + this.type + ":INACTIVE")) // (2)
        .compose(kue::getJob) // (3)
        .setHandler(r -> {
          if (r.succeeded()) {
            future.complete(r.result());
          } else
            future.fail(r.cause());
        });
    }
  });
  return future;
}
之前我们已经了解到,每当我们保存一个任务的时候,我们都会向vertx_kue:{type}:jobs列表中插入一个新元素表示新的任务可供处理。因此这里我们通过blpop命令来等待可用的任务 (1)。一旦有任务可供处理,我们就利用zpop方法取出高优先级的任务的zid (2)。zpop命令是一个原子操作,用于从有序集合中弹出最小score值的元素。注意Redis没有实现zpop命令,因此我们需要自己实现。
Redis官方文档介绍了一种实现zpop命令的简单方法 - 利用 WATCH。这里我们利用另外一种思路实现zpop命令:
private Future<Long> zpop(String key) {
  Future<Long> future = Future.future();
  client.transaction()
    .multi(_failure())
    .zrange(key, 0, 0, _failure())
    .zremrangebyrank(key, 0, 0, _failure())
    .exec(r -> {
      if (r.succeeded()) {
        JsonArray res = r.result();
        if (res.getJsonArray(0).size() == 0) // empty set
          future.fail(new IllegalStateException("Empty zpop set"));
        else {
          try {
            future.complete(Long.parseLong(RedisHelper.stripFIFO(
              res.getJsonArray(0).getString(0))));
          } catch (Exception ex) {
            future.fail(ex);
          }
        }
      } else {
        future.fail(r.cause());
      }
    });
  return future;
}
在我们的zpop的实现中,我们首先开始了一个事务块,然后依次执行zrange和zremrangebyrank命令。有关这些命令的详情我们就不细说了,可以参考Redis官方文档。然后我们提交事务,如果提交成功,我们会获得一个JsonArray类型的结果。正常情况下我们都可以通过res.getJsonArray(0).getString(0)获取到对应的zid值。获取到zid值以后我们就可以将其转换为任务的id了,最后我们将id置于Future内(因为zpop也是一个异步方法)。
接着回到getJobFromBackend方法中。获取到对应的id之后,我们就可以通过Kue的getJob函数获取任务实体了 (3)。由于getJobFromBackend也是一个异步方法,因此我们同样将结果置于Future中。
真正的“处理”逻辑
前边讲了那么多,都是在为处理任务做准备。。。不要着急,现在终于到了真正的“处理”逻辑咯!我们看一下process方法的实现:
private void process() {
  long curTime = System.currentTimeMillis();
  this.job.setStarted_at(curTime)
    .set("started_at", String.valueOf(curTime)) // (1) set start time
    .compose(Job::active) // (2) set the job state to ACTIVE
    .setHandler(r -> {
      if (r.succeeded()) {
        Job j = r.result();
        // emit start event
        this.emitJobEvent("start", j, null);  // (3) emit job `start` event
        // (4) process logic invocation
        try {
          jobHandler.handle(j);
        } catch (Exception ex) {
          j.done(ex);
        }
        // (5) consume the job done event

        eventBus.consumer(Kue.workerAddress("done", j), msg -> {
          createDoneCallback(j).handle(Future.succeededFuture(
            ((JsonObject) msg.body()).getJsonObject("result")));
        });
        eventBus.consumer(Kue.workerAddress("done_fail", j), msg -> {
          createDoneCallback(j).handle(Future.failedFuture(
            (String) msg.body()));
        });
      } else {
          this.emitJobEvent("error", this.job, new JsonObject().put("message", r.cause().getMessage()));
          r.cause().printStackTrace();
      }
    });
}
到了最核心的函数了!首先我们先给开始时间赋值 (1) 然后将任务状态置为ACTIVE (2)。如果这两个操作成功的话,我们就向Event Bus发送任务开始(start)事件 (3)。接下来我们调用真正的处理逻辑 - 之前绑定的jobHandler (4)。如果处理过程中抛出异常的话,Vert.x Kue就会调用job.done(ex)方法发送done_fail内部事件来通知worker任务处理失败。但是似乎没有看到在哪里接收并处理done和done_fail事件呢?就在这 (5)!一旦Vert.x Kue接收到这两个事件,它就会调用对应的handler去进行任务完成或失败的相应操作。这里的handler是由createDoneCallback方法生成的:
private Handler<AsyncResult<JsonObject>> createDoneCallback(Job job) {
  return r0 -> {
    if (job == null) {
      return;
    }
    if (r0.failed()) {
      this.fail(r0.cause()); // (1)
      return;
    }
    long dur = System.currentTimeMillis() - job.getStarted_at();
    job.setDuration(dur)
      .set("duration", String.valueOf(dur)); // (2)
    JsonObject result = r0.result();
    if (result != null) {
      job.setResult(result)
        .set("result", result.encodePrettily()); // (3)
    }

    job.complete().setHandler(r -> { // (4)
      if (r.succeeded()) {
        Job j = r.result();
        if (j.isRemoveOnComplete()) { // (5)
          j.remove();
        }
        this.emitJobEvent("complete", j, null); // (6)

        this.prepareAndStart(); // (7) 准备处理下一个任务
      }
    });
  };
}
任务处理有两种情况:完成和失败,因此我们先来看任务成功处理的情况。我们首先给任务的用时(duration)赋值 (2),并且如果任务产生了结果,也给结果(result)赋值 (3)。然后我们调用job.complete方法将状态设置为COMPLETE (4)。如果成功的话,我们就检查removeOnComplete标志位 (5) 并决定是否将任务从Redis中移除。然后我们向Event Bus发送任务完成事件(complete)以及队列事件job_complete (6)。现在这个任务的处理过程已经结束了,worker需要准备处理下一个任务了,因此最后我们调用prepareAndStart方法准备处理下一个Job。
处理失败了怎么办?
人生不如意事十之八九,任务处理过程中很可能会遇见各种各样的问题而失败。当任务处理失败时,我们调用KueWorker中的fail方法:
private void fail(Throwable ex) {
  job.failedAttempt(ex).setHandler(r -> { // (1)
    if (r.failed()) {
      this.error(r.cause(), job); // (2)
    } else {
      Job res = r.result();
      if (res.hasAttempts()) { // (3)
        this.emitJobEvent("failed_attempt", job, new JsonObject().put("message", ex.getMessage()));
      } else {
        this.emitJobEvent("failed", job, new JsonObject().put("message", ex.getMessage())); // (4)
      }
      prepareAndStart(); // (5)
    }
  });
}
面对失败时,我们首先通过failedAttempt方法尝试从错误中恢复 (1)。如果恢复失败(比如没有重试次数了)就向Event Bus发送error队列事件 (2)。如果恢复成功,我们就根据是否还有剩余重试次数来发送对应的事件(failed或者failed_attempt)。搞定错误以后,worker同样需要准备处理下一个任务了,因此最后我们调用prepareAndStart方法准备处理下一个Job (5)。
这就是KueWorker的全部实现,是不是很有趣呢?看了这么久的代码也有些累了,下面是时候来写个Kue应用跑一下咯~
展示时间!
在io.vertx.blueprint.kue.example包下(kue-example子工程)创建一个LearningVertxVerticle类,然后编写如下代码:
package io.vertx.blueprint.kue.example;

import io.vertx.blueprint.kue.Kue;
import io.vertx.blueprint.kue.queue.Job;
import io.vertx.blueprint.kue.queue.Priority;
import io.vertx.core.AbstractVerticle;
import io.vertx.core.json.JsonObject;


public class LearningVertxVerticle extends AbstractVerticle {

  @Override
  public void start() throws Exception {
    // 创建工作队列
    Kue kue = Kue.createQueue(vertx, config());

    // 监听全局错误事件
    kue.on("error", message ->
      System.out.println("[Global Error] " + message.body()));

    JsonObject data = new JsonObject()
      .put("title", "Learning Vert.x")
      .put("content", "core");

    // 准备学习Vert.x,爽!
    Job j = kue.createJob("learn vertx", data)
      .priority(Priority.HIGH)
      .onComplete(r -> { // 完成任务事件监听
        System.out.println("Feeling: " + r.getResult().getString("feeling", "none"));
    }).onFailure(r -> { // 任务失败事件监听
        System.out.println("eee...so difficult...");
    }).onProgress(r -> { // 任务进度变更事件监听
        System.out.println("I love this! My progress => " + r);
      });

    // 保存任务
    j.save().setHandler(r0 -> {
      if (r0.succeeded()) {
        // 开始学习!
        kue.processBlocking("learn vertx", 1, job -> {
          job.progress(10, 100);
          // 3秒速成
          vertx.setTimer(3000, r1 -> {
            job.setResult(new JsonObject().put("feeling", "amazing and wonderful!")) // 结果
              .done(); // 完成啦!
          });
        });
      } else {
        System.err.println("Wow, something happened: " + r0.cause().getMessage());
      }
    });
  }

}
通常情况下,一个Vert.x Kue应用可以分为几部分:创建工作队列、创建任务、保存任务以及处理任务。我们推荐开发者把应用写成Verticle的形式。
在这个例子中,我们要模拟一个学习Vert.x的任务!首先我们通过Kue.createQueue方法创建一个工作队列并且通过on(error, handler)方法监听全局错误(error)事件。接着我们通过kue.createJob方法创建学习任务,将优先级设定为HIGH,并且监听complete、failed以及progress事件。然后我们需要保存任务,保存完毕以后我们就可以通过processBlocking方法来执行耗时任务了。在处理逻辑中,我们首先通过job.progress方法将进度设为10,然后使用vertx.setTimer方法设一个3秒的定时器,定时器时间到以后赋予结果并完成任务。
像往常一样,我们还需要在build.gradle中配置一下。我们需要将kue-example子工程中的Main-Verticle属性设为刚才写的io.vertx.blueprint.kue.example.LearningVertxVerticle:
project("kue-example") {

  dependencies {
    compile(project(":kue-core"))
  }

  jar {
    archiveName = 'vertx-blueprint-kue-example.jar'
    from { configurations.compile.collect { it.isDirectory() ? it : zipTree(it) } }
    manifest {
      attributes 'Main-Class': 'io.vertx.core.Launcher'
      attributes 'Main-Verticle': 'io.vertx.blueprint.kue.example.LearningVertxVerticle'
    }
  }
}
好了,到了展示时间了!打开终端,构建项目:
gradle build
当然不要忘记运行Redis:
redis-server
然后我们先运行Vert.x Kue Core部分:
java -jar kue-core/build/libs/vertx-blueprint-kue-core.jar -cluster -ha -conf config/config.json
然后再运行我们的实例:
java -jar kue-example/build/libs/vertx-blueprint-kue-example.jar -cluster -ha -conf config/config.json
这时终端应该会依次显示输出:
INFO: Kue Verticle is running...
I love this! My progress => 10
Feeling: amazing and wonderful!
当然你也可以在Vert.x Kue的Web端查看任务情况。
完成我们的探索之旅!
棒极了!我们终于结束了我们的Vert.x Kue Core探索之旅~~!从这篇超长的教程中,你学到了如何利用Vert.x去开发一个基于消息的应用!太酷了!
如果想了解kue-http的实现,请移步Vert.x 蓝图 | Vert.x Kue 教程(Web部分)。如果想了解更多的关于Vert.x Kue的特性,请移步Vert.x Kue 特性介绍。
Vert.x能做的不仅仅是这些。想要了解更多的关于Vert.x的知识,请参考Vert.x 官方文档 —— 这永远是资料最齐全的地方。


网友评论