简介
OkHttp 是一款用于 Android 和 Java 的网络请求库,也是目前 Android 中最火的一个网络库。OkHttp 有很多的优点:
- 在 HTTP/2 上允许对同一个 host 的请求共同一个 socket
- 连接池的使用减少请求延迟(如果 HTTP/2 不支持)
- 透明的 GZIP 压缩减少数据量大小
- 响应的缓存避免重复的网络请求
之前写过一篇 Retrofit 源码解析,Retrofit 底层其实就是用的 OkHttp 去请求网络。本文分析 OKHttp 的源码,主要是针对一次网络请求的基本流程,源码基于 OKHttp-3.8.0
基本用法
下面是 OkHttp 的使用示例:
OkHttpClient client = new OkHttpClient();

Request request = new Request.Builder()
                .url(url)
                .build();
// 同步
Response response = client.newCall(request).execute();
// 异步
client.newCall(request).enqueue(new Callback() {
    @Override
    public void onFailure(Call call, IOException e) {
    }

    @Override
    public void onResponse(Call call, Response response) throws IOException {
    }
});
首先是创建一个 OkHttpClient 对象,其实用过的应该知道可以用 new OkHttpClient.Builder().build() 的方式来配置 OkHttpClient 的一些参数。有了 OkHttpClient 之后,下面是创建一个 Request 对象,这个对象也是通过 Builder 模式来生成,其中可以配置一些与这条请求相关的参数,其中 url 是必不可少的。在发送请求的时候,需要生成一个 Call 对象,Call 代表了一个即将被执行的请求。如果是同步请求,调用 execute 方法。异步则调用 enqueue,并设定一个回调对象 Callback。
下面就一步步分析发送一条网络请求的基本流程。
OkHttpClient、Request 及 Call 的创建
OkHttpClient 的创建采用了 Builder 模式,可以配置 Interceptor、Cache 等。可以设置的参数很多,其中部分参数如下:
  final Dispatcher dispatcher;  // 请求的分发器
  final @Nullable Proxy proxy; // 代理
  final List<Protocol> protocols;  // http协议
  final List<ConnectionSpec> connectionSpecs;
  final List<Interceptor> interceptors;
  final List<Interceptor> networkInterceptors;
  final EventListener.Factory eventListenerFactory;
  final ProxySelector proxySelector;
  final CookieJar cookieJar;
  final @Nullable Cache cache;
Request 与 OkHttpClient 的创建类似,也是用了 Buidler 模式,但是其参数要少很多:
public final class Request {
final HttpUrl url;
final String method;
final Headers headers;
final @Nullable RequestBody body;
final Object tag;
...
}
参数的含义都很明确,即使 Http 协议的url、header、method 以及 body 部分。变量 tag 用于标识一条 Request,可用于发送后取消这条请求。
client.newCall(request) 生成一个 Call 对象。Call 实际上是一个接口,它封装了 Request,并且用于发起实际的网络请求。下面是 Call 的全部代码:
public interface Call extends Cloneable {

  Request request();

  Response execute() throws IOException;

  void enqueue(Callback responseCallback);

  void cancel();

  boolean isExecuted();

  boolean isCanceled();

  Call clone();

  interface Factory {
    Call newCall(Request request);
  }
}
其中包含了与网络请求相关的操作,包括发起、取消等。看一下 OkHttpClient 是如何创建 Call 的:
  @Override public Call newCall(Request request) {
    return new RealCall(this, request, false /* for web socket */);
  }
从代码可以看到,实际上是创建了一个 RealCall 对象,它也是 Call 的唯一一个实现类。
有了 RealCall 对象后,就可以发起网络请求了,可以是同步请求(execute)或者是异步请求(enqueue)。异步请求涉及到 Dispatcher,先从相对简单的同步请求开始分析。
同步请求
调用 RealCall#execute() 即是发起同步请求,代码如下:
  @Override public Response execute() throws IOException {
    synchronized (this) {
      if (executed) throw new IllegalStateException("Already Executed");
      executed = true;
    }
    captureCallStackTrace();
    try {
      client.dispatcher().executed(this);
      Response result = getResponseWithInterceptorChain();
      if (result == null) throw new IOException("Canceled");
      return result;
    } finally {
      client.dispatcher().finished(this);
    }
  }
首先判断这条请求是不是已经执行过,如果是则会抛出异常(一条请求只能执行一次,重复执行可以调用 Call#clone())。接着执行了 client.dispatcher().executed(this),这行代码是把当前的 Call 加入到 Dispatcher 的一个队列中,这个暂时可以忽略,后面会分析 Dispatcher。
下面一行 Response result = getResponseWithInterceptorChain() 是关键,在 getResponseWithInterceptorChain 中真正执行了网络请求并获得 Response 并返回。(下一小节具体分析其中的逻辑)
最后在 finally 中调用 Dispatcher 的 finished,从队列中移除这条请求。
拦截器 Interceptor
getResponseWithInterceptorChain 的代码如下:
  Response getResponseWithInterceptorChain() throws IOException {
   // Build a full stack of interceptors.
   List<Interceptor> interceptors = new ArrayList<>();
   interceptors.addAll(client.interceptors());
   interceptors.add(retryAndFollowUpInterceptor);
   interceptors.add(new BridgeInterceptor(client.cookieJar()));
   interceptors.add(new CacheInterceptor(client.internalCache()));
   interceptors.add(new ConnectInterceptor(client));
   if (!forWebSocket) {
     interceptors.addAll(client.networkInterceptors());
   }
   interceptors.add(new CallServerInterceptor(forWebSocket));

   Interceptor.Chain chain = new RealInterceptorChain(
       interceptors, null, null, null, 0, originalRequest);
   return chain.proceed(originalRequest);
 }
可以看到,其中创建了一个 List 用于添加 Interceptor。首先添加的是 client 中的 interceptors,也就是在创建 OkHttpClient 对象时自定义的 interceptors,然后依次添加 retryAndFollowUpInterceptor(重试及重定向)、BridgeInterceptor(请求参数的添加)、CacheInterceptor(缓存)、ConnectInterceptor(开始连接)、用户自定义的 networkinterceptors 及 CallServerInterceptor(发送参数并读取响应)。从这里可以知道,OkHttp 默认添加了好几个 interceptor 用于完成不同的功能。
在研究各个 interceptor 之前,需要考虑一下如何让这些拦截器一个接着一个的执行?继续看上面的代码,在添加了各种 interceptors 之后,创建了一个 RealInterceptorChain 对象。(它的构造函数需要的参数很多,并且这些参数涉及到连接池、请求数据的发送等。由于这篇文章主要分析 OkHttp 的基本流程,所以暂时略过这部分)RealInterceptorChain 是接口 Chain 的实现类,Chain 是 链 的意思,其作用是把各个 Interceptor 串起来依次执行。在获得了 RealInterceptorChain 之后调用其 proceed 方法,看名字就能知道是让 Request 请求继续执行。
下面具体分析 RealInterceptorChain,它有如下的成员变量:
  private final List<Interceptor> interceptors;  // 拦截器
  private final StreamAllocation streamAllocation; // 流管理器
  private final HttpCodec httpCodec; // http流,发送请求数据并读取响应数据
  private final RealConnection connection;  // scoket的连接
  private final int index; // 当前拦截器的索引
  private final Request request; // 当前的请求
  private int calls; // chain 的 proceed 调用次数的记录
其中 streamAllocation、httpCodec 和 connection 都与 socket 连接有关,后续文章再分析。看一下 proceed 方法:
public Response proceed(Request request, StreamAllocation streamAllocation, HttpCodec httpCodec,
      RealConnection connection) throws IOException {
    if (index >= interceptors.size()) throw new AssertionError();

    calls++;

    // If we already have a stream, confirm that the incoming request will use it.
    // 如果已经有了一个流,确保即将到来的 request 是用它
    if (this.httpCodec != null && !this.connection.supportsUrl(request.url())) {
      throw new IllegalStateException("network interceptor " + interceptors.get(index - 1)
          + " must retain the same host and port");
    }

    // If we already have a stream, confirm that this is the only call to chain.proceed().
    // 如果已经有了一个流,确保这是对 call 唯一的调用
    if (this.httpCodec != null && calls > 1) {
      throw new IllegalStateException("network interceptor " + interceptors.get(index - 1)
          + " must call proceed() exactly once");
    }


    // Call the next interceptor in the chain.
    RealInterceptorChain next = new RealInterceptorChain(
        interceptors, streamAllocation, httpCodec, connection, index + 1, request);                           // (1)
    Interceptor interceptor = interceptors.get(index); // (2)
    Response response = interceptor.intercept(next);   // (3)

    // Confirm that the next interceptor made its required call to chain.proceed().
    if (httpCodec != null && index + 1 < interceptors.size() && next.calls != 1) {
      throw new IllegalStateException("network interceptor " + interceptor
          + " must call proceed() exactly once");
    }

    // Confirm that the intercepted response isn't null.
    if (response == null) {
      throw new NullPointerException("interceptor " + interceptor + " returned null");
    }

    return response;
  }
刚开始做了一些连接方面的判断,需要关注的是标了(1)、(2)、(3)的几行,主要做了以下操作:
- 创建新的
RealInterceptorChain,其中index加1用于标识当前的拦截器 - 通过
index获取当前的拦截器 - 调用下一个拦截器的
intercept方法,并把上面生成的新的 RealInterceptorChain 对象next传进去
由之前的 getResponseWithInterceptorChain 方法可以知道,当前 RealInterceptorChain 的 interceptors 的第一个是 RetryAndFollowUpInterceptor,下面是其 intercept 的代码:
  @Override public Response intercept(Chain chain) throws IOException {
    Request request = chain.request();

    streamAllocation = new StreamAllocation(
        client.connectionPool(), createAddress(request.url()), callStackTrace);

    int followUpCount = 0;
    Response priorResponse = null;
    while (true) {
      if (canceled) {
        streamAllocation.release();
        throw new IOException("Canceled");
      }

      Response response = null;
      boolean releaseConnection = true;
      try {
        // 调用 chain 的 proceed
        response = ((RealInterceptorChain) chain).proceed(request, streamAllocation, null, null);
        releaseConnection = false;
      } catch (RouteException e) {
        ... // 省略部分代码,主要是错误重试以及重定向
    }
  }
这个 Interceptor 主要用于出错重试以及重定向的逻辑,其中省略了部分代码。在这个方法当中要关注的是再次调用了 chain 的 proceed 方法,这里的 chain 是之前新创建的 next 对象。相当于说通过调用 Chain#proceed() 将网络请求推向下一个拦截器(proceed 中会获取下一个 Interceptor 并调用其 intercept 方法),并且得到 response 对象,而下一个拦截器也是类似的操作。于是,多个 interceptors 就通过这种方式串起来依次执行,并且前一个 Interceptor 可以得到后一个 Interceptor 执行后的 response 从而进行处理。
通过不同的 Interceptor,OkHttp 实现了不同的功能。各个 Inercept 职责分明又不会互相耦合,并且可以非常方便的添加 Interceptor,这是 责任链 模式的体现,非常优雅的设计。现在可以发现 OkHttp 中的拦截器的调用过程如下图所示:
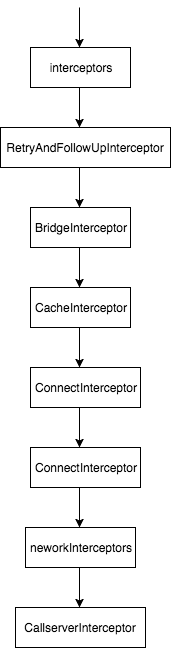 拦截器调用链
异步请求
相比于同步请求,异步请求主要是增加了 Dispatcher 的处理。Dispatcher 是请求的分发器,它有一下的成员变量:
private int maxRequests = 64;   // 最大连接数
private int maxRequestsPerHost = 5;  // 单个 host 最大连接数
private @Nullable Runnable idleCallback;   // 空闲时的回调

/** Executes calls. Created lazily. */
private @Nullable ExecutorService executorService; // 线程池

/** Ready async calls in the order they'll be run. */
// 准备执行的异步 Call 的队列
private final Deque<AsyncCall> readyAsyncCalls = new ArrayDeque<>();

/** Running asynchronous calls. Includes canceled calls that haven't finished yet. */
// 正在执行的的异步 Call 的队列
private final Deque<AsyncCall> runningAsyncCalls = new ArrayDeque<>();

/** Running synchronous calls. Includes canceled calls that haven't finished yet. */
// 正在执行的同步 Call 的队列
private final Deque<RealCall> runningSyncCalls = new ArrayDeque<>();
在 Dispatcher 中,默认支持的最大并发连接数是64,每个 host 最多可以有5个并发请求。
下面看一下线程池 executorService 的创建。线程池会在两个地方创建,分别是 Dispatcher 的构造函数或者是 executorService 方法中(如果调用了默认的构造函数):
// 默认构造函数没有创建
public Dispatcher() {
}
// 自定义线程池
public Dispatcher(ExecutorService executorService) {
    this.executorService = executorService;
}
// 如果没有自定义线程池,则默认创建
public synchronized ExecutorService executorService() {
    if (executorService == null) {
      executorService = new ThreadPoolExecutor(0, Integer.MAX_VALUE, 60, TimeUnit.SECONDS,
          new SynchronousQueue<Runnable>(), Util.threadFactory("OkHttp Dispatcher", false));
    }
    return executorService;
  }
Dispatcher 支持自定义的线程池,否则会默认创建一个。在生成 OkHttpClient 对象时,默认调用的是 Dispatcher 无参的构造方法。这个默认线程池通过 new ThreadPoolExecutor(0, Integer.MAX_VALUE, 60, TimeUnit.SECONDS, new SynchronousQueue<Runnable>(), Util.threadFactory("OkHttp Dispatcher", false)) 创建,看上去类似于一个 CachedThreadPool,没有常驻的 core 线程,空闲线程60秒后自动关闭。
enqueue
每个 Call 被添加到某一个队列,如果是同步请求添加到 runningSyncCalls 中:
synchronized void executed(RealCall call) {
    runningSyncCalls.add(call);
}
异步请求添加的逻辑如下:
synchronized void enqueue(AsyncCall call) {
    if (runningAsyncCalls.size() < maxRequests && runningCallsForHost(call) < maxRequestsPerHost) {
      runningAsyncCalls.add(call);
      executorService().execute(call);
    } else {
      readyAsyncCalls.add(call);
    }
}
具体步骤是:
- 判断是否超出总共的最大连接数以及单个 host 的最大连接数
- 如果没有则添加到
runningAsyncCalls并且提交到线程池执行 - 否则添加到
readyAsyncCalls等待后续执行
需要注意的是异步请求的 Call 不是原始的 Call,而是被包装为 AsyncCall:
final class AsyncCall extends NamedRunnable {
    private final Callback responseCallback;

    AsyncCall(Callback responseCallback) {
      super("OkHttp %s", redactedUrl());
      this.responseCallback = responseCallback;
    }
    ...
    @Override protected void execute() {
      boolean signalledCallback = false;
      try {
        // 调用 getResponseWithInterceptorChain
        Response response = getResponseWithInterceptorChain();
        if (retryAndFollowUpInterceptor.isCanceled()) {
          signalledCallback = true;
          responseCallback.onFailure(RealCall.this, new IOException("Canceled"));
        } else {
          signalledCallback = true;
          responseCallback.onResponse(RealCall.this, response);
        }
      } catch (IOException e) {
        if (signalledCallback) {
          // Do not signal the callback twice!
          Platform.get().log(INFO, "Callback failure for " + toLoggableString(), e);
        } else {
          responseCallback.onFailure(RealCall.this, e);
        }
      } finally {
        client.dispatcher().finished(this);
      }
    }
  }
AsyncCall 继承自 NamedRunnable,它其实就是一个为线程设置了名字的 Runnable,在其 Run 中调用 execute,所以 AsyncCall 的主要逻辑都写在 execute 中。可以看到最终还是调用了 getResponseWithInterceptorChain 方法,所以后续执行网络请求的逻辑是一样的。在获得 response 之后,就可以调用 responseCallback 返回最终的信息。
finished
在上面的代码中,finally 里面执行了 client.dispatcher().finished(this),在同步请求 RealCall#execute() 中也有类似的一行代码。finished 的作用是让 Dispatcher 从队列中移除已完成的 Call,对于异步请求还会从 readyAsyncCalls 中取出等待中的请求提交给线程池。下面是具体代码:
  /** Used by {@code AsyncCall#run} to signal completion. */
  void finished(AsyncCall call) {
    finished(runningAsyncCalls, call, true);
  }

  /** Used by {@code Call#execute} to signal completion. */
  void finished(RealCall call) {
    finished(runningSyncCalls, call, false);
  }
  private <T> void finished(Deque<T> calls, T call, boolean promoteCalls) {
    int runningCallsCount;
    Runnable idleCallback;
    synchronized (this) {
      if (!calls.remove(call)) throw new AssertionError("Call wasn't in-flight!");
      // 异步请求会进入
      if (promoteCalls) promoteCalls();
      runningCallsCount = runningCallsCount();
      idleCallback = this.idleCallback;
    }

    if (runningCallsCount == 0 && idleCallback != null) {
      idleCallback.run();
    }
  }
    private void promoteCalls() {
    if (runningAsyncCalls.size() >= maxRequests) return; // Already running max capacity.
    if (readyAsyncCalls.isEmpty()) return; // No ready calls to promote.

    for (Iterator<AsyncCall> i = readyAsyncCalls.iterator(); i.hasNext(); ) {
      AsyncCall call = i.next();
      // 找到一个等待队列中的 Call,符合连接数要求时加入 runningAsyncCalls 并提交给线程池执行。
      if (runningCallsForHost(call) < maxRequestsPerHost) {
        i.remove();
        runningAsyncCalls.add(call);
        executorService().execute(call);
      }

      if (runningAsyncCalls.size() >= maxRequests) return; // Reached max capacity.
    }
  }
有两个重载的 finished 方法均调用了另一个 pirvate 的 finished,区别在于这个 finished 的最后一个参数 promoteCalls。对于同步请求(参数为 RealCall) promoteCalls 为 false,而异步请求(参数为 AsyncCall) promoteCalls 为 true。 pirvate 的 finished 主要是从队列中移除 Call,异步请求会执行 promoteCalls。promoteCalls 里面主要是从 readyAsyncCalls 取出一个 Call,如果满足最大连接数的要求,则把这个 Call 加入 runningAsyncCalls 并提交给线程池执行。
通过 runningAsyncCalls 和 readyAsyncCalls,Dispatcher 实现了异步请求的调度执行。这里比较巧妙的方式是在 finally 中去执行 readyAsyncCalls 中的请求,避免了 wait/notity 的方式,避免了代码的复杂性。
总结
OkHttp 的基本执行流程如下图所示:
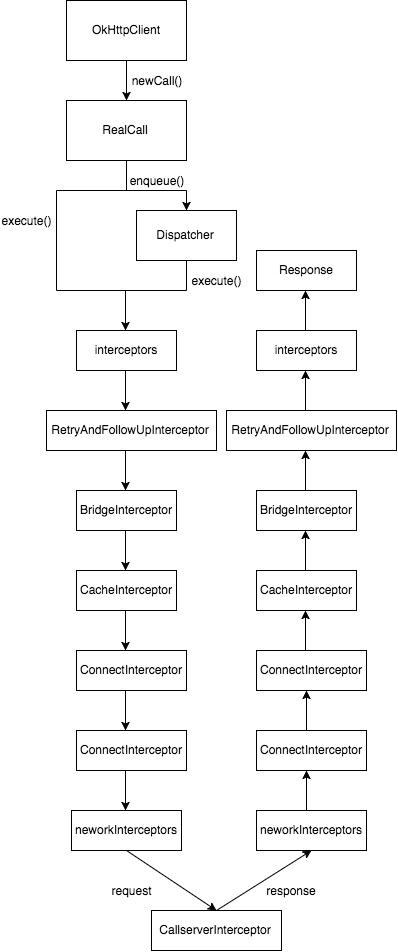 OKHttp 基本流程
主要是以下步骤:
-
OkHttpClient调用newCall创建RealCall对象,Call封装了Request,代表一条即将执行的请求。 - 根据同步还是异步请求分别调用
RealCall的execute或enqueue方法,将Call加入Dispatcher的相应队列中。最终,同步或异步请求都会调用getResponseWithInterceptorChain。 - 在
getResponseWithInterceptorChain中,OkHttp 添加用户自定义以及默认的 inceptors,并用一个Chain管理并依次执行每个 Interceptor。 - 每个 Interceptor 调用
Chain#proceed()将请求发送给下一级的 Inceptor,并能通过这个方法获得下一级 Interceptor 的 Response。所以上图所示,Request 一级级地往下传递,而获取了网络的 Response 之后一级级地往上传递。
OkHttp中一条网络请求的基本流程就是这样,下一篇文章介绍 OkHttp 如何建立连接:OkHttp 源码解析(二):建立连接。


网友评论